
MMS Node
The MMS node enables you to send messages to customers through the MMS channel that are configured within a service. You can send multimedia messages up to 4096 characters with a 80 char limit for Message Subjects using a combination of pictures, video, and audio files.
Node Configuration
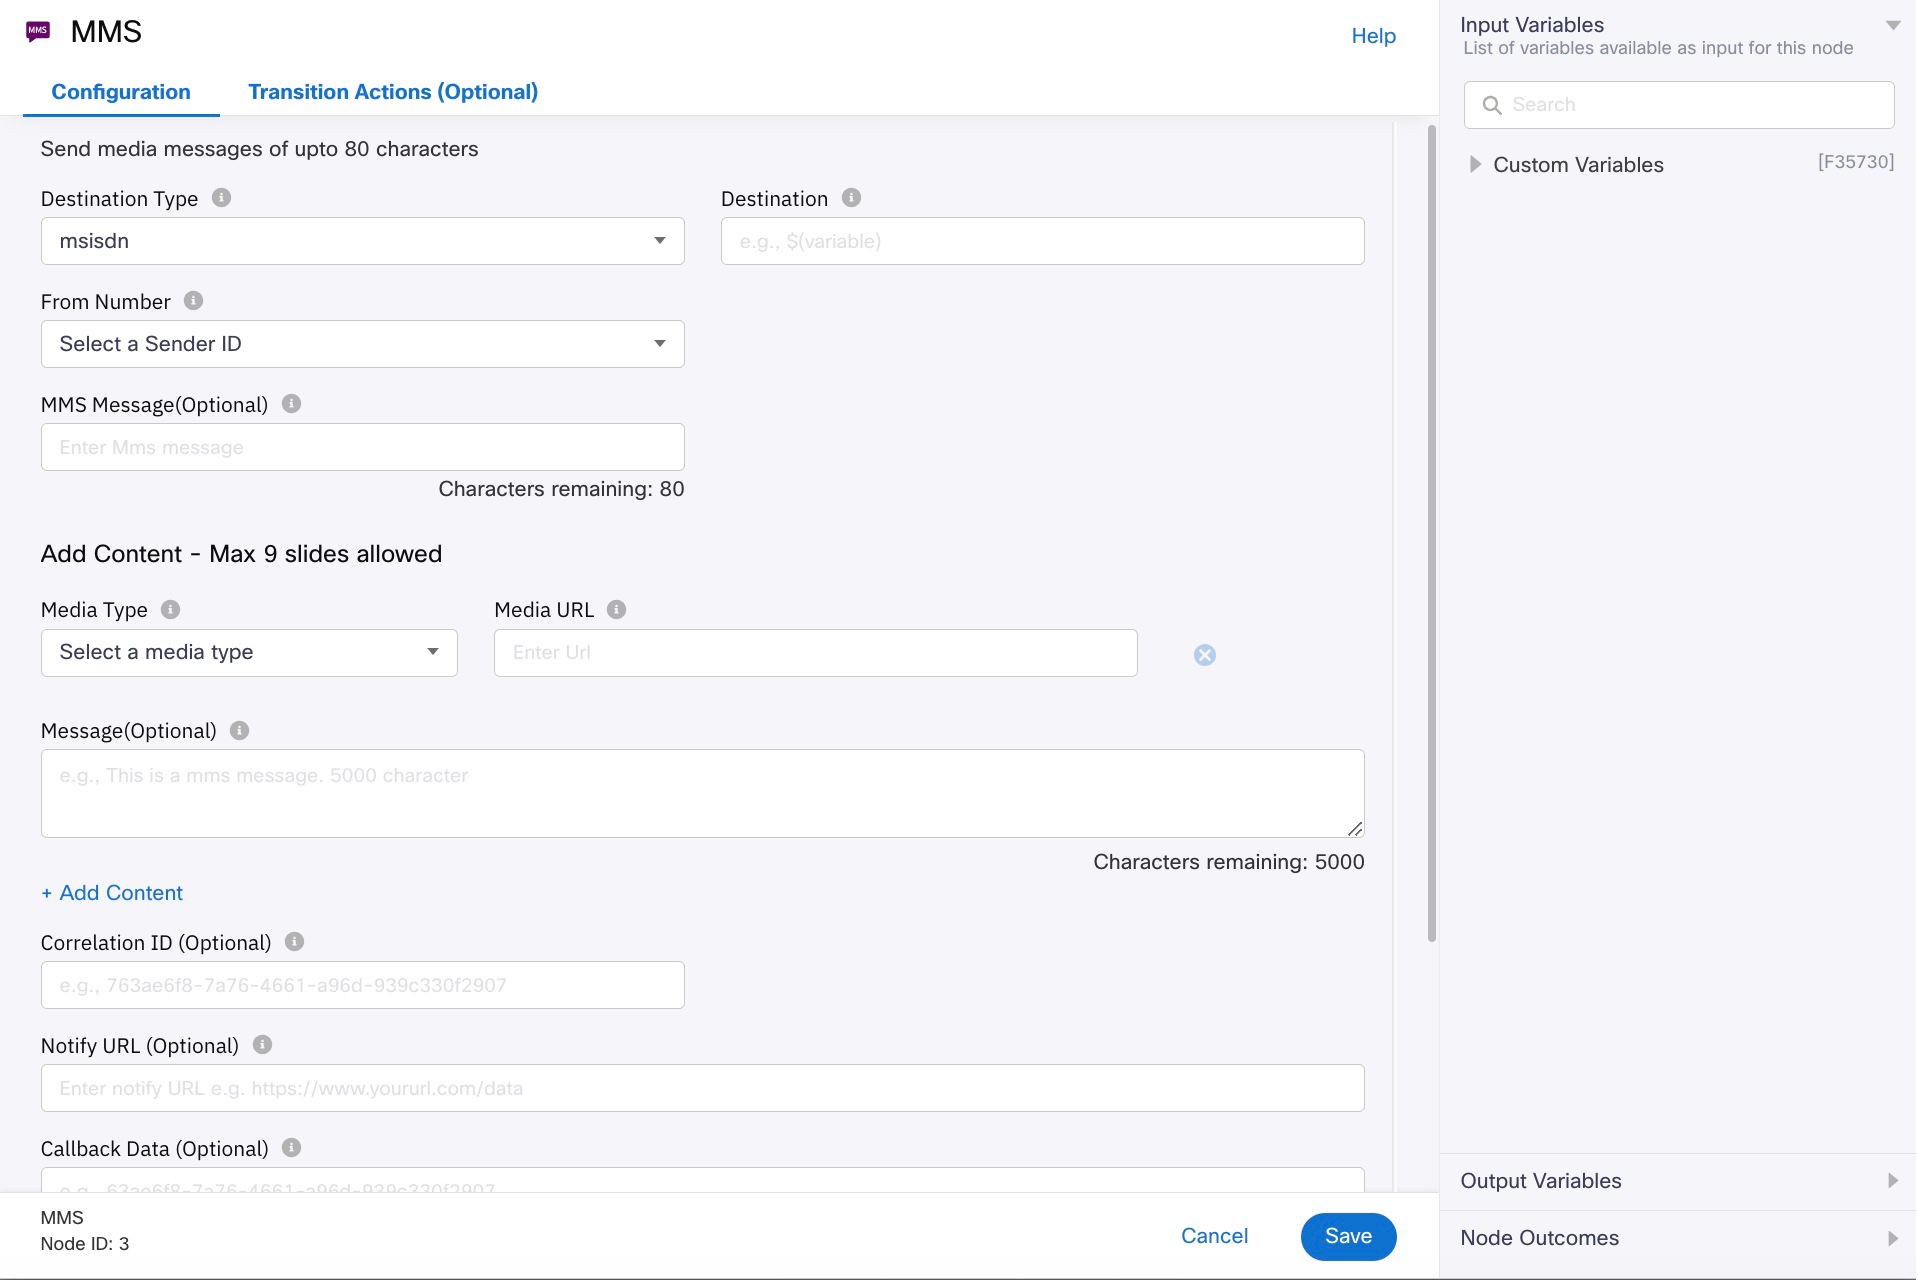
Drag and drop the MMS node on the flow canvas. Double-click the node to configure it.
MMS Node
Node Configuration - Common fields for all message types
To configure the MMS node:
- Select one of the following for Destination Type.
- Customer Id - is a master ID that is linked to all different channel-specific user IDs of a user. It is useful in cross channel communication. For example, you want to send an exclusive promo code to a user’s app because of previous positive feedback that they have given via Messenger. In that case, you can use the Customer Id of the user since it remains constant across the channels.
- msisdn - Mobile Station International Subscriber Directory Number (MSISDN) is a number used to identify a mobile phone number internationally.
- Enter the Destination value. This field contains the destination value corresponding to the selected Destination Type. The value can be static or dynamic. For example, if the destination type is CustomerID, the destination can be dynamic by declaring it as $(customerID). Likewise, if the destination type is msisdn, the destination can be dynamic by declaring it as $(phoneNumber).
- Select number or sender ID that is used to send the MMS from the From Number field. The node supports short codes, long codes, and AlphaSender IDs. The only restrictions are the ones placed by the country network operators, which can vary.
- Enter the text in the MMS Message field to be sent to the customer. It supports up to 80 characters, including unicode.
- Select one of the following from the Media Type dropdown. You can add up to 9 Media types.
- Audio
- Video
- Image
- Text
- Calendar
- Contact
- Enter the MMS Slide Media URL. The URL can be public.
- Enter the text in the Message field. The message should not be longer than 4096 characters.
- (Optional) In the Correlation ID field, enter the unique reference ID to be passed back to you in delivery receipts for this transaction.
- (Optional) In the Notify URL field, enter the URL where you can receive delivery receipts for this transaction.
- (Optional) In the Callback Data field, enter any additional data that needs to be posted to the Notify URL.
- (Optional) Advanced Options
- Wait For: Select the event to wait for on this node. The available options are None, Gateway Submit, Delivery Report, and Read. In case of timeout, the node will exit regardless of the configured Wait For option.
- None: The default option, exits the node immediately after executing the Send action.
- Gateway Submit: Exits the node upon submitting the message to Google Business Message.
- Delivery Report: Waits until receiving the delivery receipt for the message sent.
- Read: Waits until the customer has read the message.
- Time Out: Maximum time in seconds until which the node should wait for one of the 'Wait for' conditions to be met. The node exits via the 'onDeliveryReportFail' node outcome edge when the set time elapses.
- Expiry: Select the message expiry format. The available options are UTC and Seconds.
- Expiry Date And Time: If you selected UTC, enter the message expiry date and time in YYYY-MM-DDTHH:MM:SS format. For example, if the value is set to 2019-23-04T03:06:48, the message is terminated if a send attempt is made beyond the set time.
- Expiry Time: If you selected Seconds, enter the maximum time in seconds within which the message must be submitted.
- Wait For: Select the event to wait for on this node. The available options are None, Gateway Submit, Delivery Report, and Read. In case of timeout, the node will exit regardless of the configured Wait For option.
- Click Save.
Updated 14 days ago