Analyze customer sentiment using Webex Connect with IBM Watson
This tutorial provides a step-by-step walk-through of how you can integrate IBM Watson Tone Analyzer API with Webex Connect to analyze the sentiment in the customer feedback captured via SMS.
Understanding whether your customers are satisfied with your products and services is a key priority for every business. However, most feedback collection methods do not allow you to analyze the true sentiment and emotions of your customers. This tutorial provides a step-by-step walk-through of how you can integrate IBM Watson Tone Analyzer API with Webex Connect to analyze the sentiment in the customer feedback captured via SMS.
Usecase overview
•The user receives an SMS message requesting feedback about the services provided by the business
•The user replies to the message in natural language with his feedback
•The feedback/customer response is captured using Webex Connect and is then analyzed by the watson API to identify the tone of the message.
•The tone will be categorised as either of the following : anger, disgust, fear, joy, and sadness
•Based on the user tone, the business can initiate a post feedback journey
Setup overview
The below section lists the steps involved in building the IBM Watson Sentiment Analyzer use case
Prerequisites
•Access to Webex Connect platform
•Create an account on IBM Watson to get access to Tone Analyzer API
Step 1: Create a Service
Create a new service for this use case. If this is the first time you're creating a service refer this tutorial.
Step 2: Buy a Phone Number
Buy a phone number for sending and receiving messages from your customers, if you don't already have one provisioned for this purpose.
Step 3: Configure a reusable integration with Tone Analyzer API using Custom Node
Set-up a reusable integration with IBM Watson Tone Analyzer API using Webex Connect custom node integration option.
Follow this tutorial for configuring the integration.
Step 4: Create a Flow to Analyze Customer Sentiment
Here are the steps for configuring a flow to send a proactive message to request and collect customer feedback, and use IBM Watson Tone Analyzer API to assess customer sentiment based on the content in customer's response.
Let's start by creating a new flow with a custom event trigger.
Step 5.1: Configure the event trigger for the flow
Select the custom event as the event trigger on the trigger category selection page.
- On the next window, configure your custom event. Select "Create New Event"
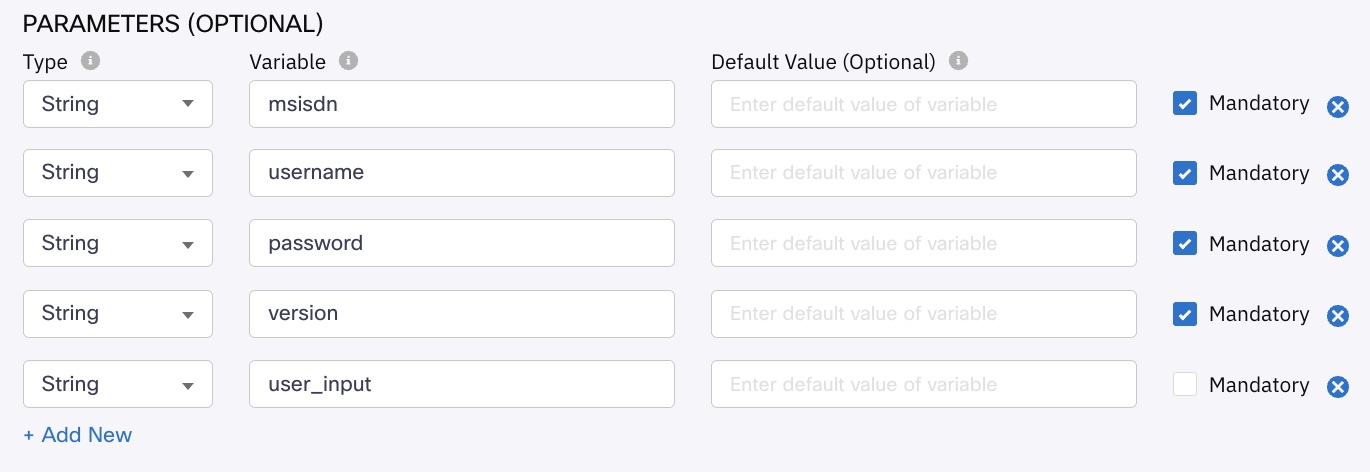
- Name the custom event. Next, define the parameters to be used in this event.
- Under the PARAMETERS (OPTIONAL) section, choose the TYPE as String from the drop down.
- Enter msisdn as the variable.
- Check the Mandatory box.
- Click on +ADD NEW to define another parameter & define all the parameters as follows
| TYPE | VARIABLE | MANDATORY |
|---|---|---|
| String | msisdn | Yes |
| String | username | Yes |
| String | password | Yes |
| String | version | Yes |
| String | user_input |
Step 5.2: Add the Send SMS node
- Drag and drop the Send SMS node on to the flow canvas by dragging from the Channels menu under UTILITIES.

- Configure the node parameter
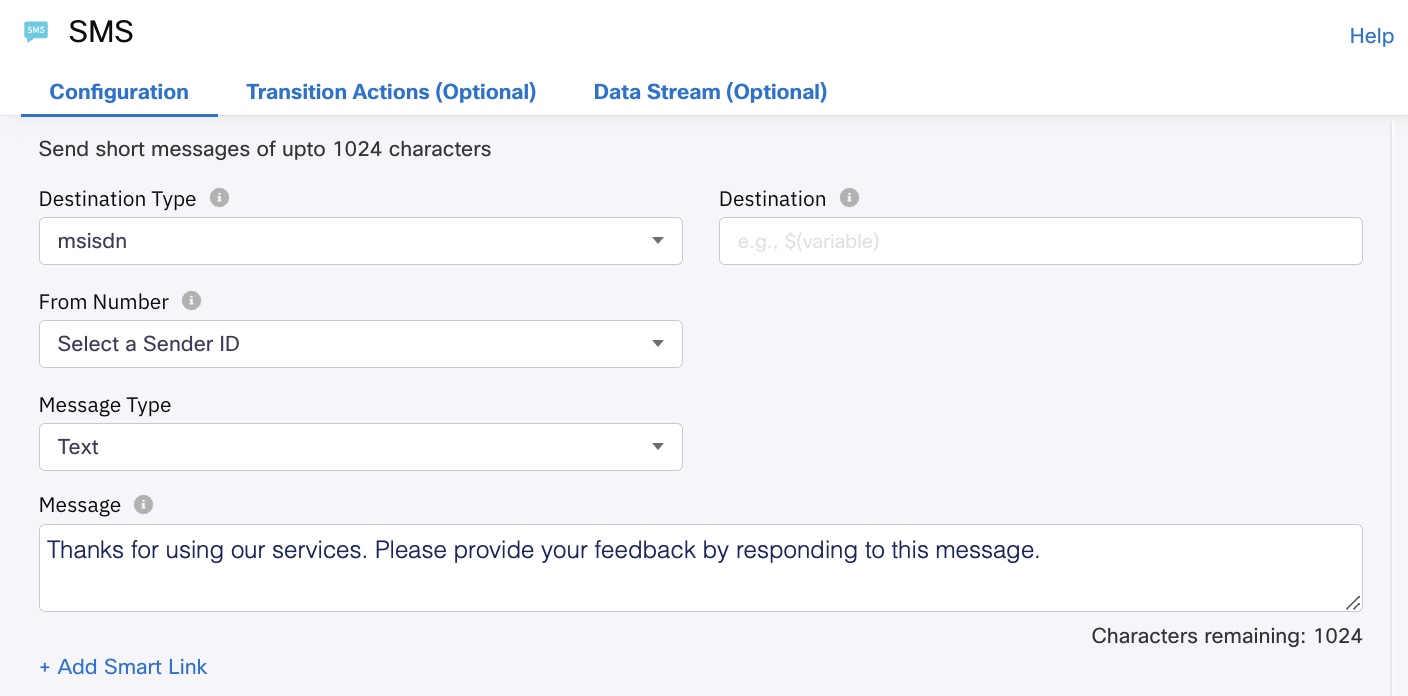
Double-click on the Send SMS node to open the configuration menu. See the image below - Under the Configuration tab on the Settings window.
- Choose msisdn from the Destination Type drop-down.
- Enter $(msisdn) in the Destination field.
Note: msisdn stands for Mobile Station ISDN number. It refers to the mapping of telephone number to SIM card. - Choose Text from the Message Type drop-down.
- Choose the sender id assigned for the service from the From Number drop-down.
- Enter the Message to be sent to the customer in the Message text box.
- Edit the name of the node by clicking the pencil icon .
- Click OK at the bottom.
Now configure the onError event for the node. Refer this tutorial for more information.
Step 5.3: Configure the Receive Response node
- Drag and drop the Receive node on to the flow canvas by dragging from the NODES palette under UTILITIES.
- Connect the onsuccess node edge of SMS node with the Receive node
a. Drag the green dot on the SMS Node and release it on Receive node
b. This enables the flow to proceed from the Send node to the Receive node if the event is successful.
Configure the Receive Node Parameters
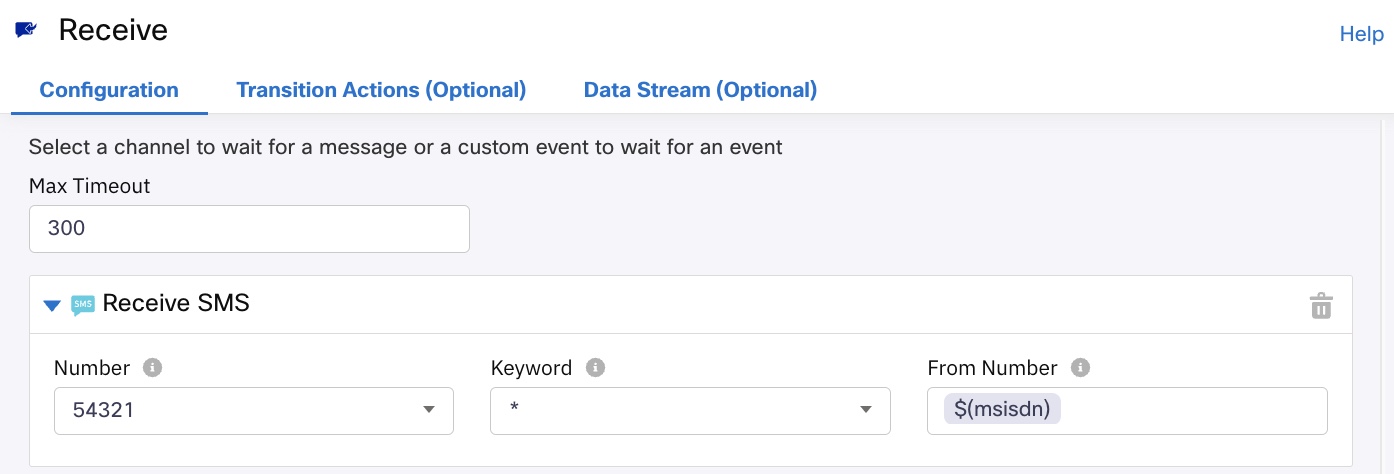
Double-click on the Receive node to configure its settings. See the image below and follow the steps listed
- Select the Receive SMS event

- Select the phone number along with the country code for the service from the Number field
dropdown. - Select * from the keyword field dropdown.
- Enter $(msisdn) in the From number field.
- Enter the maximum timeout in the 'Max timeout' field.
- Click on OK at the bottom.
Configure the 'ontimeout' event
The 'ontimeout' event occurs when the time (in seconds) mentioned in the Time Outfield has expired.
To configure the ontimeout event response:
- Drag and drop the orange dot on the Receive node .
- Choose ontimeout from the Node event drop-down on the [END FLOW - SETTINGS] tab.
- Choose 103 – Flow ended due to an interruption [Incomplete] from the Custom flow result drop-down.
- Click OK at the bottom.

Step 5.4: Add & Configure the IBM Watson Tone Analyzer node
Drag and drop the IBM Watson Tone Analyzer custom integration node to the Canvas and configure it as per below.
- Double-click on the IBM Watson node to configure its settings. See the image below & fill in the fields accordingly.
- Configure the error handling edges.
a. Configure the the 'oninvaliddata' event edge. The 'onInvalidData' event occurs when the response received contains no information. Drag and drop the red dot on the IBM Watson node to configure onInvalidData event.
b. Configure the 'onauthorizationfail' event edge. The ‘onauthorizationfail’ event occurs when the username or password is not valid.
Step 5.5: Setup the branch node & conditional logic
Add a branch node and configure various branches based on the value of $(toneIdentifier) variable.
- Positive Flow
- Negative Flow
Please refer to the below images for a detailed view.
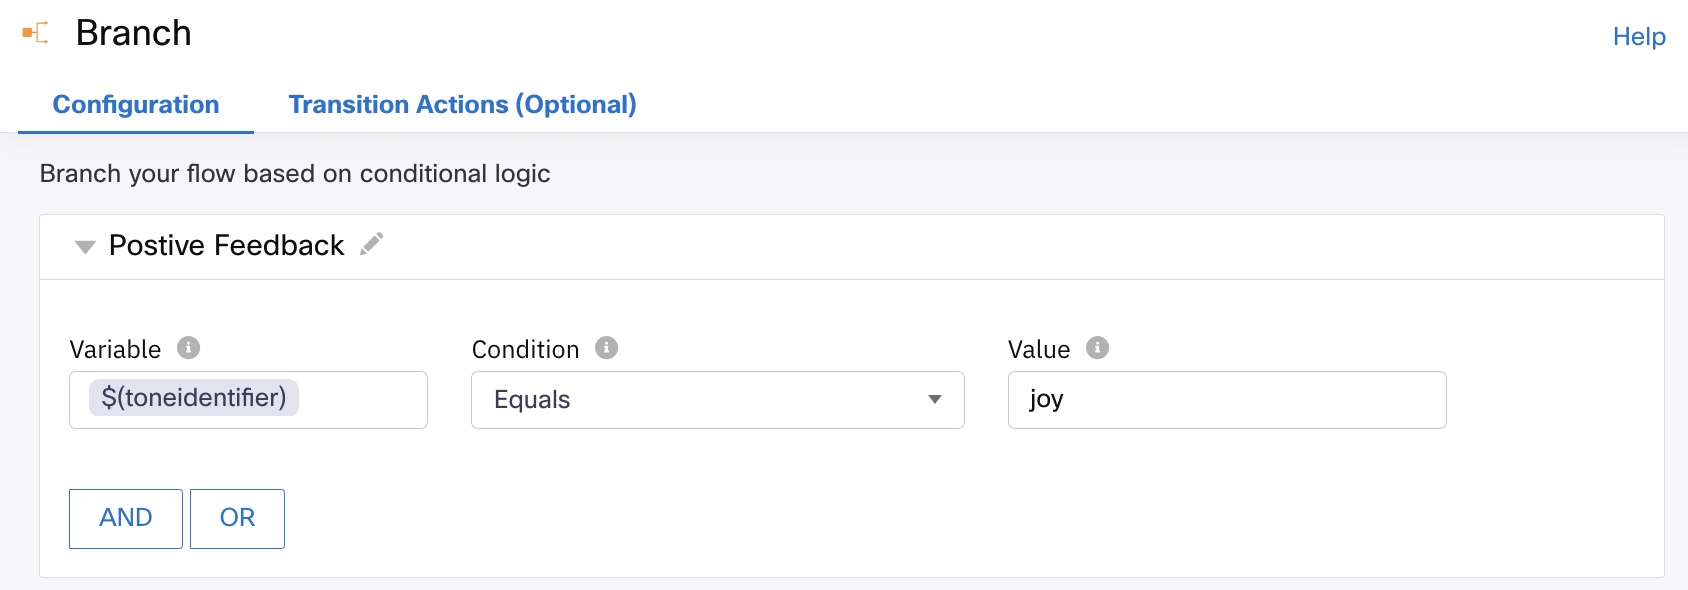

If the user tone is identified as Joy, it will flow into the positive feedback flow. If the user tone is identified as other than Joy, it will flow into negative feedback flow.
Let us now configure send SMS nodes to respond to the customer based on sentiment analysis.
Step 5.6: Setup Send SMS nodes for each branch
- Setup Send SMS node for positive flow.
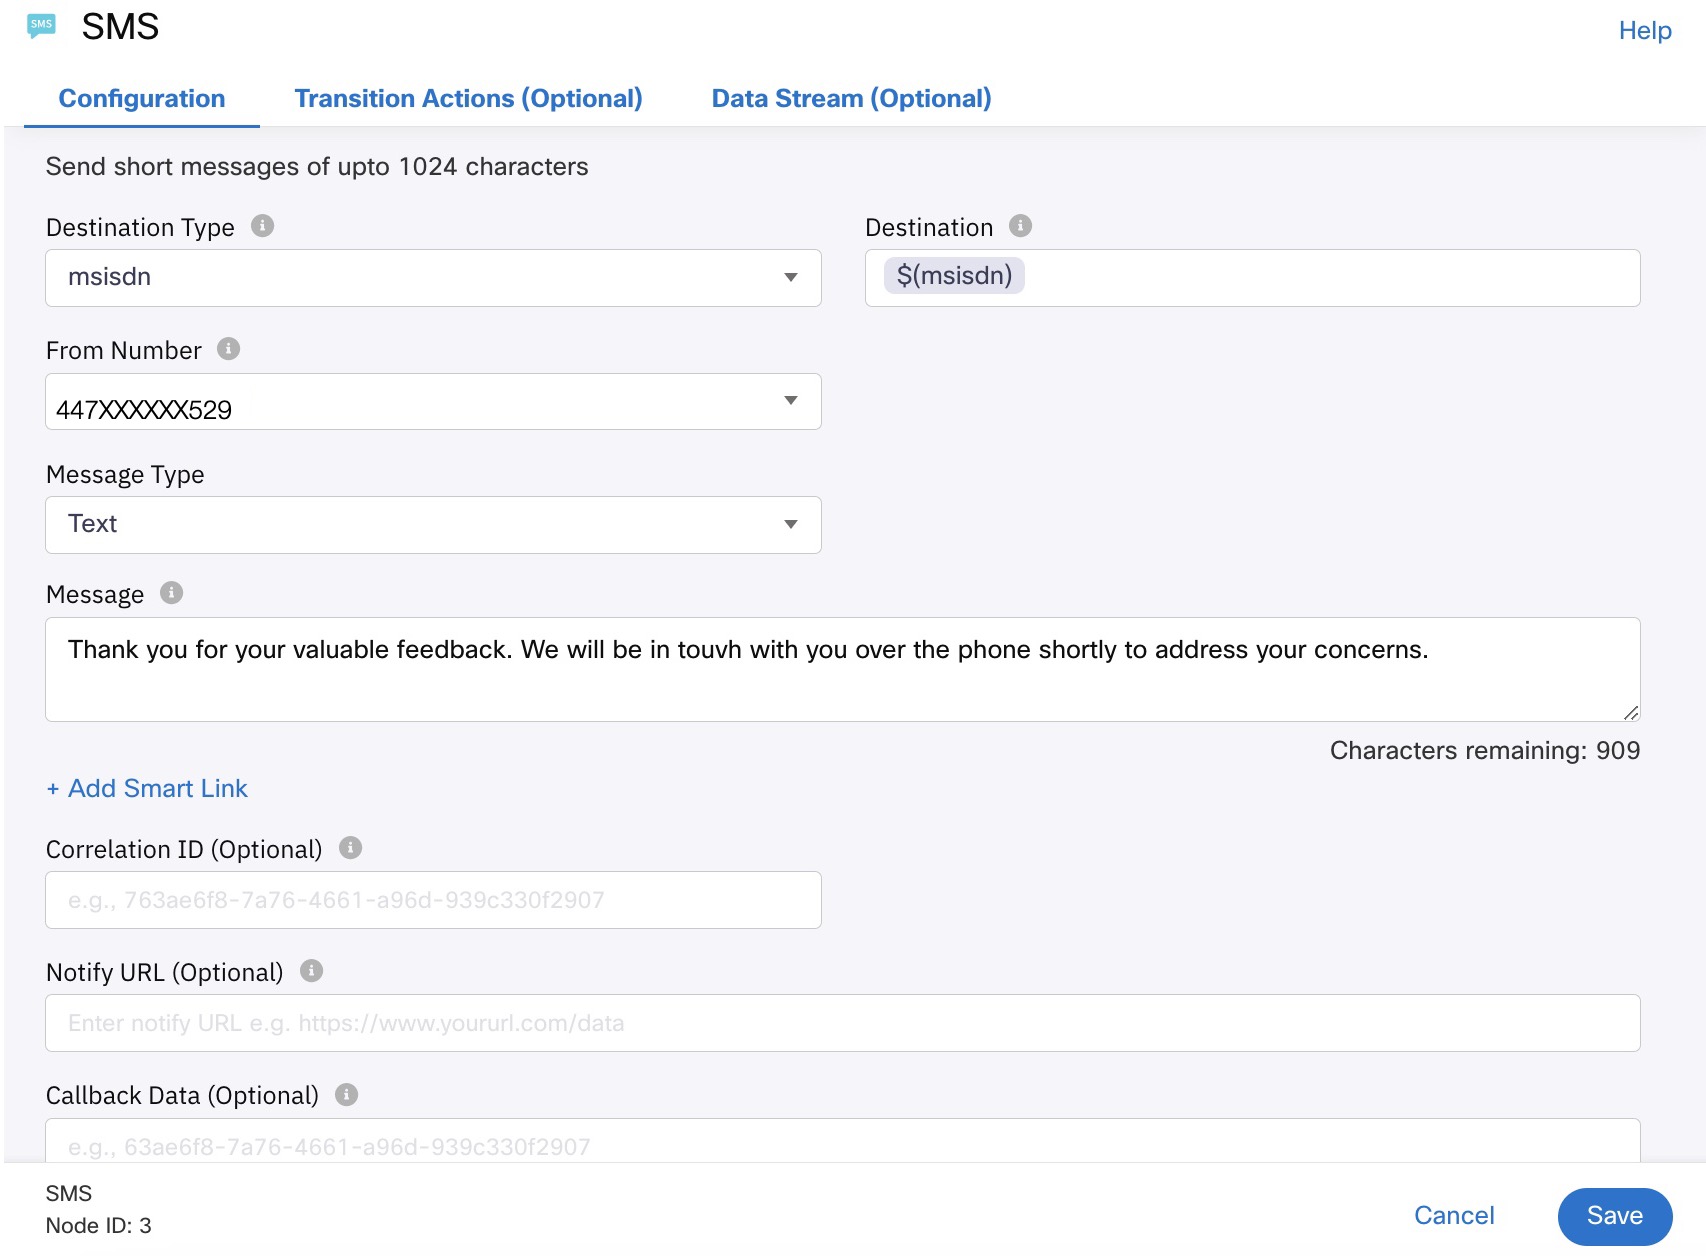
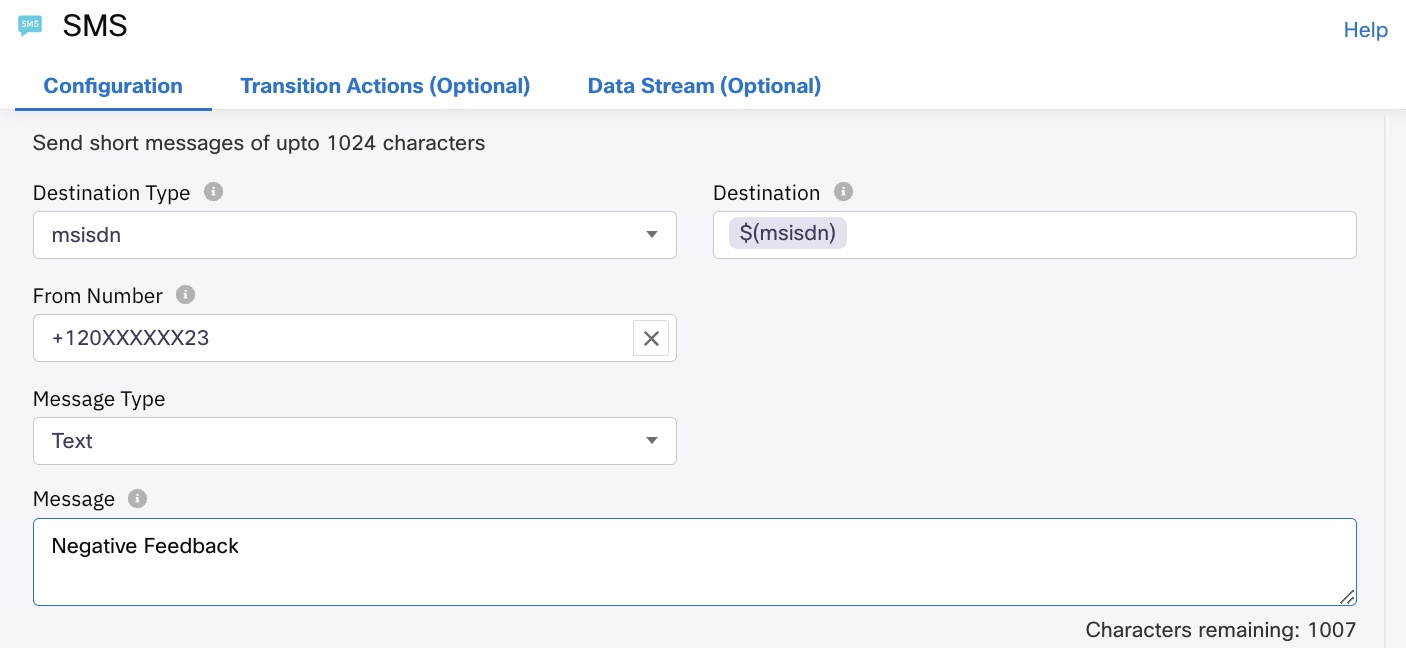
- Setup Send SMS node for negative flow.
Step 6: Publish the flow
- Click MAKE LIVE button at the top right corner of the screen. You will then see a Confirm – Make Live message box.
- Click OK to publish the flow.
This finishes the flow set-up for this use case. Go ahead and invoke the flow by sending relevant variables as part of the event API call.
Updated about 1 month ago
