
Event Scheduler
Schedule SMS messages or event triggers to invoke Webex Connect flows using file uploads.
Event Scheduler allows Webex Connect to schedule outbound messages to be sent to your customers as per the configured time schedule. You can send SMS messages or schedule future invocations of Webex Connect rules/live flows simply by uploading a file (on the UI or via an SFTP location) with required information in the relevant format.
Configuring a Schedule
On the Event Scheduler page, click 'Add Scheduler'. You can select one of the following two actions to be triggered as per the schedule configured in subsequent steps:
- Custom Events – Allows you to trigger rules or flows associated with the selected custom event. The variables required to trigger the custom event and for the successful execution of concerned flows/rules should be available in the file.
- SMS – Allows you to send SMS messages simply by processing the file. One of the columns in the uploaded file must contain the recipients' phone number(s).
The file types supported by Event Scheduler include .txt, .csv, and .xlsx. The file can be uploaded through the user interface or can be picked from a configured SFTP location. The scheduler can be configured to run either once or in a recurring pattern that can be hourly, daily, weekly, or monthly.
Limitations
Webex Connect Event scheduler can process file sizes of up to 75 MB. Also, the file name of the uploaded file should be less than 75 characters in length. Not subscribing to these limits can lead to schedule failure during execution.
Only one file can be uploaded per Schedule.
To schedule an event using Event Scheduler, it is mandatory to create a custom event and a rule that is configured with custom event.
To invoke an event successfully, it is mandatory to match uploaded files' header parameters with the event parameters.
Follow these steps to create a new schedule:
- Click Event Scheduler in the app tray. The Event Scheduler screen appears as shown below.

Event Scheduler
- To create a new schedule, click Add Scheduler. Create a Schedule page appears.

Create a Schedule
The configuration varies depending on whether you select 'Custom Event' or 'SMS'. The following are the details:
Custom Events
To invoke a flow, perform the following steps:
- Click Custom Event under the Select action section.

Create Custom Event
- Select a service from the Select Service dropdown.
- Select an event you want to use from Select Event dropdown.
- Click Next.

Create Custom Event
- Select one of the following:
- Upload File to upload a file from your system.
- SFTP to pick the file from an SFTP location.
- Consent Group to select the consent groups as per contact policy.
Note
The Consent Group option is visible only when the Contact Policy is enabled for your tenant.
Using Upload File Option
- The Total Rows field displays the total number of rows available in the spreadsheet including the number of Valid Rows, Invalid Rows, and Duplicate Rows. This populates/shows up when a file is uploaded in the "Upload a file" option.
Note
Only valid records will be processed further. The total number of rows processed will be displayed in the Total Entries column in the Logs page.
If the transactions fail or if any duplicate or invalid records are found during the processing, they will be captured in the logs csv file. - Select the delimiters of the file and click OK.
If the file upload is successful, the status is indicated with a tick along with the detail count of values read from the provided file. Such as, the name of the file, name of the person who uploaded the file and the total number of rows (including Valid, Invalid and Duplicate Rows).

Parameters
The parameters will be matched in Parameter and File Headers. As without the parameters you would not be able to trigger the errors.
In case of errors or some values are not readable, you can upload the file again.
Using SFTP Option
- To upload a file via SFTP, select SFTP.

Upload SFTP
- Click Select Existing SFTP to upload the file using existing SFTP. The data will be non-editable.
Or - Click Create New SFTP to create a new SFTP. Refer SFTP section below for more details.
Once you have uploaded the file or configured the SFTP details successfully:
Note
The FTP feature is no longer supported for new configurations, because Data sent via FTP is vulnerable to sniffing, spoofing, and brute force attacks, among other basic attack methods.
The feature will work as is for the existing customers.
- Click Next. Basic Details page appears.

Create Schedule - Basic Details
- Enter a name for this Schedule, in the Name field.
- Select Send Trigger Notification Via Email checkbox (optional) and enter a valid email ID, to receive notifications via Email. You can add multiple email ids separated by commas. A list of notifications through emails for errors that occur in event scheduler is added and gets triggered according to the error type to the entered email ids. The Email contains the summary of the trigger execution including File Name, Trigger Name, Trigger Id, and so on.
Below is the list of events for which error notifications will be sent:- Failure - Folder Path Not Found
- Failure - File Header Mismatch
- Failure - File Size Too Large
- Failure - File Not Found
- Failure - No Valid Records Found In The File
- Failure - Invalid Zip Password
- Failure - Failed To Connect To FTP
- Failure - Failed To Connect To SFTP
- Failure - End Of File Not Found
- Failure - Social Hours
In case the Send Trigger Notification Via Email checkbox is unchecked customer can still see the list and progress of the triggered events from the Logs option.
Note
The file name comes as NA if the transaction fails during processing.
- Click Next. The page to configure the execution pattern and the dates of execution for this schedule.
Note
The time and date on which the trigger happens always depends on the time-zone of the tenant. Thus, the start and end date/time need to be defined accordingly.

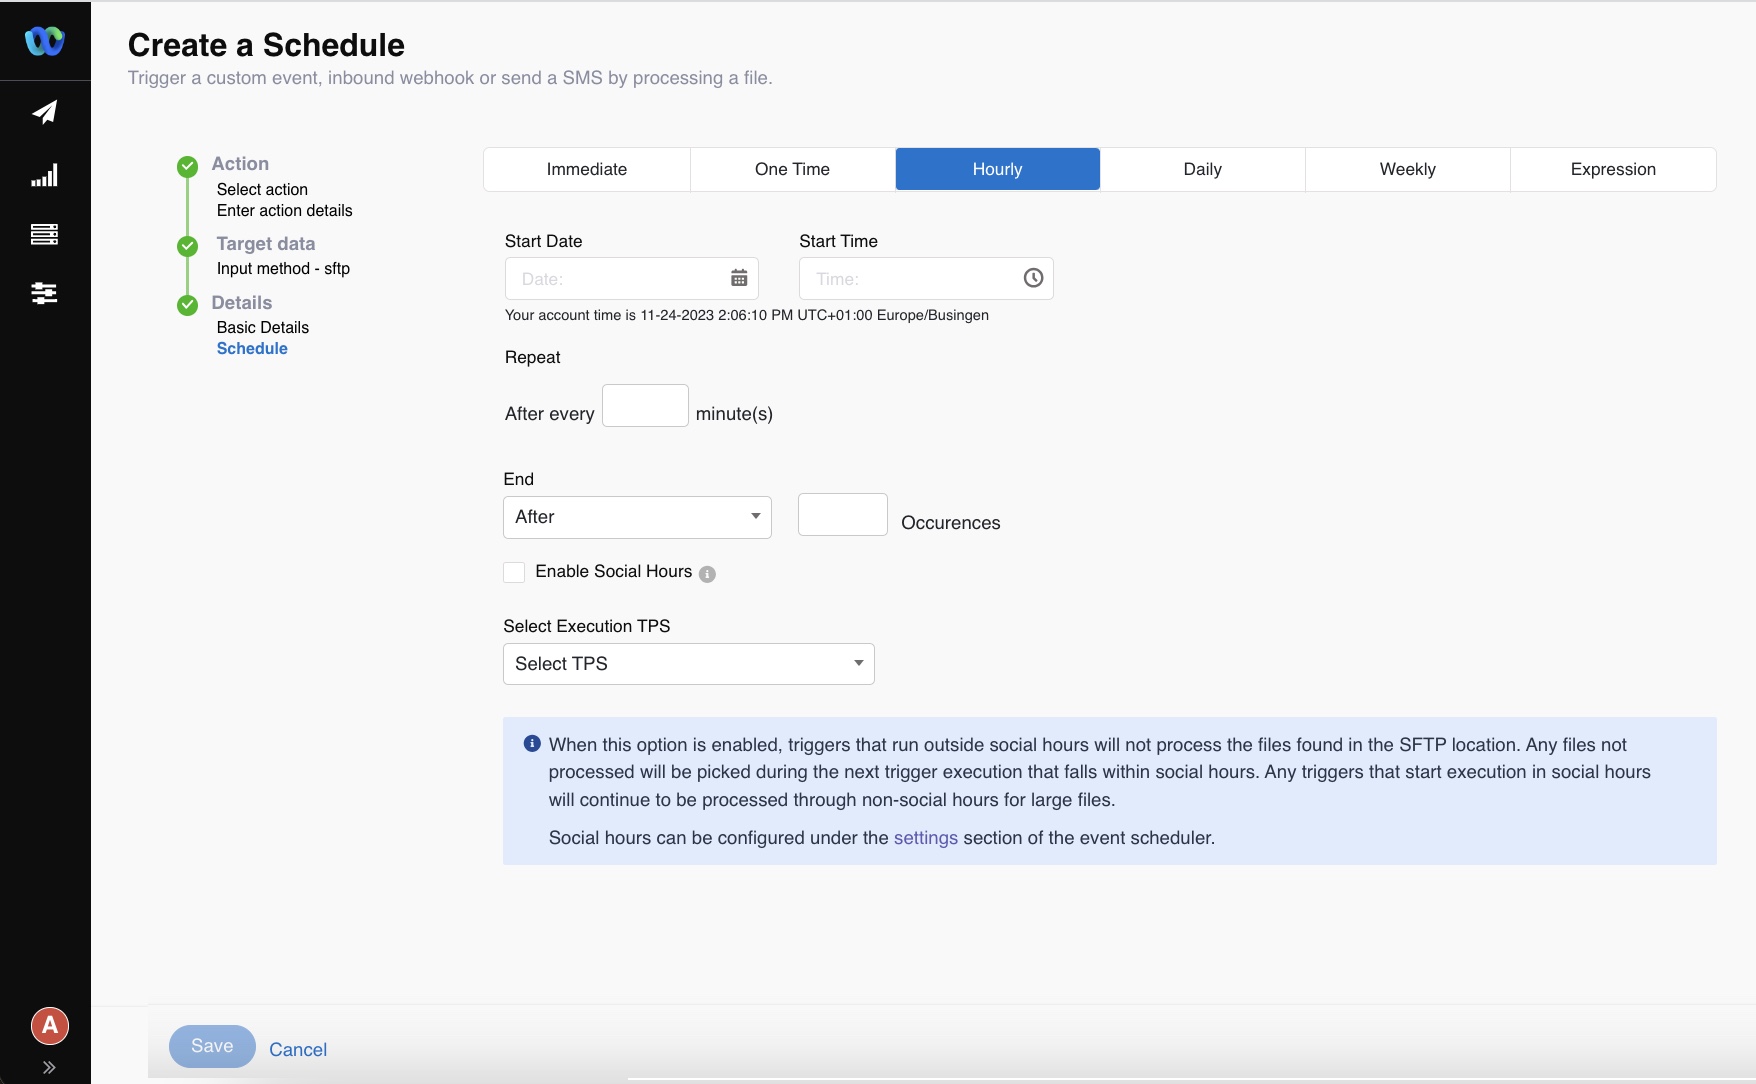
Event Frequency
-
You can select from one of the following execution patterns for running the schedule:
-
Immediate: the messages or custom event triggers are sent immediately.
-
One time: you can set a future date and time for sending the SMS or invoking custom event.
- Enter the start date and start time.
-
Hourly: the hourly allows to set the frequency however many times you want per hour.
-
Enter the start date and start time.
-
Enter the Repeat frequency in After every __ minutes.
-
Select one of the from the End dropdown:
- No End trigger will repeat continuously without end.
- After the trigger stops after entered number of Occurrences.
- On the trigger stops at the entered End Date and End Time.
-
Daily: the event trigger to be fired daily.
-
Weekly: the event trigger to be fired on weekly basis.
-
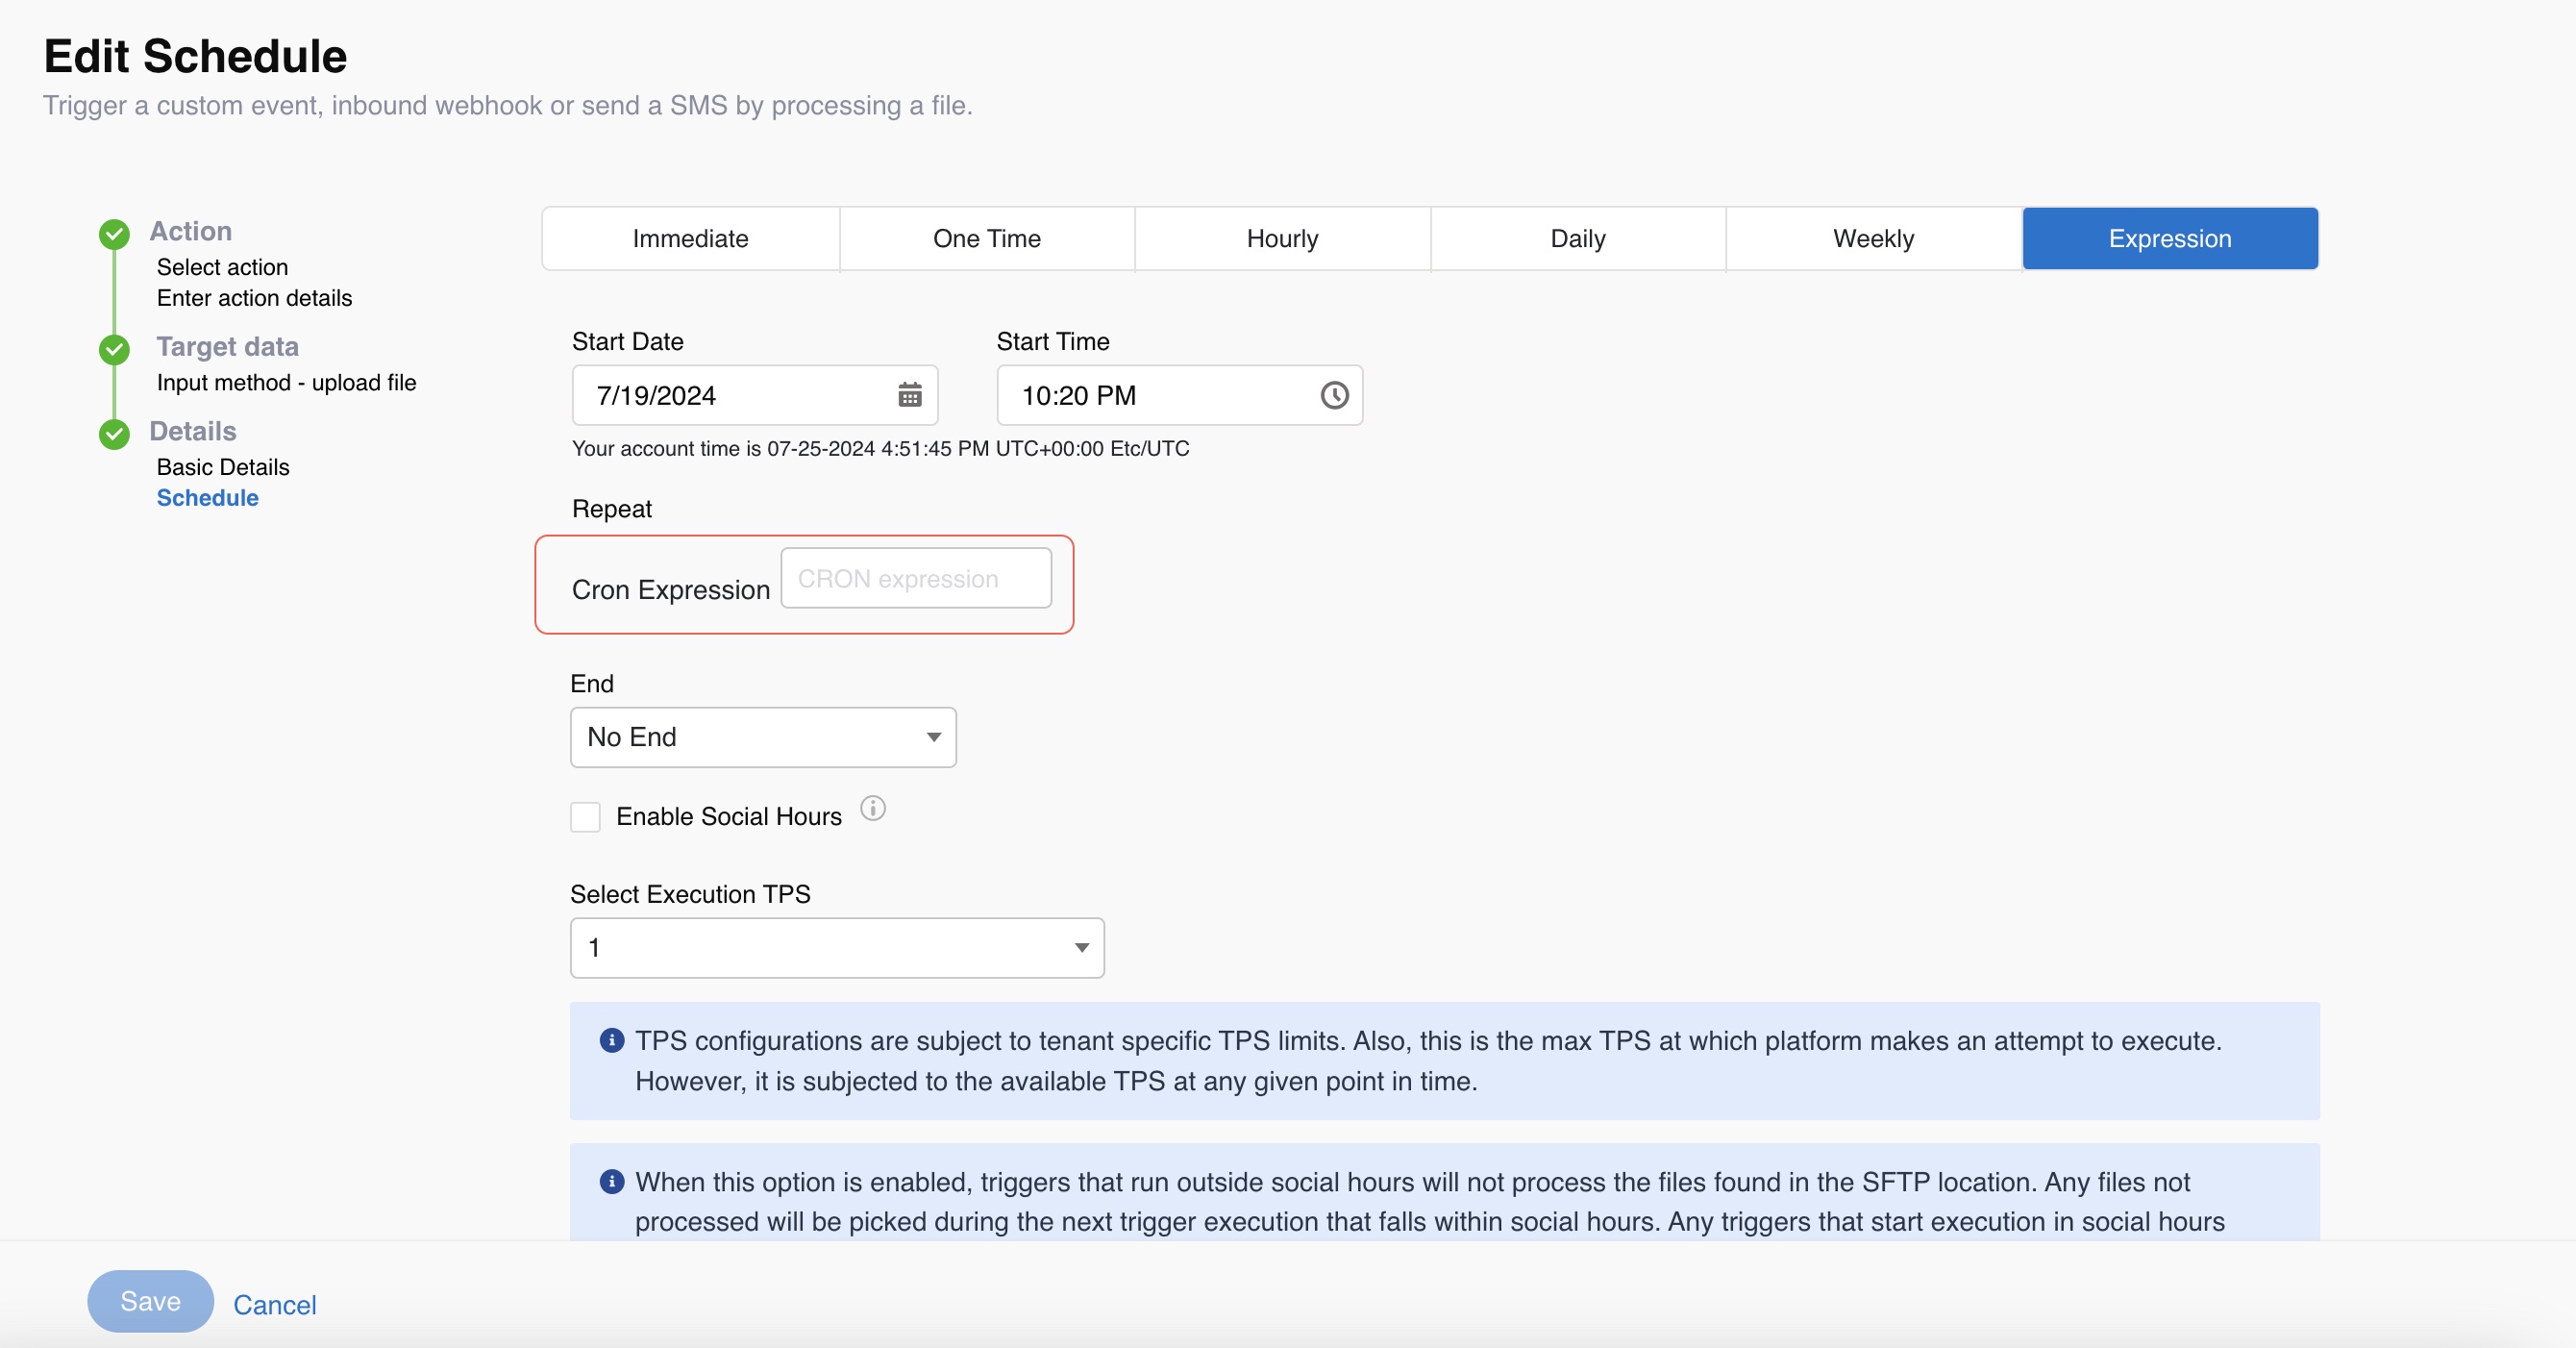
Expression: the event trigger can be customized as per the requirement entering expression.
-
No End trigger will repeat continuously without end.
-
After the trigger stops after entered number of Occurrences.
-
On the trigger stops at the entered End Date and End Time.
-
-
-
-
You can click the Social Hours check box given on the page for all the options to enable the triggers to be delivered only within the set social hours.
Note
When this option is enabled, triggers that run outside social hours will not process the files found in the SFTP location. Any files not processed will be picked during the next trigger execution that falls within social hours. Any triggers that start execution before social hours will continue to be processed through non-social hours for large files.
You need to define the social hour from the Settings section of Event Scheduler first to enable the option. See Social Hours section for details.
- From the Select Execution TPS dropdown list, select the required TPS. The TPS ranges from 1 to 50. Using this option, you can configure the transactions per second (TPS) limit for various Messaging/Event API invocation schedules configured through the event scheduler.
Overall, the TPS is subject to a maximum of the Messaging API and Event API TPS limits of your Webex Connect account.
Note
Whenever an Event Scheduler is provisioned for a new tenant, by default the TPS setting is enabled and it can be configured to 50.

Select Execution TPS
- Click Save. The Event Scheduler list page appears.
Using Consent Group Option
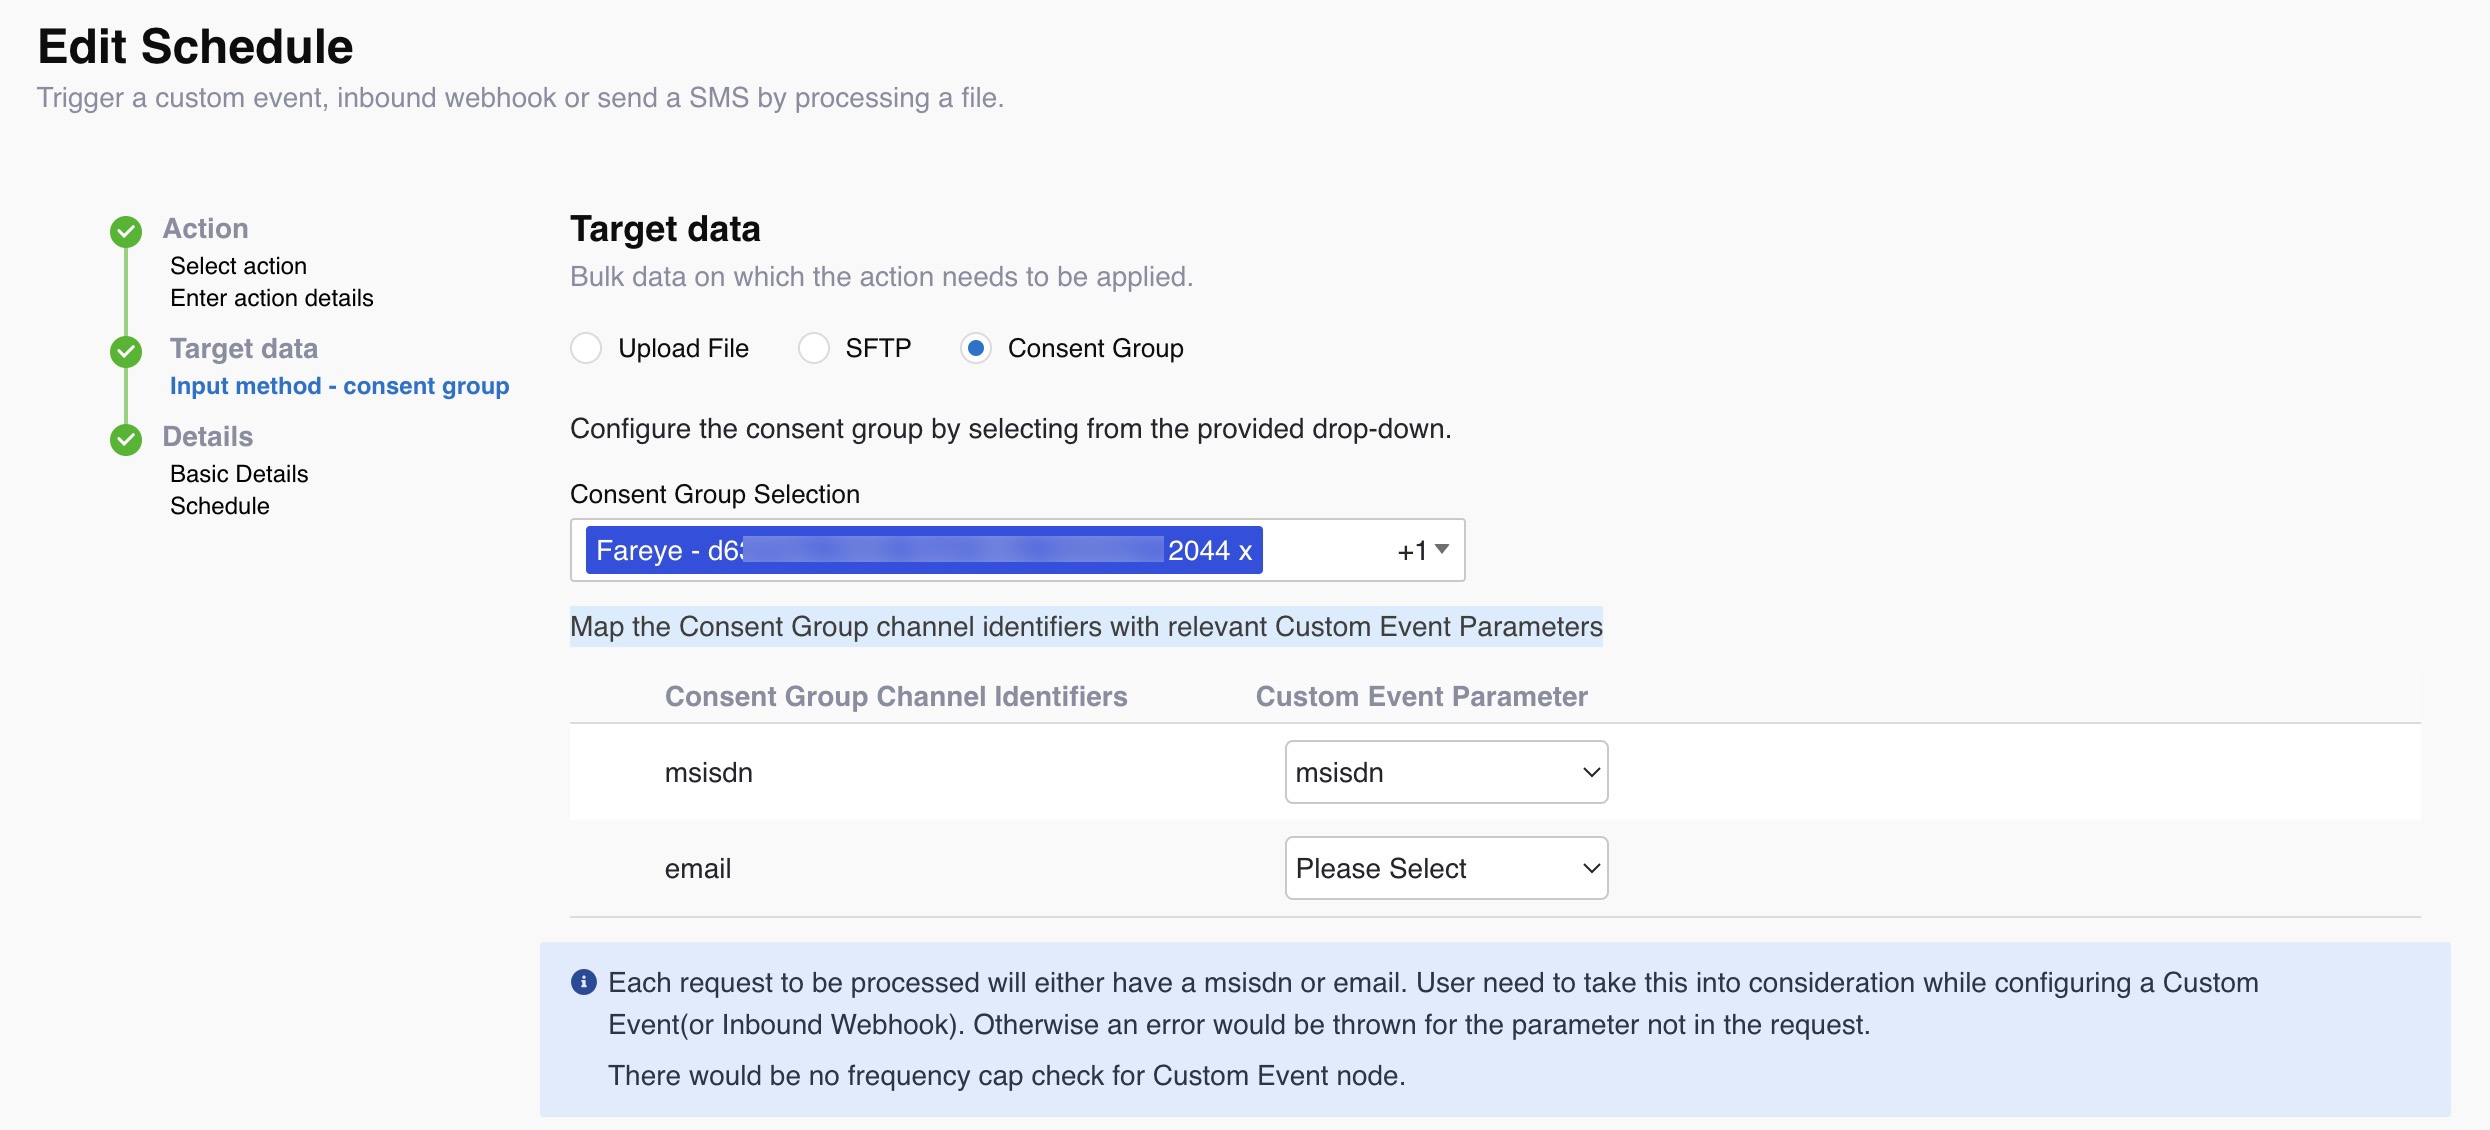
- Select Consent Group.
- Select one or more consent groups from the dropdown. The dropdown contains only the allowed list from the Contact Policy.
Note
Even if a consumer id is present in more than one selected consent group the message will be sent only once to the consumer id.
- Map the Consent Group Channel Identifiers with relevant Custom Event Parameters.
- Click Next. Basic Details page appears.
The list contains information on Trigger ID such as Type, Name - Unique Correlation ID (with details of Creation Time, By Whom), Total Runs, Pattern, and Status of all the schedules. You can manage and update any of these Schedules by clicking the Action dropdown.

Event Scheduler List
Event Schedule Correlation ID
When you configure a schedule using Event Scheduler, Webex Connect generates a unique Correlation ID and uses it as the correlation id for every message sent using this Schedule whether it's a direct outbound SMS schedule, or a custom event trigger based schedule. However, you can use a different Correlation ID in the channel specific Send Node if you want to user a different value.
The list contains information on Trigger ID such as Type, Name (Time, By Who), Total Runs, Pattern, Status and Action of all the triggered events. All the triggers are by default Enabled.
SMS
To invoke an SMS schedule type, perform the following steps:
- Click SMS on Select action page.

Create a Schedule - SMS
-
Select a service type from the Select Service dropdown.
-
Select a message type you want to use from Message Type dropdown. Available options are- Test, Binary, Flash and Unicode.
-
Select a Sender ID from the list.
-
Use 'Extra Parameters' section to pass the DLT Template ID details if you are planning to send these messages to recipients in India. This feature currently supports only this particular use case.
-
Enter the Message Validity in Minutes in the text box.
-
Follow the steps from 5-8 in Custom Events section above.
Note
The dropdown for the consent group selection contains the allowed list which has SMS, SMS+Voice, SMS+Voice+Email, SMS+Email, groups.
-
On successful file upload (through either input type) or consent group selection, do the following:
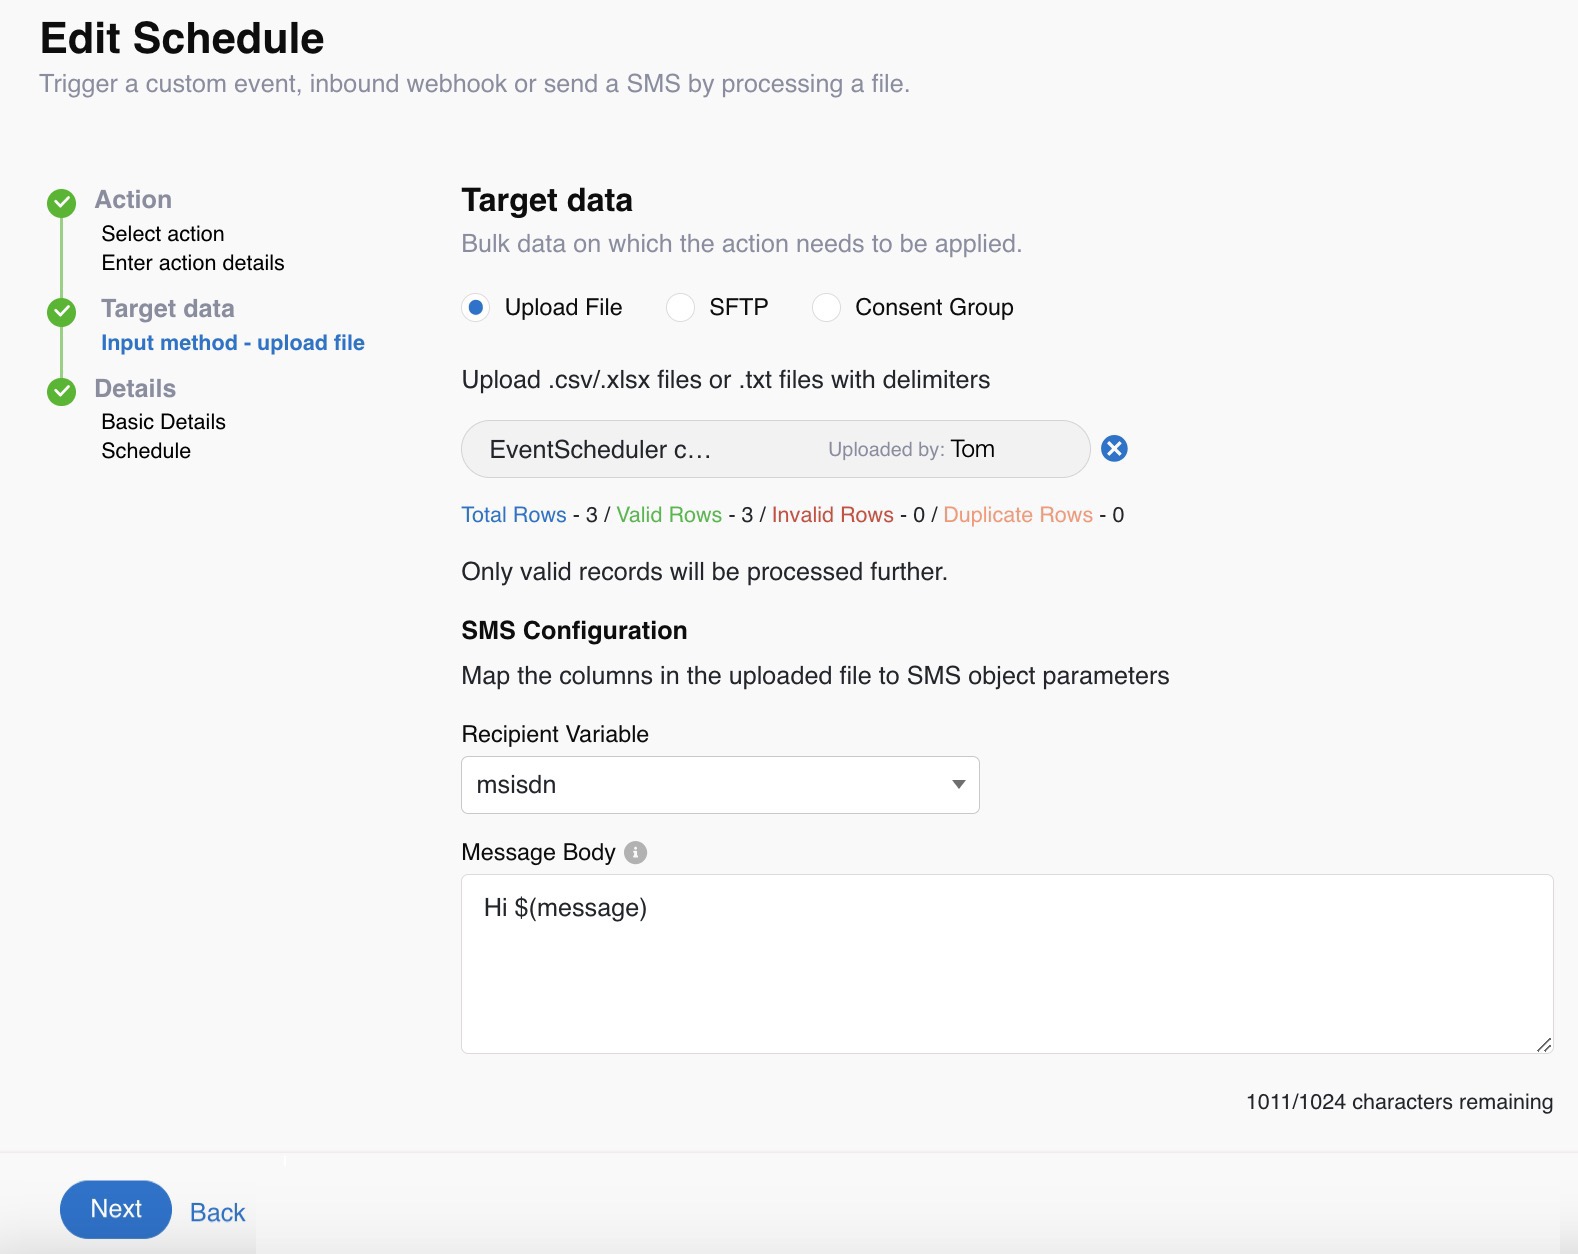
- (For Upload File and SFTP) Recipient: select a recipient from the dropdown.
- Message Body: enter a message in the text field. You can enter attributes in the message body by typing $ and select from the dropdown.
Note
Messages will be sent only to recipients who have provided consent for SMS and if the consent has not expired.
The valid escape characters like \n , \t, \', \” ,\r can be used in the Message Body.
-
Click Next.
Note
Any errors occurred during the process, for example, deleted, expired or revoked of consent groups, are captured in the logs.
-
Follow the steps 12 to 15 in Custom Events section above.
-
Click Save.
The Event Scheduler list page appears with the added SMS Event Schedule.

Note
If +E.164 format is enabled for your tenant - all the Destination numbers should follow the "+E.164" format.
This format displays the number with a "+" followed by the country code and the phone number.
+E.164 format is not applicable to the numbers in the Sender field.
Configuring SFTP Details for Event Scheduler
The tab displays the current SFTP configuration.
To upload files using SFTP, perform the following steps:

SFTP
- Click Add SFTP to create a new SFTP.

Create SFTP
- Select SFTP Type from the dropdown. By default the SFTP is selected.
- Enter a Friendly Name for the SFTP.
- Add the Host Name.
- Enter the Port number (for ex. SFTP is port 22).
- Enter a User Name and Password.
- Enter the Folder Path.
- Enter the File Regex. It limits the file to be uploaded as per the given condition such as you can only upload the file starting from P or Pn etc.
Note
- We support User Name and Password-based authentication for SFTP connections. You can also upload the private key (like example: AWS based Open SSH key files like rsa512.ppk, rsa256.ppk, ecdsa521.ppk, ecdsa384.ppk, ecdsa256.ppk, ed25519.ppk, ECDSAprivate.ppk, EDDSA255private.ppk) for SFTP configuration, when you select the File Destination as SFTP using the Upload button.
- Key-based authentication for both, Linux servers and AWS servers is currently not supported.
- Regex is applied to filename part alone and not to extensions.
Example:
- [a-z]*
- [a-zA-Z0-9]*
- [^xyz]*
- Select Disable end of file to remove limit of file ending.
- Select Enable zip file processing to enable the processing of even the zipped files.
- Enter the Delimiter value.
- Click Upload Key File, if the upload of SFTP files with key exchange is required.
Note
SFTP now supports uploading a SSH key file which is required to connect to certain SFTP systems.
- In case of SFTP only .csv and .xlsx are supported and not .txt.
- Click Save.
The files will be uploaded and saved.
Note
The server creates different folders for SFTP files based on their status for example - the files still in progress will be saved in Processing, the files finished processing successfully in Done and unsuccessful file uploads in Failed folder respectively.
Configuring Settings for Social Hour Checks
To configure settings for social hour checks, perform the following steps:
- Navigate to the Settings option to define the Social Hour. The social hour will be based on the time-zone of the tenant. By default, for every country social hour is configured from 9:00 to 18:00. However, you can set exceptions by checking the Set social hour exception checkbox.

Settings - Social Hour
- Enter exception start and end time in FROM and TO time-pane.
- Click Add New to add another exception in the same day. For each day of the week max two exceptions can be added. The user will not get any messages during the set exception time.
You can also add an entire day as Non-Social Hour by going to the Add holiday into list and they are treated as a non-social hour section on the page. - Click Add and select a date from the calendar. Sunday is the by default non-social hour of the week.
The date of newly added day, along with the date of respective Sunday will start appearing on the page. - Click Update.
On success, Social hour settings saved successfully. message appears and social hour gets updated.
When any trigger happens in non-social hour, it triggers an error email sent to the customer stating the failure as triggers that runs outside social hours will not process the files found in the SFTP location. Similar kind of email will also be sent in case of the successful trigger execution.

Error Email
Any files not processed will be picked during the next trigger execution that falls within social hours. Any triggers that start execution before social hours will continue to be processed through non-social hours for large files.
Event Scheduler Logs
Logs provide a detailed overview of the events that have been triggered.

Logs
Table below describes the parameters in the log tab.
| Field | Description |
|---|---|
| Search | Enter a keyword to search a log. |
| Schedule Type Filter | Select the event from the dropdown for which the logs are required to be generated. Options include All Events, SMS or Custom Event. |
| Select Period | Use the dropdown to select the required time period to view the logs. You can also select custom date and time. Note: Logs are saved only for 6 months. So you cannot select the start date which is more than 6 months ago in the Custom filter. |
| Type | Signifies the event type, for example, SMS. |
| Name | Event scheduler name. |
| Service | Service to which the event being scheduled belongs. |
| Time | Date and time corresponding to the status of the event. |
| Total Entries | Displays the number of but the number of records that will be processed. |
| Processed Entries | DDisplays the number of successfully processed entries. |
| Errors (I/D) | Lists the number of Invalid or Duplicate IDs. |
| Status | Displays the trigger status, for example: Started, Processed or Error. The information icon associated with the Error status displays the error message. |
| Error Report | Downloadable report in csv format, that lists the errors/failed transactions. The report contains the following information: · List of rows that were not processed · Reason of failure and the details along with the transaction id Note: The download button is not visible if the errors in the Errors (I/D) column in 0/0. It is available only in case of processing errors. |
Additional Options
Click the inverted triangle to open the menu of an event to view additional options:
- To make changes to an event, click Edit.
- To rename an event, click Rename.
- To delete an event, click Delete.
Updated 1 day ago