
Evaluate Node
Add your custom JavaScript code to handle advanced business logic and computations
The Evaluate node allows you to run JavaScript code as part of a flow execution to handle complex flows that require advanced computations or data transformations.
The Configuration tab provides a script input box where you can add your own JavaScript code. The script output section allows you to conditionally branch the flow based on your script output.

Evaluate Node
Using Evaluate Node

Evaluate Node
Accessing Flow Variables in Evaluate Node
- Custom Variables are directly accessible by their names within Evaluate node. However, values of auto-generated flow variables are to be referenced as $(nodeid.variablename).
- When a variable is to be referenced in the Evaluate node, it should mandatorily be referenced in one or more preceding nodes in the flow, either in the Configuration tab or the Transition Actions tab for the variable to populate its value during flow execution. For details on Transition Actions, refer to https://help.imiconnect.io/docs/transition-actions.
- The variables are case-sensitive.
Description of Interface elements:
| S. No | Element | Description |
|---|---|---|
| 1 | Configuration tab | Use this tab to evaluate javascript. Field descriptions: Configure Script output Specify a name for the script output in this field. It appears in the Output Variables panel. Branch Name Once the script output is configured, then specify the branch name in this field. |
| 2 | Transition Actions tab | Use this tab to configure node on-enter/on-leave operations. |
| 3 | Test button | Both the Configuration tab and the Transition Actions tab contain a Test button. Click the Test button on the Configuration tab to test the script output. Similarly, click the Test button on the Transition Actions tab to test the on-enter /on-leave operations that are configured. |
| 4 | Input Variable | Click this collapsible panel to view the list of all the available flow variables. You can search for a variable using the Search field. You can also add a variable to the flow variables list by clicking the Add new flow variable link at the bottom of the list. |
| 5 | Output Variables | Click this collapsible panel to view the output variables. |
| 6 | Node Outcomes | Click this collapsible panel to view the list of possible node outcomes. You can also customize the node labels by clicking the Edit icon. |
| 7 | Generate Code using AI | Enable the toggle button to generate code using AI. It is important to note that Bot builder application is mandatory for enabling the toggle to generate code using AI. |
| 8 | Prompt textbox | Enter the message which will be sent to the AI. Example - Write a JavaScript for generating a 25-digit random string to use it as a Correlation ID. |
| 9 | Script generated as output textbox | This is the script generated as output when the message added in the above Prompt textbox is sent to AI. |
| 10 | Script editor | Enter your script here. The script in the editor is executed during flow execution. |
Evaluating a Script Output
You can evaluate the JavaScript in two steps: Configuring Script and Transition Actions.
Configuring the Script
As part of configuring the script, you need to first configure and then test it.
Here are the steps:
- Double click the Evaluate Node.
The Evaluate screen appears. See the above image. - Do the following on the Configuration tab:
- In the Input box, specify the Javascript, enter the Javascript, which you want to evaluate or generate code using AI.
- In the Script Output field, enter a name for the script output. It appears in the Output Variables in the panel.
- In the Branch Name field, enter a name for the branch.
Note: Click the + Add New , if you want to configure more javascript.
Generate Code using AI
Generate sample JavaScript code tailored to your specific use case or requirements by providing a prompt. The resulting code is designed to be compatible with the JavaScript Engine utilized by Webex Connect.
Prerequisite: Code generation using AI requires Bot Builder App Tray. If Bot Builder is not enabled for your tenant, reach out to your account manager to get it enabled. For more information on Bot Builder, see here.
To generate code with AI:
- Double-click the Evaluate Node. The Evaluate screen appears.
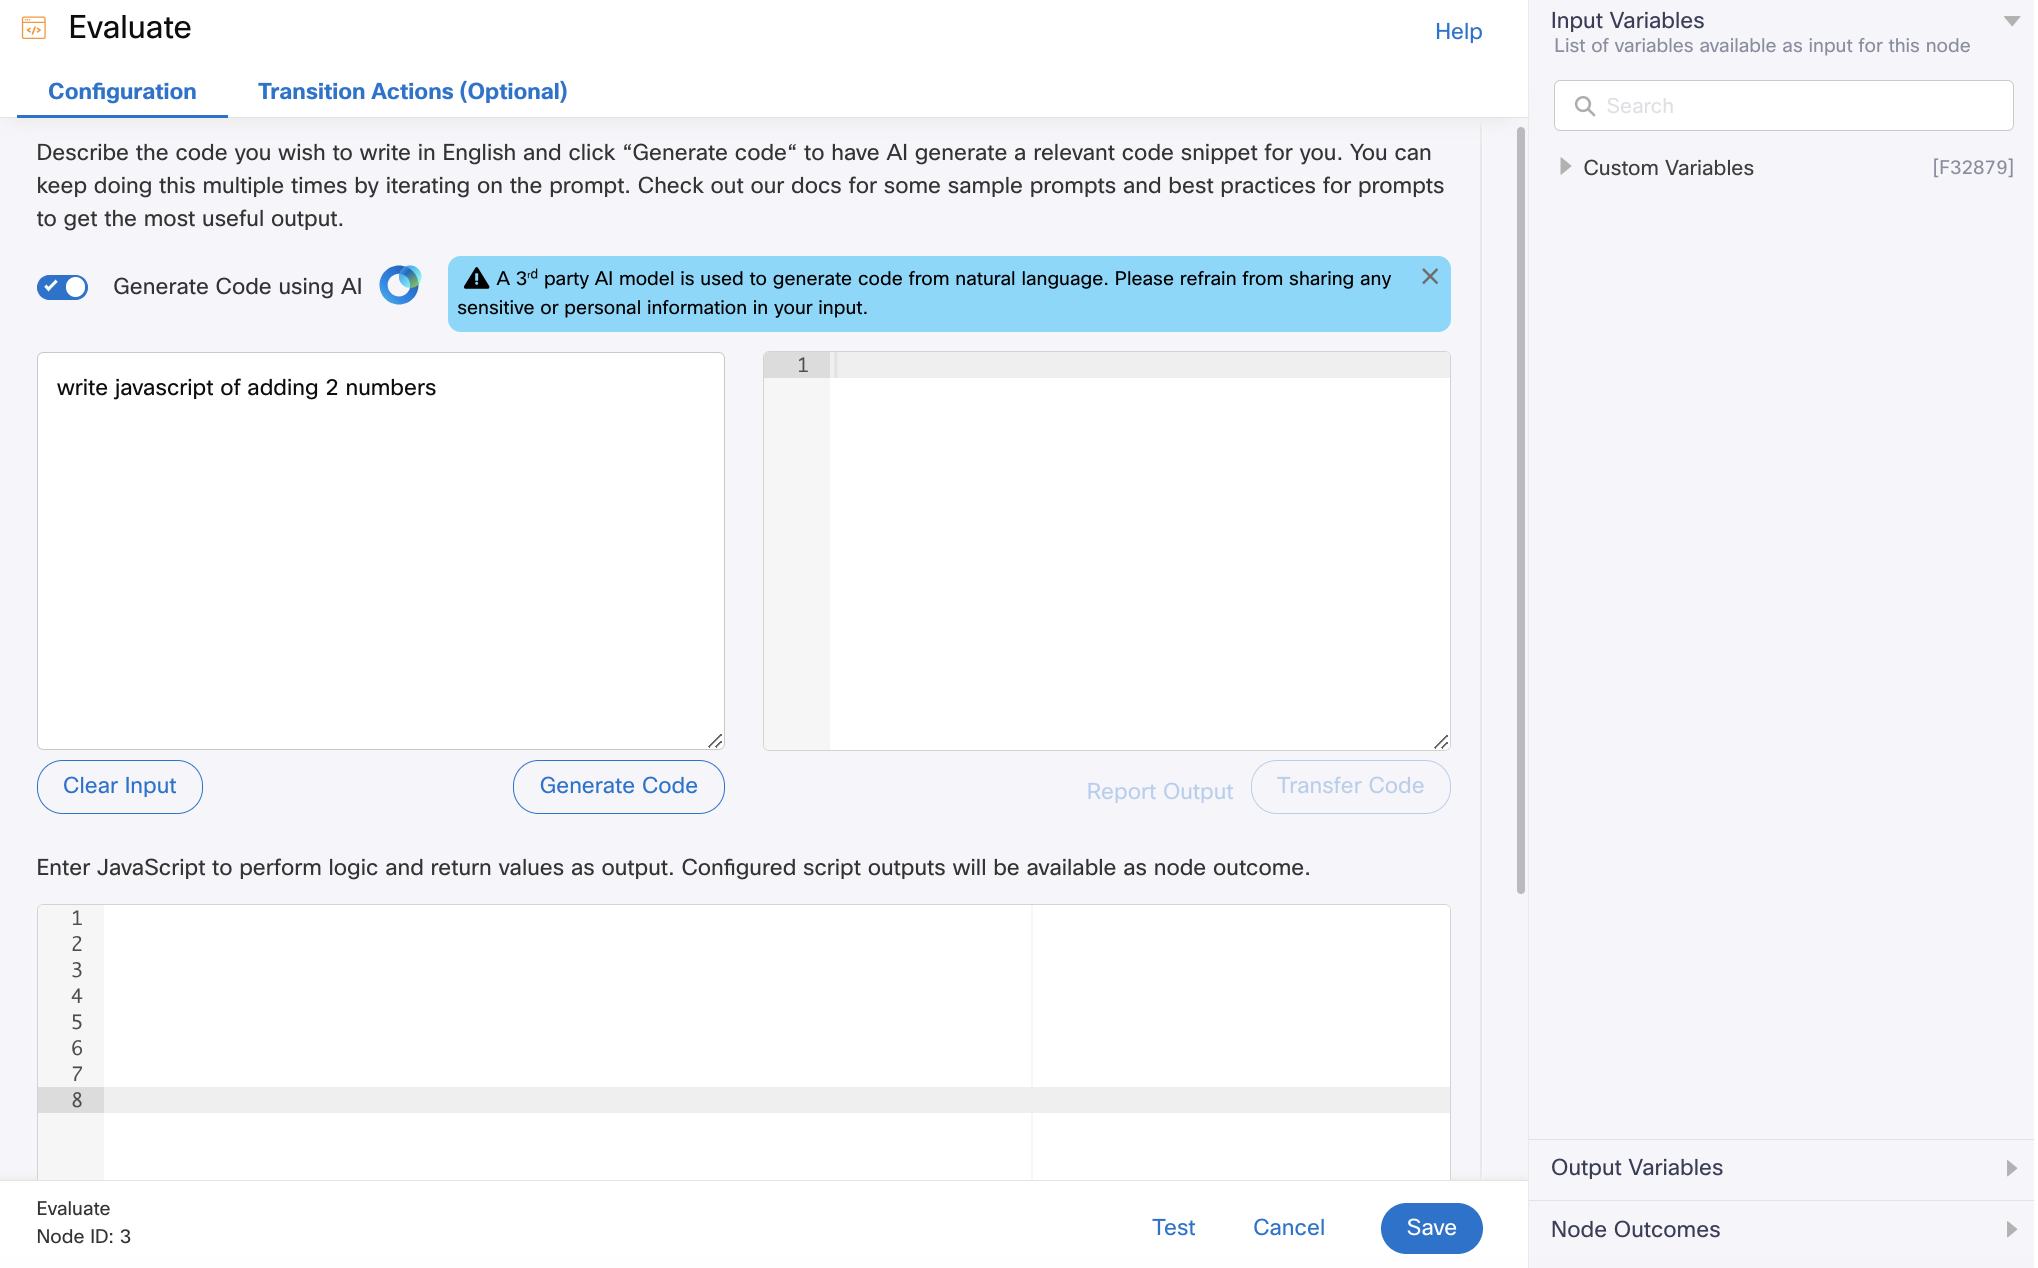
- Enable the Generate Code using AI toggle button (field 7 in the above table)..
- Enter a prompt for the AI in the Prompt textbox (field 8 in the above table). Tip: To get the anticipated output from the Bot, the prompt message must be as descriptive as possible. Example - Write a JavaScript for generating a 25-digit random string to use it as a Correlation ID.
- Click Generate Code. Based on the prompt entered, the script is generated in the Output textbox (field 9 in the above table).
- Click Transfer Code to move the AI-generated script to your script editor (field 10 in the above table). The script will be transferred to the editor in a new line.
Note: If the script output generated by the AI poses a security risk, you can report it.
Note
If the script output generated by the AI poses a security risk, you can report it.
- Click Test. Make sure to test your script and verify that it is generating the desired output.
Note
The Generate Code button is disabled after generating the code. It is enabled only when a new change is added to your previous prompt.
Note
Each Bot Builder-enabled tenant is permitted a maximum of 1000 requests per month for generating scripts using AI. Once this quota is exhausted, it will automatically reset at the beginning of the next month. The quota of 1000 requests per month is applied across tenants and includes all groups and teams.
Report Output
To report the generated output:
- Click Report Output. A pop-up appears.
- Enter the feedback message and select the required checkbox under Report AI’s Output.
Note: It is mandatory to enter one character and select one checkbox. - Click Submit.
Pre-defined Functions
Webex Connect platform provides libraries that you can include in the Evaluate node. The libraries contain pre-defined functions that can be directly called instead of writing code for them. Use the following syntax at the beginning of the JavaScipt code to include libraries:
- For single library -
includeJs(LibraryName1) - For multiple libraries -
includeJs(LibraryName1,LibraryName2,LibraryName3)
imi_general Library
The following table provides a list of functions available in this library:
| Function Name | No. of Parameters | Parameter Type | Output/Example | Note |
|---|---|---|---|---|
| typeof | 1 | ANY | Returns the type of the variableIMI_GENERAL.typeof(<<variable_to_be_evaluated>>); | |
| length | 1 | ANY | Returns the length of the given objectIMI_GENERAL.length(<<variable_to_be_evaluated>>); | |
| unicodeToString | 1 | Array or Object | Returns the String from charCodeIMI_GENERAL.unicodeToString(<<variable_to_be_evaluated>>); | |
| urlEncode | 1 | String | Returns the encoded URLIMI_GENERAL.urlEncode(<<variable_to_be_evaluated>>); | |
| urlDecode | 1 | String | Returns the decoded URLIMI_GENERAL.urlDecode(<<variable_to_be_evaluated>>); | |
| encodeURIComponent | 1 | String | Returns the complete encoded URL including the protocolIMI_GENERAL.encodeURIComponent(<<variable_to_be_evaluated>>) | |
| decodeURIComponent | 1 | String | Returns the complete decoded URL componentIMI_GENERAL.decodeURIComponent(<<variable_to_be_evaluated>>); | |
| stringToUnicode | 2 | string, output_type ( output_type variable can accept 'string', 'array' and 'object') | Returns the unicode of the provided stringIMI_GENERAL.stringToUnicode(<<variable_to_be_evaluated>>, '<<output_type>>'); |
imi_base64 Library
| Function Name | No. of Parameters | Parameter Type | Output/Example |
|---|---|---|---|
| encodeBase64 | 1 | String | Returns the encoded base64 stringvar messageencode = base64encode(<<variable_to_be_evaluated>>); |
| decodeBase64 | 1 | String | Returns the decoded base64 stringvar messagedecode = base64decode(<<variable_to_be_evaluated>>); |
imi_strings Library
The following table provides a list of functions available in this library:
| Function Name | No. of Parameters | Parameter Type | Output/Example |
|---|---|---|---|
| length | 1 | ANY | Returns the length of the variableIMI_STRINGS.length(<<variable_to_be_evaluated>>); |
| concat | 2 | String and String or String and Number | Adds the provided input to the stringIMI_STRINGSs.concat(<<variable1_to_be_evaluated>>, <<variable2_to_be_evaluated>>); |
| lastIndexOf The method name is case-sensitive | 3 | search_text (mandatory) - String text (mandatory) - String * start_pos (optional) - String; the start position from where the search should start within the string | Returns the position of the last occurrence of a specified value in a string. This method returns -1 if the value to search for never occurs. Note: The string is searched from the end to the beginning, but returns the index starting at the beginning, at position 0. IMI_STRINGS.lastIndexOf(<<search_text>>, <<text>>, <<start_pos>>); |
| indexOf | 3 | search_text (mandatory) - String text (mandatory) - String start_pos (optional) - String; the start position from where the search should start within the string | Returns the first occurrence position of the search_text within the actual text or returns -1 if not foundIMI_STRINGS.indexOf(<<search_text>>, <<text>>, <<start_pos>>); |
| search | 2 | search_text (mandatory) - String or regular expression text (mandatory) - String | Returns a number, representing the position of the first occurrence of the specified search value, or -1 if no match is foundIMI_STRINGS.search(<<search_text_or_regular_expression>>, <<text>>); |
| replace | 3 | search_text (mandatory) - the value, or regular expression that needs to be replaced by the new value newvalue (mandatory) - the value to replace the search value with * text (mandatory) - String | Returns a new string, where the specified value(s) has been replaced by the new value. If a normal string is provided, it will replace the first occurrence. For global use, use a regular expression instead. IMI_STRINGS.replace(<<search_text_or_regular_expression>>, <<newvalue>>, <<text>>); |
| toUpperCase | 1 | String | Returns the upperCase format of the provided stringIMI_STRINGS.toUpperCase(<<variable_to_be_evaluated>>); |
| toLowerCase | 1 | String | Returns the lowerCase format of the provided stringIMI_STRINGS.toLowerCase(<<variable_to_be_evaluated>>); |
| trim | 1 | String | Removes whitespace from both sides of a stringIMI_STRINGS.trim(<<variable_to_be_evaluated>>); |
| split | 2 | text (mandatory) - String separator (mandatory) - String | Converts the provided string to an array based on the provided separatorIMI_STRINGS.split(<<variable_to_be_evaluated>>, <<separator>>); |
| slice | 3 | start (mandatory)- the position where to begin the extraction. The first character is at position 0 end(optional) - the position (up to, but not including) at which to end the extraction. If omitted, slice() selects all characters from the start position to the end of the string * text (mandatory) - the actual text | Returns a string, representing the extracted partIMI_STRINGS.slice(<<start>>, <<end>>, <<the_actual_text>>); |
| substring | 3 | start (mandatory) - the position where to start the extraction. The first character is at index 0 text (mandatory) - the actual text * end (optional) - the position (up to, but not including) at which to end the extraction. If omitted, it extracts the rest of the string | Returns a string containing the extracted charactersIMI_STRINGS.substring(<<text>>, <<start>>, <<end>>); |
| substr | 3 | start (mandatory) - the position where to start the extraction. The first character is at index 0. If start is positive and greater than, or equal, to the length of the string, substr() returns an empty string. If start is negative, substr() uses it as a character index from the end of the string. If start is negative or larger than the length of the string, start is set to 0. length (optional) - the number of characters to extract. If omitted, it extracts the rest of the string * text (mandatory) - the actual text | Returns a string, containing the extracted part of the text. If length is 0 or negative, an empty string is returnedIMI_STRINGS.substr(<<start>>, <<length>>, <<text>>); |
imi_array Library
The following table provides a list of functions available in this library:
| Function Name | No. of Parameters | Parameter Type | Output/Example |
|---|---|---|---|
| concat | 1 | args (mandatory) - an array of elements | Returns an array object, representing the joined arIMI_ARRAY.concat(<<Array_of_Elements>>); |
| indexOf | 3 | array (mandatory) - the original array item (mandatory) - the item to search for * start (optional) - the position from where to start the search. Negative values will start at the given position counting from the end, and search to the end | Returns a number, representing the position of the specified item, otherwise -1IMI_ARRAY.indexOf(<<Original_Array>>, <<Item_to_Search>>, <<optional_start_position>> ); |
| isArray | 1 | object (mandatory) | Returns true if the object is an array, otherwise it returns falseIMI_ARRAY.isArray(<<variable_that_need_to_tested>>); |
| join | 2 | array (mandatory) - the original array separator (optional) - the string value which is used as a separator between the array elements | Returns a string, representing the array values, separated by the specified separatorIMI_ARRAY.join(<<Array>>, <<Optional_Separator>>); |
| lastIndexOf | 3 | array (mandatory) - the original array item (mandatory) - the item to search for * start (mandatory) - the position from which to start the search. Negative values will start at the given position counting from the end, and search to the beginning | Returns a number, representing the position of the specified item, otherwise -1IMI_ARRAY.lastIndexOf(<<Original_Array>>, <<Item_to_Search>>, <<optional_start_position>> ); |
| push | 2 | array (mandatory) - the original array items (mandatory) - an array of Items | Returns a number, representing the new length of the array. Note*: Add item at the end of the arrayIMI_ARRAY.push(<<Original_Array>>, <<Array_of_Items>> ); |
| unshift | 2 | array (mandatory) - the original array items (mandatory) - an array of items | Returns a number, representing the new length of the array. Note*: Add item at the beginning of the arrayIMI_ARRAY.unshift(<<Original_Array>>, <<Array_of_Items>> ); |
| reverse | 1 | array (mandatory) - the original array | Returns an array, representing the array after it has been reversedIMI_ARRAY.reverse(<<Original_Array>> ); |
| splice | 4 | array (mandatory) - the original array index (mandatory) - an integer that specifies at what position to add/remove items. Use negative values to specify the position from the end of the array howmany (optional) - the number of items to be removed. If set to 0, no items will be removed items (mandatory) - an array of elements to be added to the original array | Adds/removes items to/from an array, and returns the removed item(s)IMI_ARRAY.unshift(<<Original_Array>>, <<Index>>, <<Optional_howmany>>, <<Array_of_elements>> ); |
| fill | 4 | originalarray (mandatory) - array value (mandatory) - the value to be filled in array start (optional) - the position from where to start filling the value in the array end (optional) - the position to stop filling the value in the provided originalarray | Returns the changed arrayIMI_ARRAY.fill(<<Original_Array>>, <<value>>, <<Start>>, <<end>> ); |
Testing the Script
After configuring the script output, you need to test it to evaluate its function.
- Click Test button at the bottom.
The Test Evaluate Script window appears. - On the Test window:
- In the Variable Name field, enter the variable. For example, age.
- In the Value field, enter the value corresponding to the variable.
- Click the Test button at the bottom to test it.

Test Window
- Finally, click the Save button at the bottom.
The script is evaluated.
Configuring Transition Actions
The Transition Actions tab in a node enables you to configure the On-enter and On-leave actions to capture logs when the flow is executed.
For information, see Transition Action.
FAQs
- Is the script generated by AI always secure?
It is advisable to verify and test the script using the 'Test' option in the node before incorporating it into the flow. The script generated by AI is designed to be compatible with the JavaScript Engine employed by Webex Connect. However, it's important to acknowledge that a third-party tool is utilized for script generation. - I have written a prompt to AI, but when I click on generate code, I receive TPS reached error? I have not exhausted my 1000 request per month quota.
Access to TPS for code generation using AI is limited for each tenant. Please attempt the operation again. If the issue persists, kindly raise an operational ticket or contact your account manager for further assistance.
Updated about 1 month ago