Task Bots - Quick Start Guide
Task bots enable multi-turn conversations where a bot can obtain relevant data from users to perform the task at hand. Task bots augment the no-code bot-building capabilities of Webex Bot Builder by complementing Q&A bots. Q&A bots are pertinent to cases where the interactions with users are restricted to answering specific queries from a corpus or knowledge base with minimal turn-taking involved. Task bots overcome this limitation by enabling multi-turn conversations where a bot can obtain relevant data from users to perform the task at hand.
Use this procedure to create a task bot.
- Log in with valid credentials to the application.

- Click +New Task Bot on the Dashboard screen. The Bot Profile screen appears.
- Specify this information:
Bot Name
The name of the bot.
Bot Unique name
A unique name for the bot.
Text orientation
Display of text format on the platform. Possible values:
- Left to right (English)
- Right to left (Arabic)
URL for the Bot Logo/Brand Image
The URL from where the bot logo or image defaults.
- Select the Allow Feedback toggle to request feedback from the consumer on every bot-message that is triggered in a session.
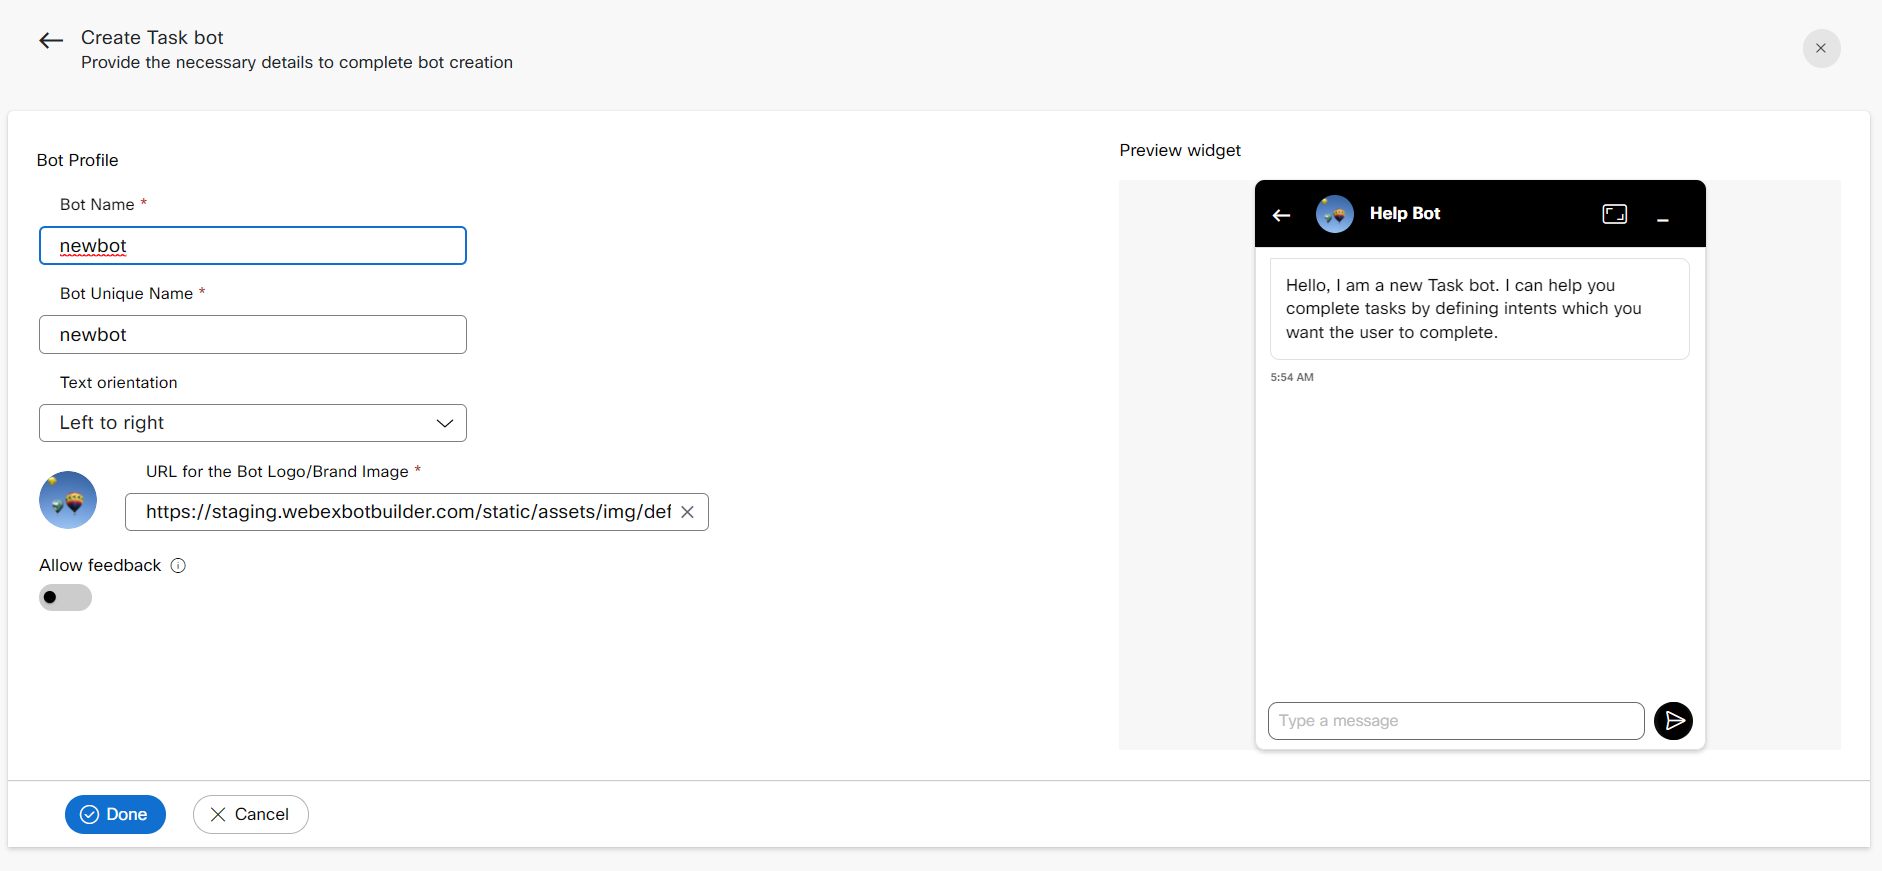
- Click Done. The bot is created successfully, and you are redirected to the Training data screen.
Defining an intent
An intent represents a task or action the consumer wants to perform in each conversation. Bot developers define all intents that correspond to tasks consumers want to accomplish in the bot.
Use this procedure to define an intent:
- Select a specific task bot on the Task bots tab of the dashboard screen to which the intents must be added.
- Click Training. The Training data screen appears.
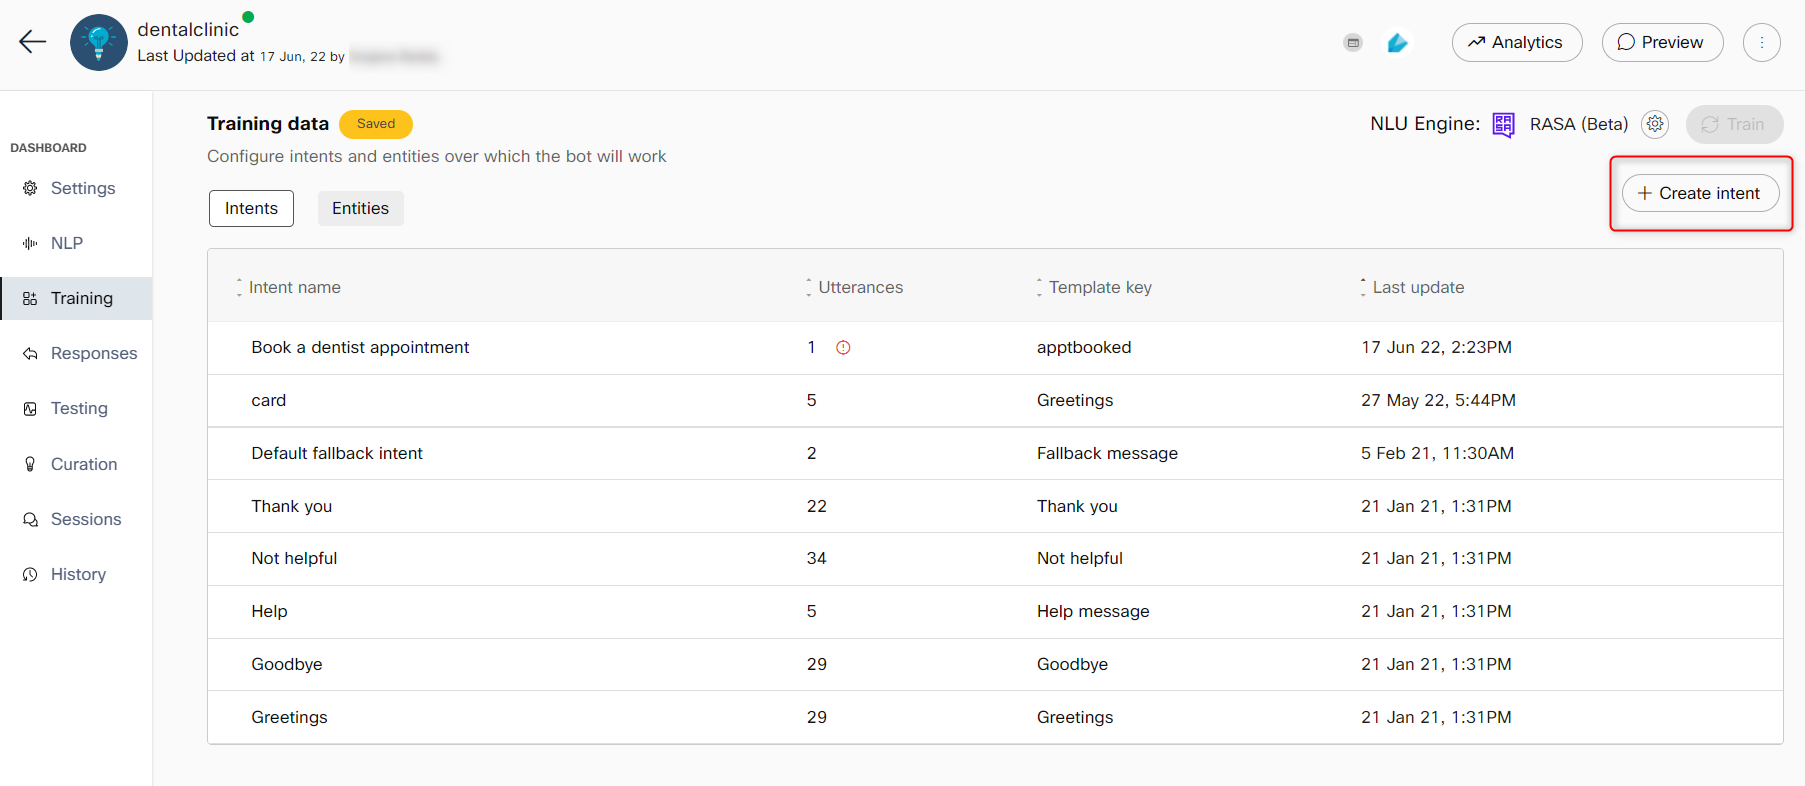
- Click +Create intent, on the Intents tab. The Create intent screen appears.
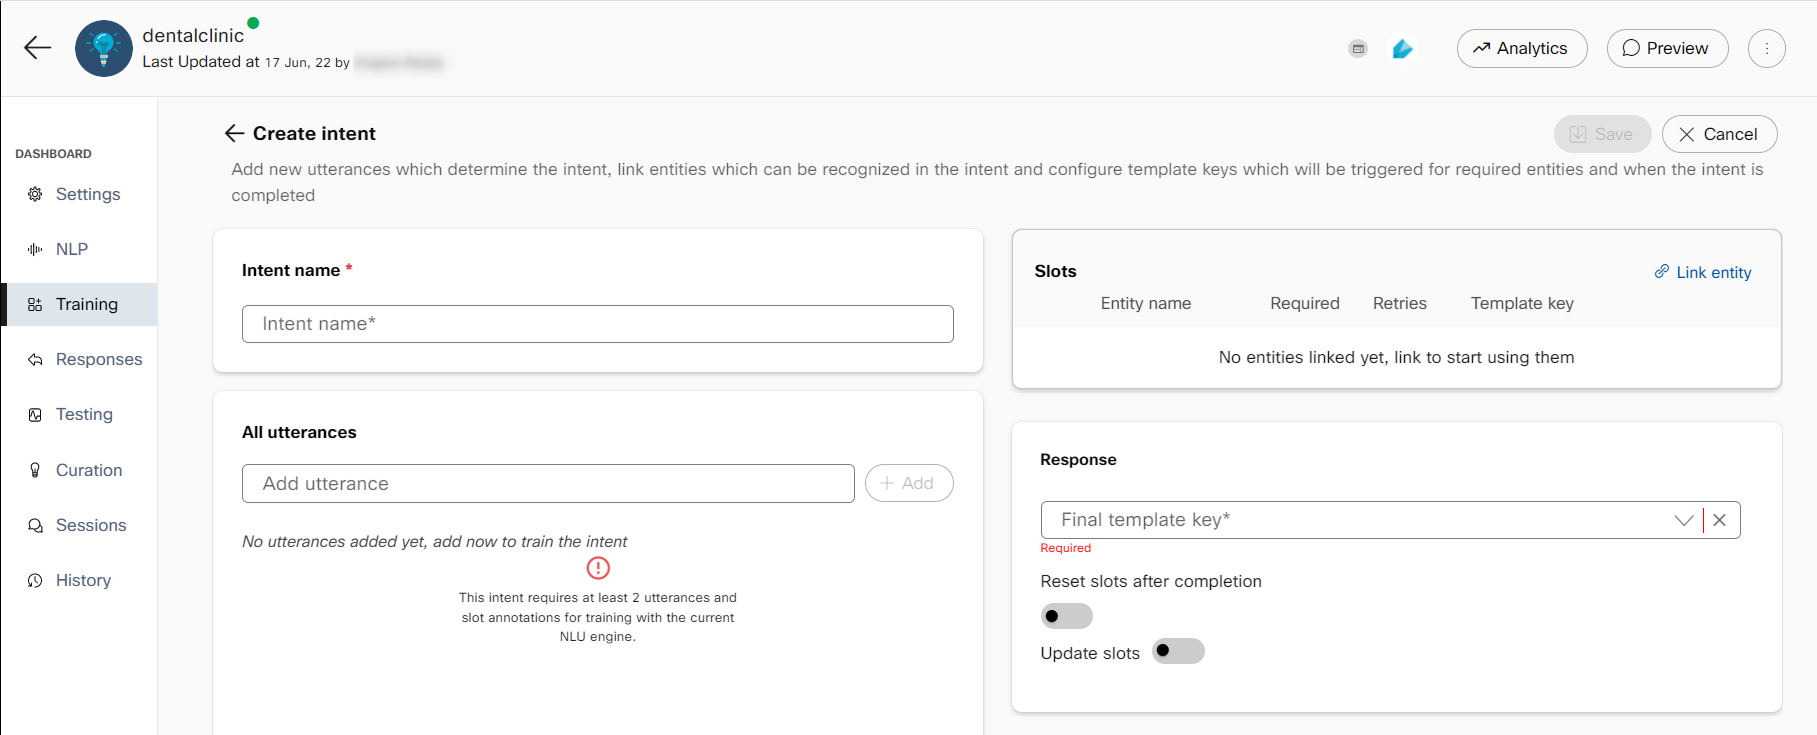
- Specify the intent name and utterances the consumers might input to trigger this intent.
- Click Add utterance after adding each utterance.
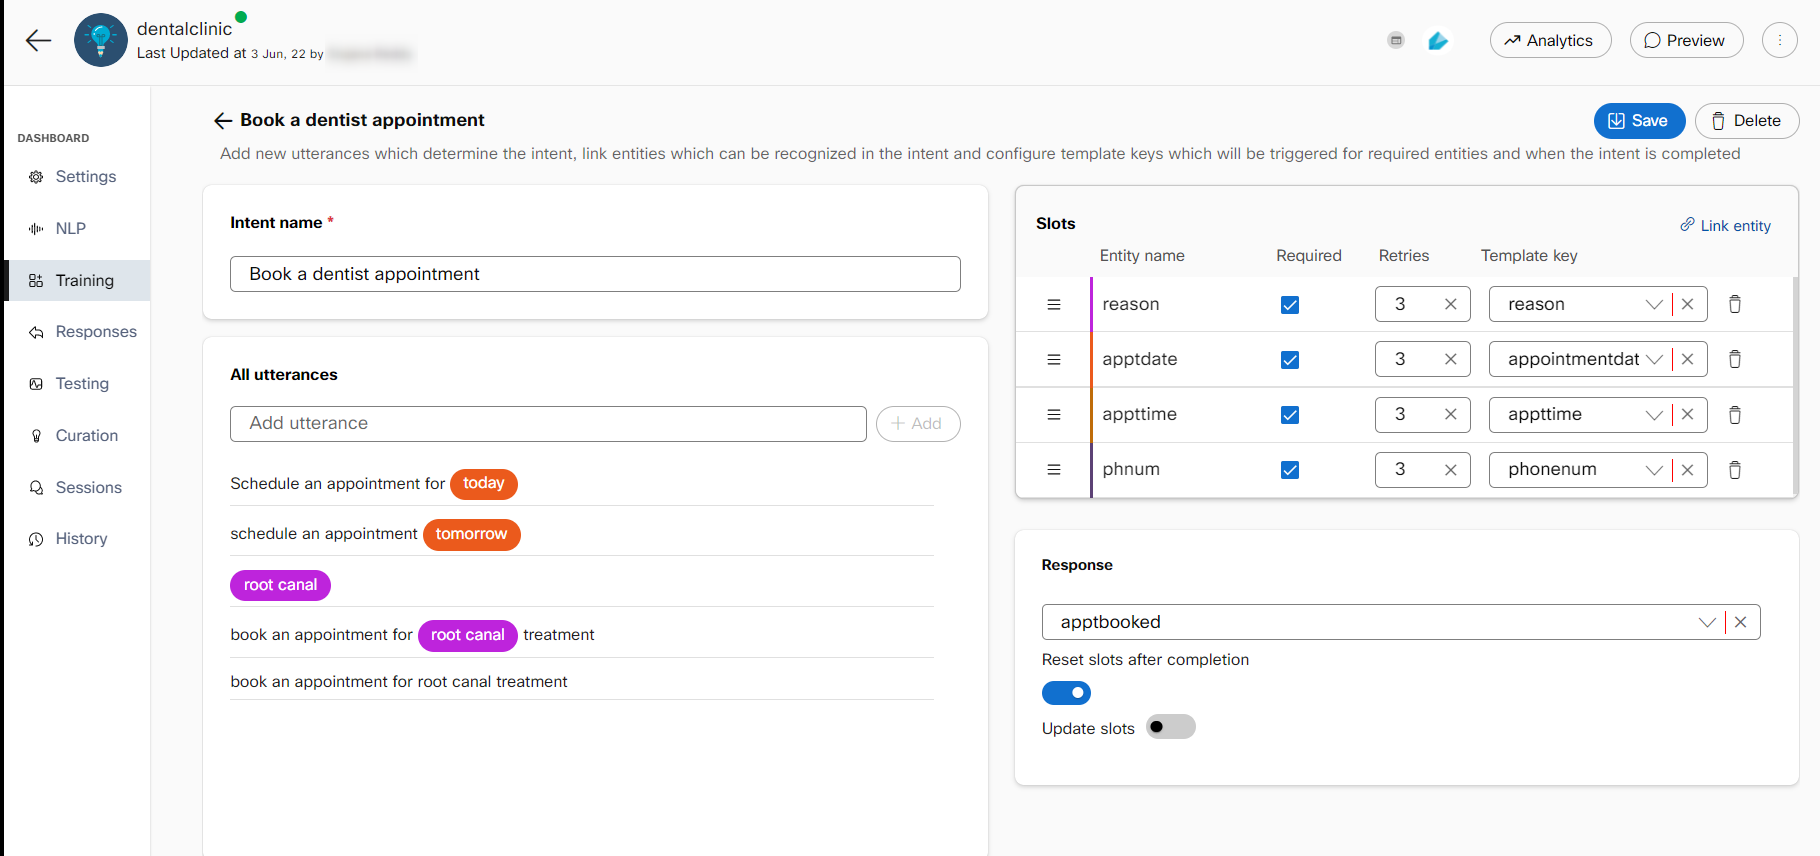
- Click + Link entity to link entities to the intent, in the Slots section.
Note: It is optional to link entities to the intent.
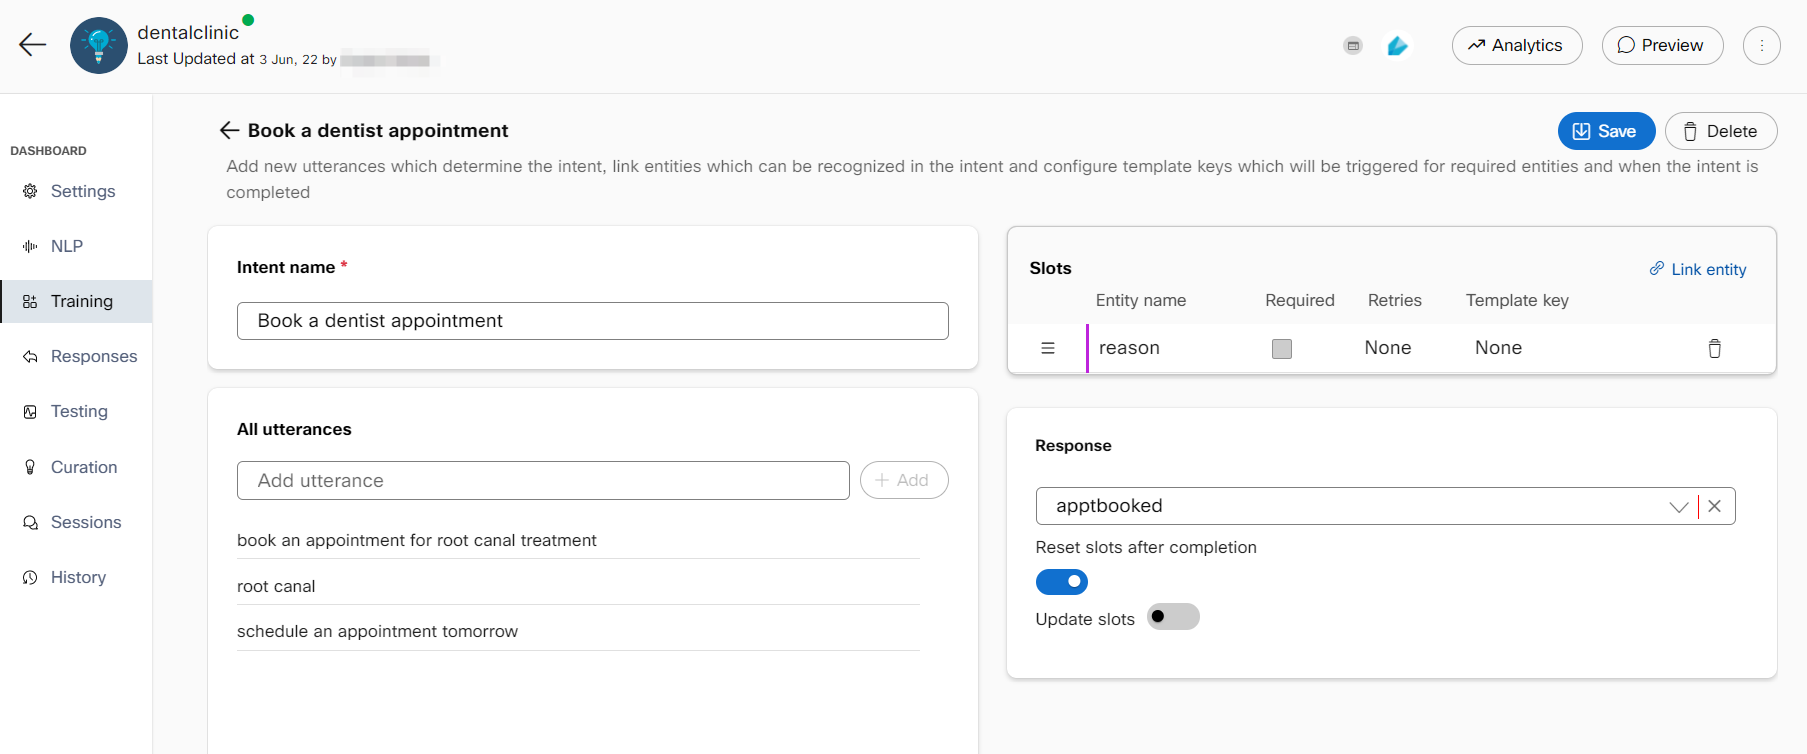
- Select the entity that must be linked to the intent.
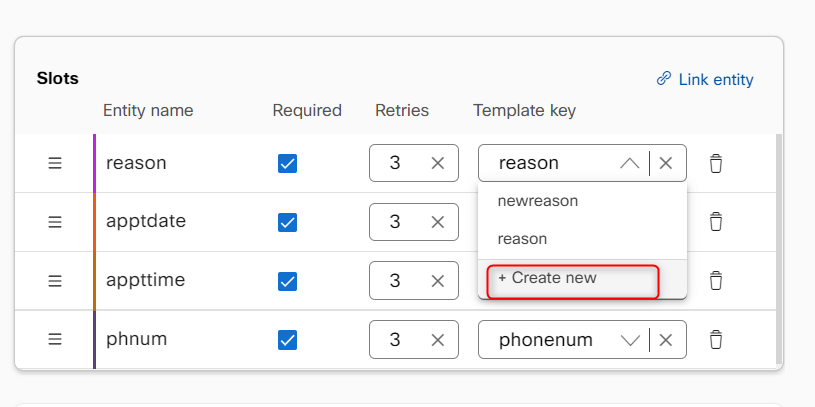
Note: The entities that are defined on the Create entity page are populated in the list. See Defining an entity section. - Modify this information:
Entity Name
The name of the selected entity.
Required
Select this check box to make the selected entity a mandatory slot.
Retires
The number of incorrect inputs after which the fallback message must be displayed to the consumer.
Template key
The template key for the entity. You can define the response that must be displayed to the consumer in this template. See Defining responses section.
Note:
• You can link multiple entities to an intent. You can also delete the entity that is added as a slot, using the Delete option.
• You can rearrange the order of the slots, using the Reorder option. This order is followed by this bot to query the consumer one by one to collect the information.
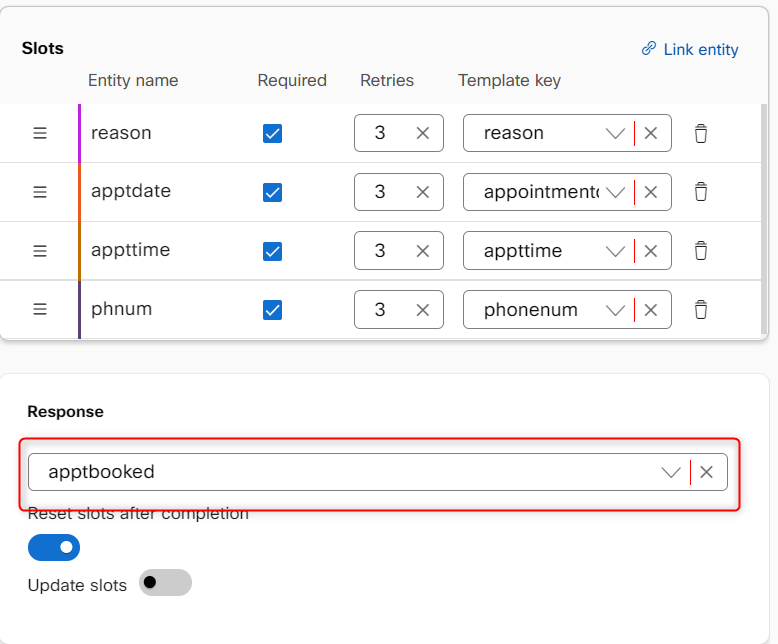
- Select the template key for the final response that must be displayed to the consumer once all the required slots associated with the intent are filled.
Note:
• You can select the template key from the list or create a new template key, using the + Create New option.
• You can select the Reset slots after completion toggle to clear the entities that are recognized in the conversation up until that point for that intent.
- Click Save. The Training data changes to the Saved status.
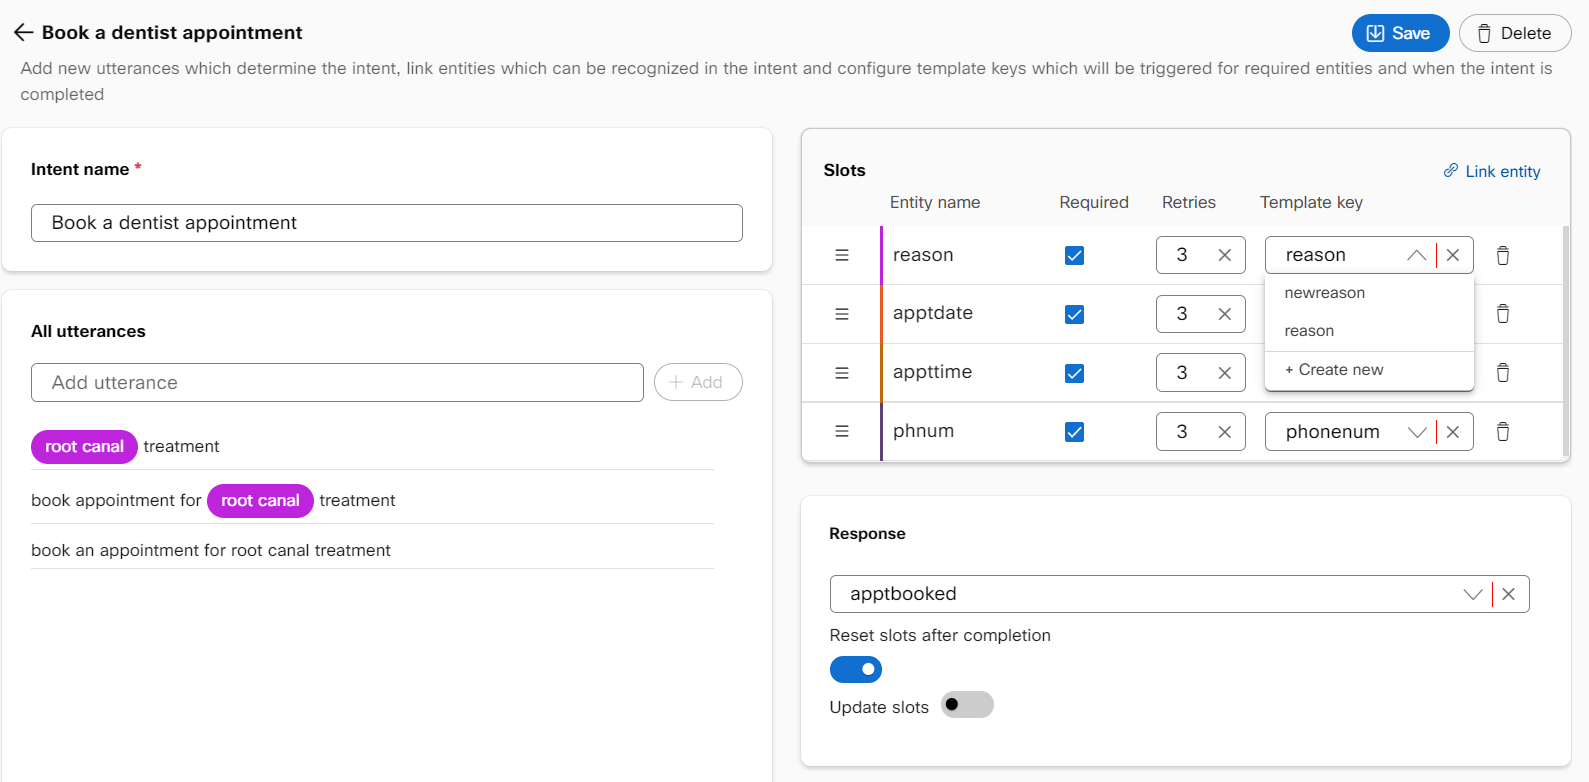
- Click Train to train the knowledge base with the new data that is added.

- Provide the comment to track the reason for changes in the bot’s history
- Click Continue. After the data is trained, the status of the Training data changes from Saved to Trained.
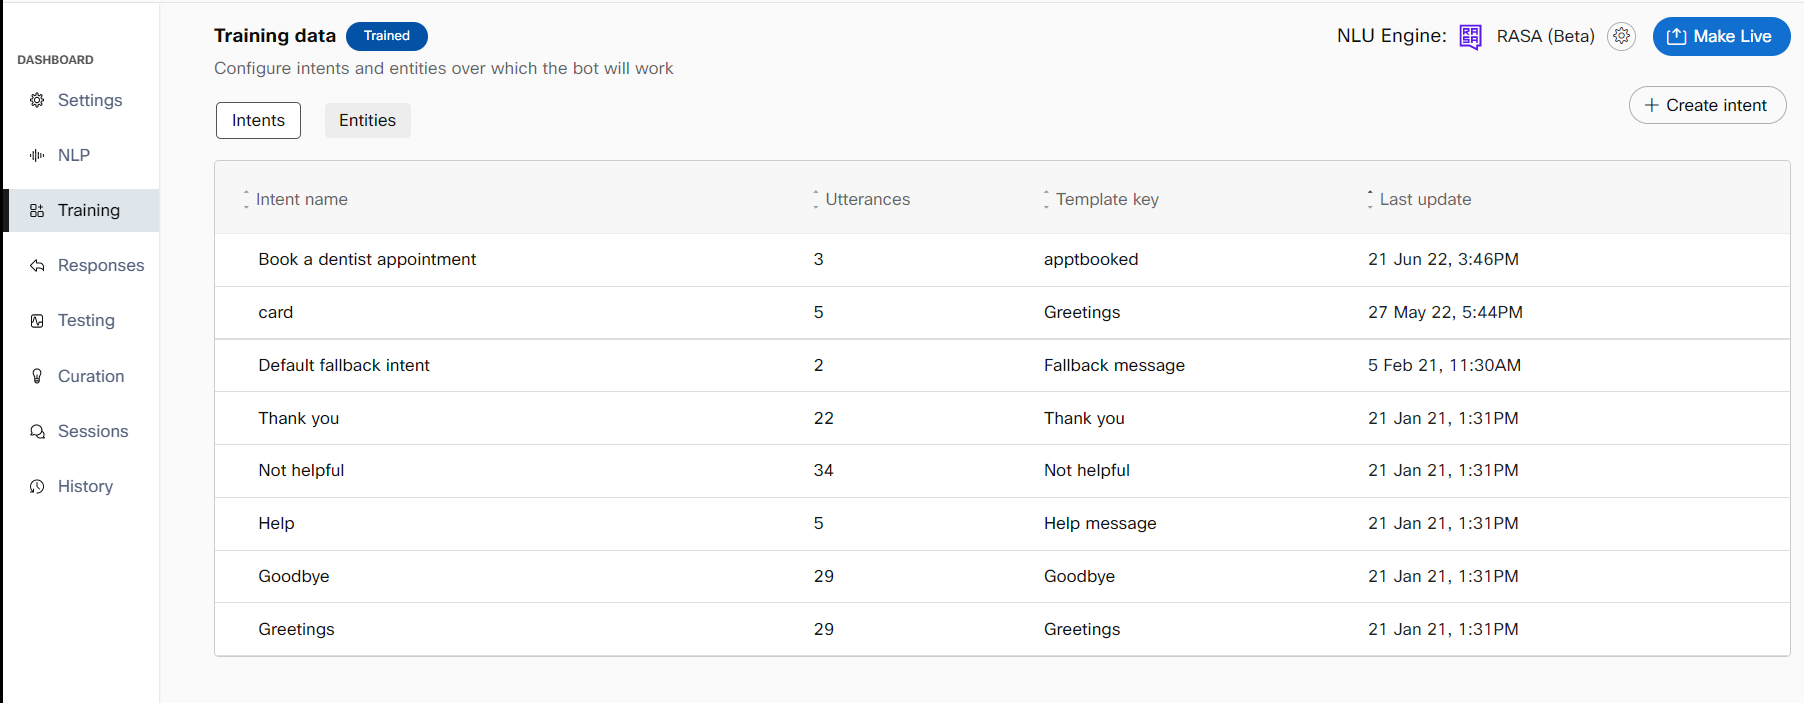
- Click Make live after adding the responses to make this task bot live.
Defining an entity
Entities are data you want to extract from consumer utterances, such as product names, dates, quantities, or any significant group of words. An utterance can include many entities or none.
Use this procedure to define entities that you can link to the intent of a task bot.
- Select a task bot to which the entities must be added.
- Click Articles. The Training data screen appears.
- Click the Entities tab.
- Click +Create entity. The Create entity window appears.
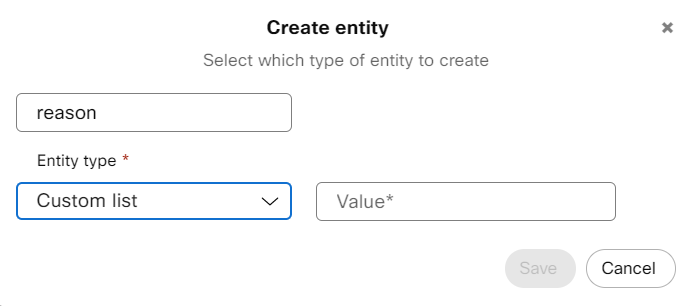
- Specify this information:
Entity name
The name of the entity
Entity type
The type of entity. Possible values:
• Custom list
• Regex
• Date
• Time
• Monetary units
• Ordinal
• Cardinal
• Geolocation
• Non-geolocation
• Organization
• Person names
• Language
• Percentage
• Quantity
• Duration
• Free form
• Map location (WhatsApp)
Value
The value for the entity. You can add multiple values (words) to the entity, using the Add value option.
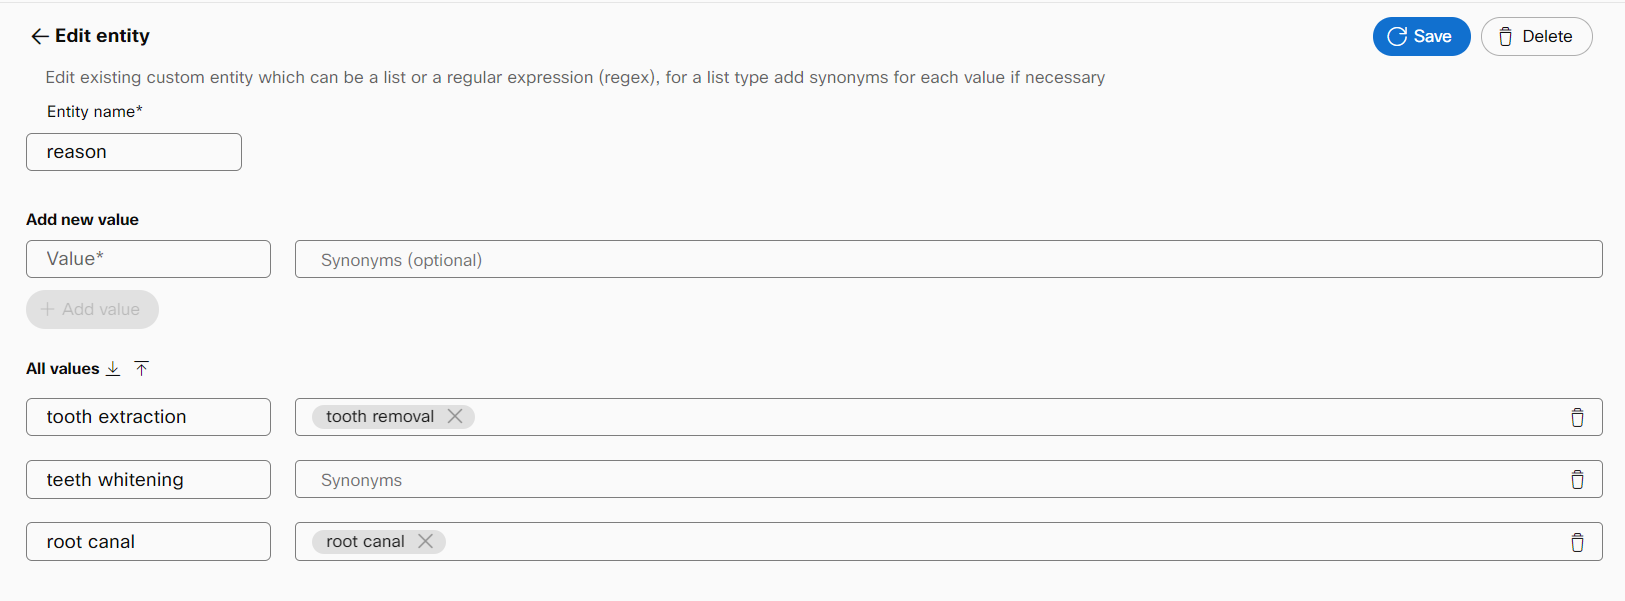
Note:
This field is displayed only when you set the Entity type as **Custom list.
- Click Save.
You can also use this page to:
• Modify the entity details, using the Edit option.
• Delete the entity, using the Delete option.
Defining responses for an intent
Use this procedure to define responses for an intent, which has no or multiple entities. Each entity is linked to a template key. For each template key, a response is defined. There is also a final response that is defined to display for consumers once all the slots linked to a specific intent are filled. The response can be of different types, such as static response, the code editor, and logic builder. The static responses can be in different formats such as, text, carousel, quick reply, image, audio, video, code, and file.
- Select a task bot to define responses for an intent.
- Click Responses. The Responses screen appears.
- Select a custom template that is mapped to the intent through a template key for defining the response.
Note:
You can also modify the responses of the default templates.
- Select the response type for the intent linked to a template key. Possible values:
• Code snippet
• Conditional response - Specify a response that must be displayed to a consumer who queries for the intent mapped to the template key.
- Click Update.
- Click Make live.
Configuring the task bot settings
Use this procedure to configure the bot settings. The bot operations in the application are controlled based on these settings.
- Select a task bot for which the settings must be configured, on the Task bot tab of the Dashboard screen.
- Click Settings. The Bot Configuration screen appears.
- Review or modify this information on the Profile tab:
Bot Name
The name of the bot.
Bot Unique Name
The unique name of the bot.
Description
The description of the bot.
Default language
The language in which the bot is created. By default, the value is set to English.
URL for the Bot Logo/Brand Image
The URL from where the bot logo or image defaults.
Default Platform Error message
The error message is displayed when the consumer query does not match with the data that is in the bot’s knowledge base.
Text orientation
Display of text on the platform. Possible values:
• Left to right (English)
• Right to left (Arabic)
Time zone
Time of a particular country/city. This field is displayed only on the Profile tab of task bots. - Specify this information in the Bot Status section of the Management tab:
Disable bot
Select this option to disable the active bot.
Fallback action
Select this option to take appropriate action on the incoming messages to the bot. Possible values:
• Do nothing: No action is taken.
• Send to Agent: The chat is handed over to an agent based on the incoming messages to the bot.
Disabled Message
The message that is displayed to the consumer who queries a disabled bot. - Specify this information in the Sessions Management section of the Management tab:
Room Close callback
Select this option to trigger the callback API before a room is about to close.
Allow Feedback
Select this option to request feedback from the consumer on every bot-message that is triggered in a session. This displays the downvote and upvote options to consumers for every bot message on the Bot preview widget.
Transactions Per Billing unit
The number of transactions that can be performed for every billing unit.
Session Close Time [mins]
The time after which the session must be closed. The value is expressed in minutes. - Specify this information on the Security tab:
Data retention period (in days)
The period up to which the data is retained. The value is expressed in days.
Allow anonymization
Select this option to make the sessions data anonymous, after the data retention period.
Advanced data protection
Select this option to encrypt sessions and consumer data.
Consent disclaimer message
The disclaimer message for the consent. This field is available only if you enable the Advanced data protection option.
Blanket consent for all consumers
This field is displayed only if you enable the Advanced data protection option. - Specify this information on the Handover tab:
Allow agent handover
Select this option to transfer the consumer to an agent when the bot cannot handle the queries or if the consumer explicitly asks for it.
Enable handover on fallback
Select this option to allow agent handover after a series of fallback messages in a session. This number is configurable.
No. of results to store for each message
The number of articles for which bot’s calculated confidence scores.
Enable handover on partial match - Select this option to allow agent handover after a specific number of consecutive partial matches in a session. This number is configurable.
Enable handover for consecutive messages - Select this option to trigger agent handover after a series of consecutive repeated messages in a session. The number of repetitions required for this trigger is configurable.
- Select the platforms to which the bot must be integrated, on the Integrations tab.
- Click Update bot.
Defining and executing the test cases of a task bot
Use this procedure to define and execute the test cases of a bot. A test case may consist of a series of messages, which can be useful for testing flows.
To define and execute the test cases of a bot:
- Select a specific task bot on the Task tab of the Dashboard screen.
- Click Testing.
- Specify this information on the Testcases tab:
Message
A sample consumer message that contains the kind of messages you expect consumers to send to your bot.
Expected template
The template whose response must be displayed for the corresponding consumer message. This field comes with a smart auto-complete feature to suggest matching templates based on the text typed to that point.
This populates the templates that are on the Responses screen.
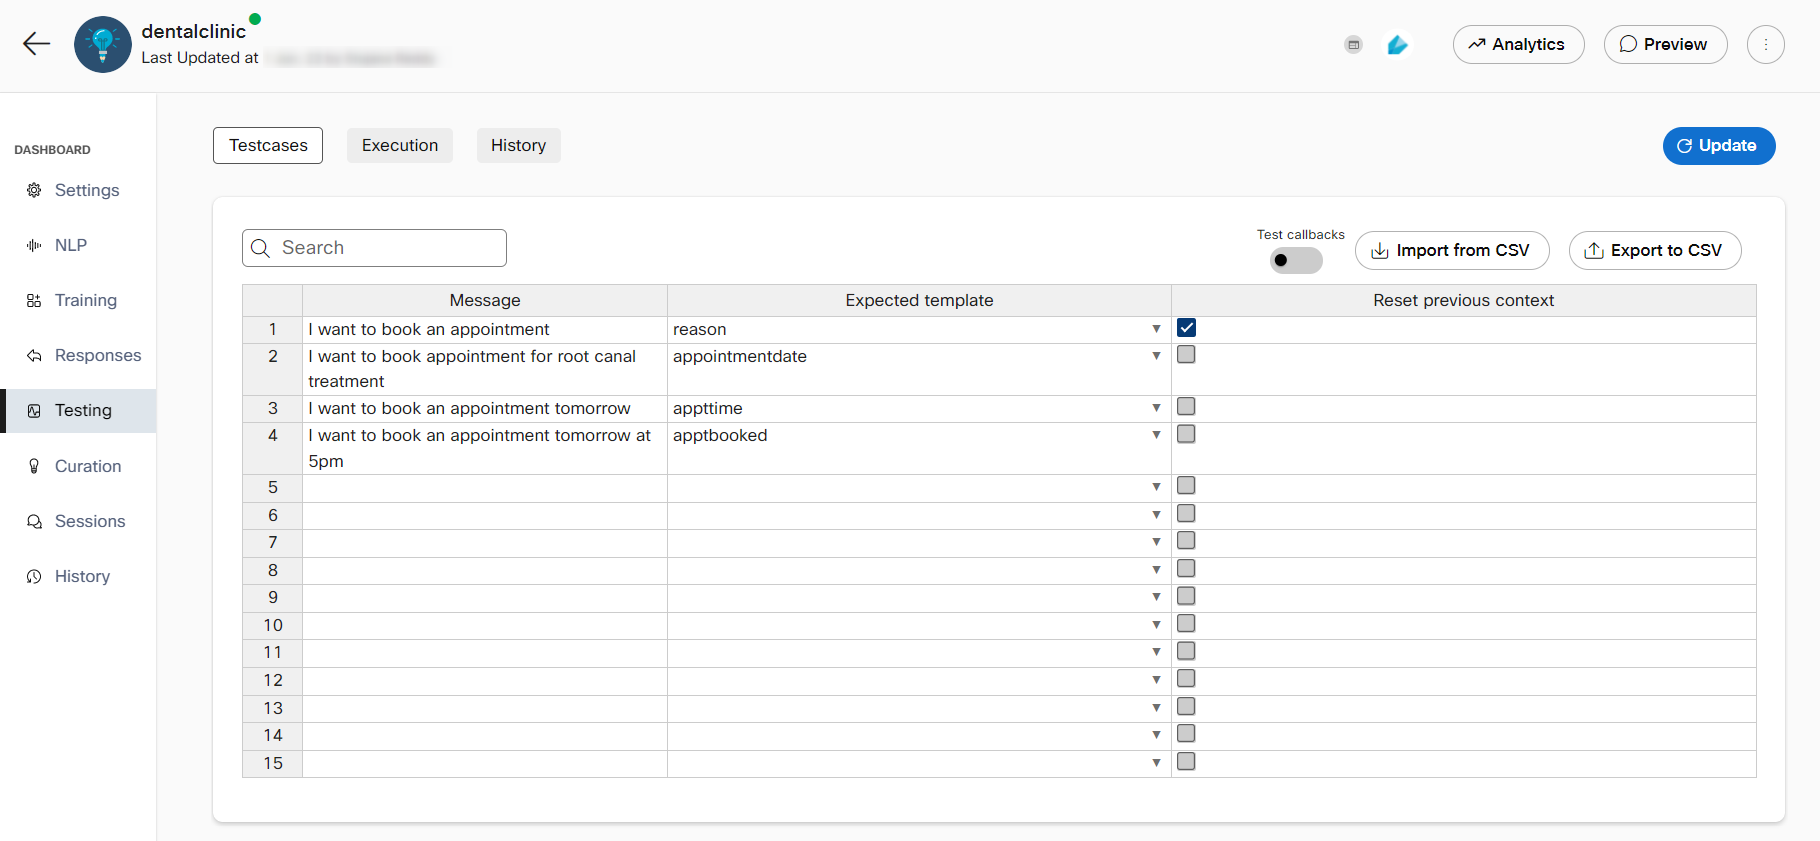
- Select the Reset previous context check box to clear the previous context before executing the test cases.
- Click Execute tests on the Execution tab to run and execute the test cases.
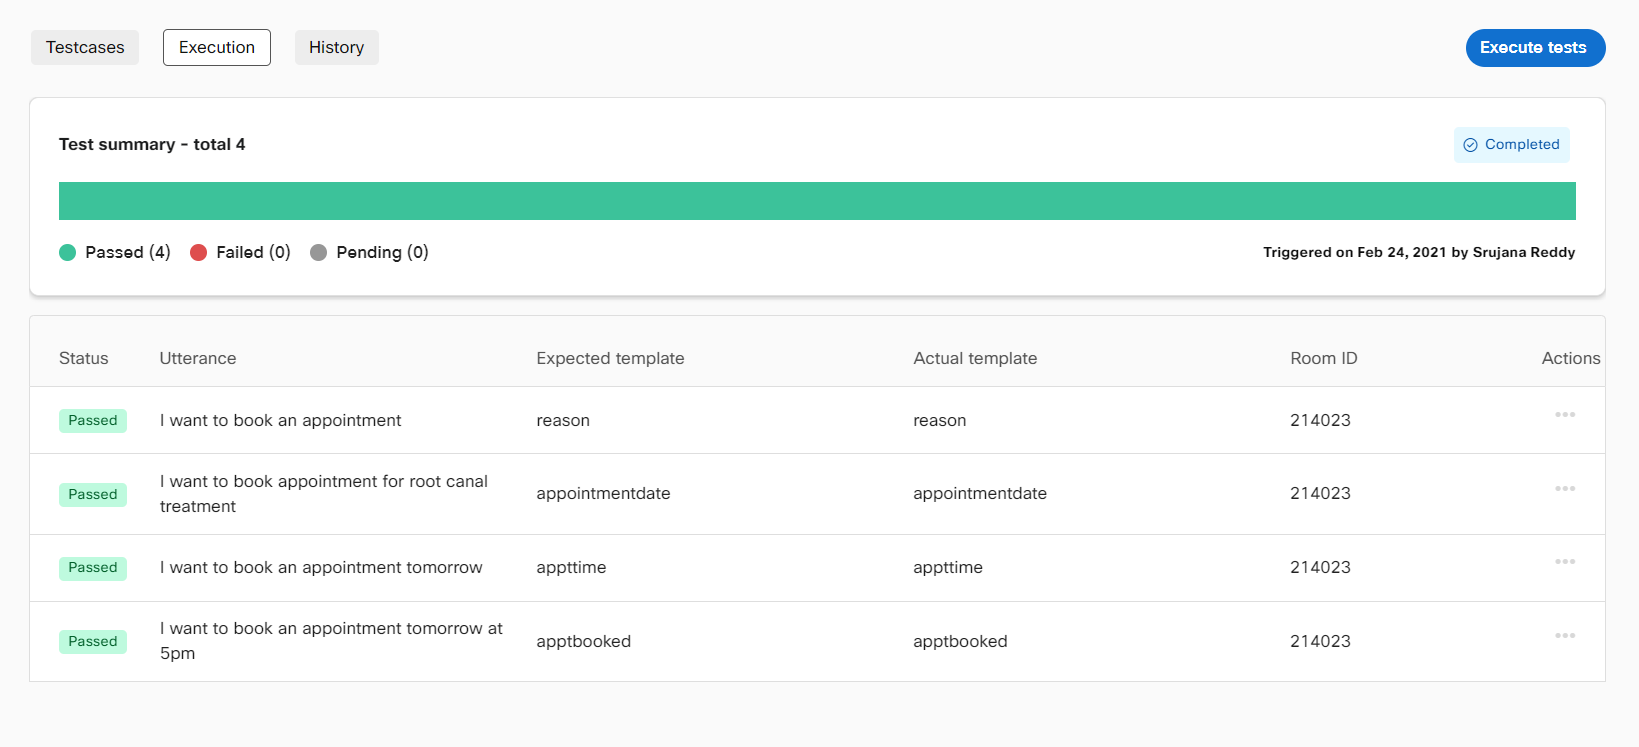
- Select to execute test cases on the latest trained version of the bot or the live version.
Note: You can abort the test cases midway, using the Abort run option. - Review the test summary that provides details, such as a number of passed test cases, failed test cases, pending test cases, triggered dates, and status of execution.
- Review this information:
Status
The status of the test case that is executed. Possible values:
o Pass
o Fail
Utterance
The query of a consumer.
Expected template
The response template is expected to be displayed for a consumer query.
Actual template
The actual response template that is displayed for a consumer query.
Room ID
The room ID that is generated for a consumer whenever the conversation is initiated
You can perform these actions from the Ellipses option in the Action field:
• Click Transaction details to view the transaction information of a specific utterance that is displayed on the Sessions screen.
• Click Test in Preview to test the articles in the preview chat widget.
• Click Copy transaction ID to copy the transaction ID for viewing the transaction information of a specific utterance in the log management system.
Updated 8 months ago
