Setting up a Two-way Appointment Reminder in Webex Connect
Sending an SMS to your customers is a great way of reminding them about their upcoming appointments. This tutorial walks you through the process of setting up an automated SMS appointment reminder flow.
Step 1: Create a Service
Create a new service to manage this use case.
Step 2: Get a Phone Number & assign it to the service
Step 3: Create a Flow to Send Appointment Reminder
1. Create a New Flow
2. Configure a Custom Event
- Select 'Custom Event' on the Select Trigger Category screen that's shown while creating a new flow
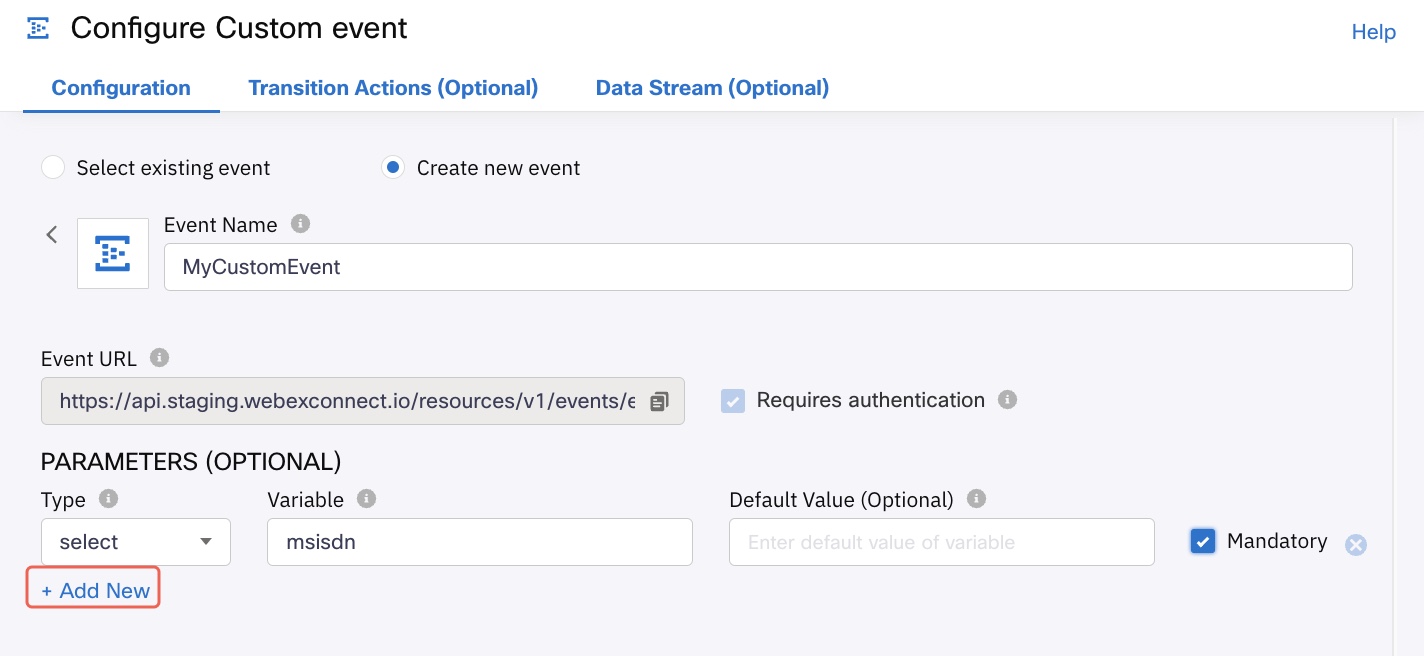
- On the next window, configure your custom event. Select the "Create New Event" option
- Name the custom event. Then, define the parameters that will be used in the flow.
- Under the PARAMETERS (OPTIONAL) section, choose the TYPE as String from the drop-down.
- Enter msisdn as the variable.
- Check the Mandatory box.
- Click on +ADD NEW to define another parameter & define all the parameters as follows
3. Configure Send Node
- You will then see the Visual Flow Builder screen with the custom event node already present on the flow canvas.
- Drag and drop a Send SMS node from the node palette to the left of the screen, under the UTILITIEStab.
- Connect the custom event node with the Send SMS node by dragging the green dot towards the Send node.
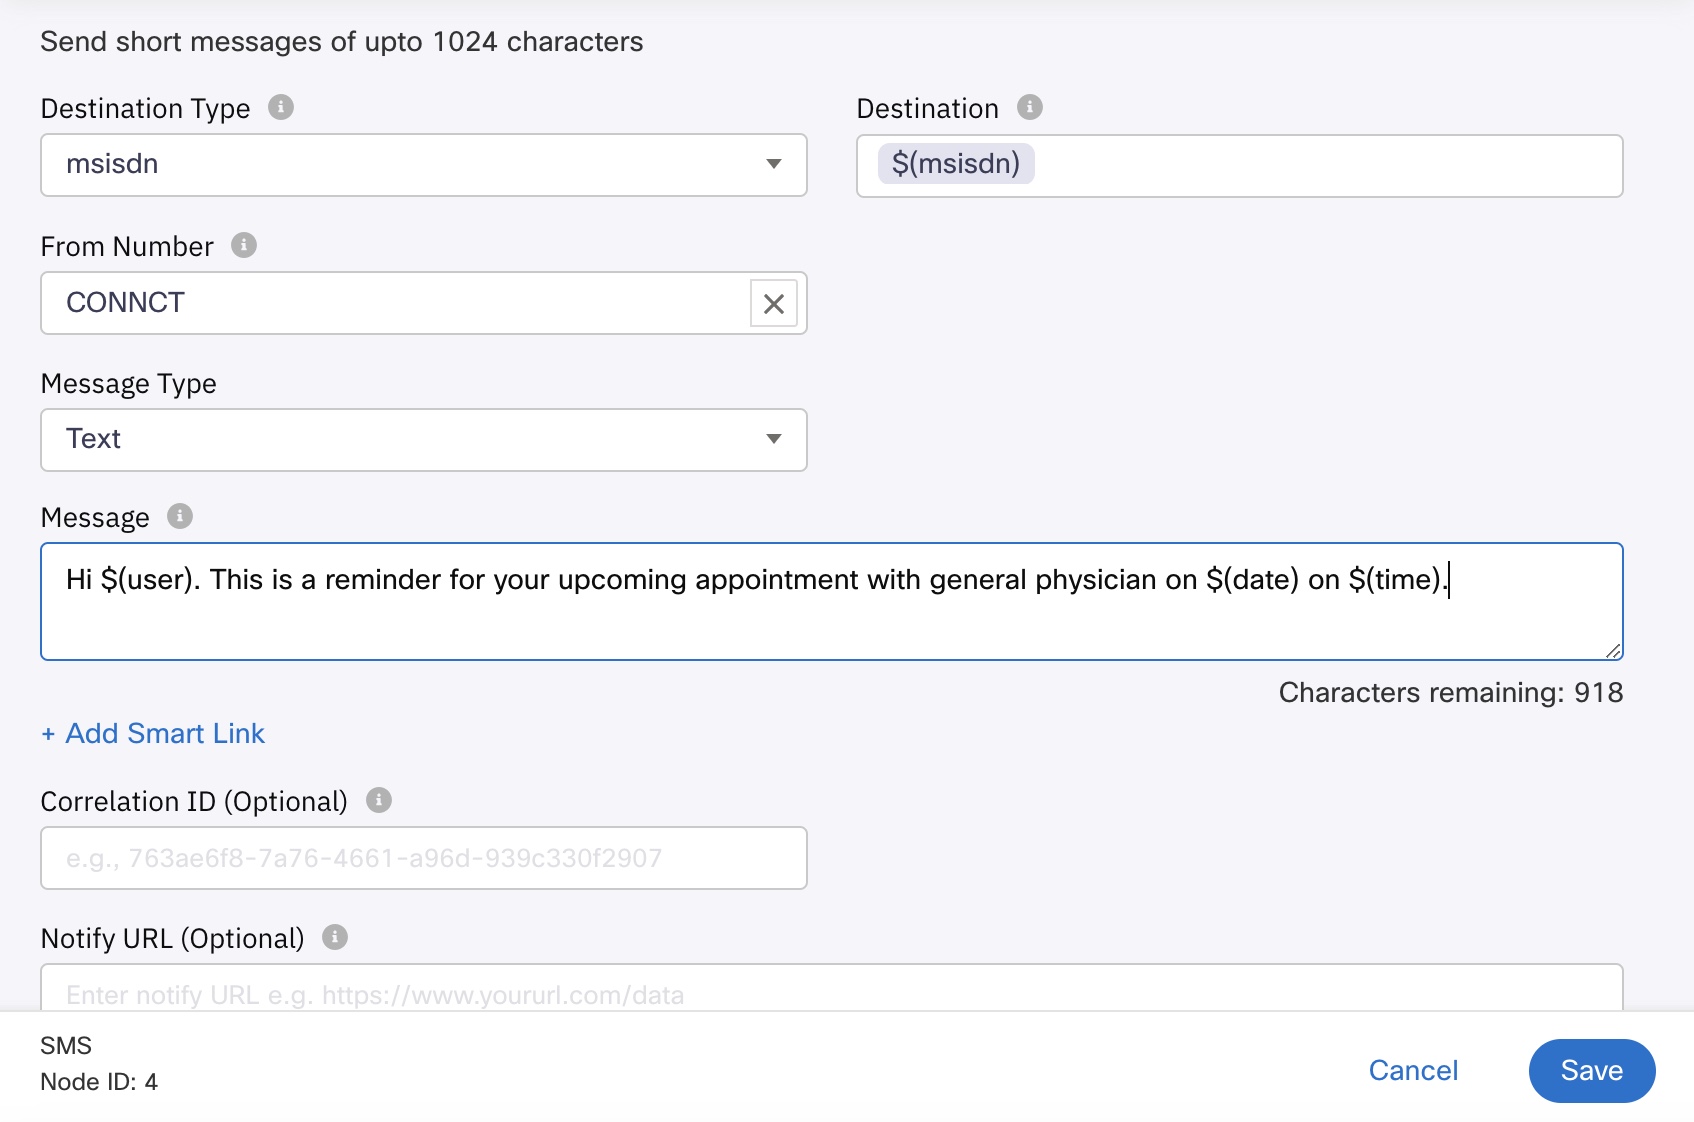
- Double-click on the Send node to configure its parameters. You will arrive at the configuration window.
- Here, enter $(msisdn) in the DESTINATION field.
Note
MSISDN stands for Mobile Station ISDN number, which refers to the mapping of the telephone number to the SIM card. In simple words, it's the mobile number
- Select the sender id from the drop-down under FROM NUMBER
- Type the message that you wish to send to your customers in the MESSAGE section and click on SAVE to save these settings.
4.Configure Exception handling details for the node
- Set up 'onPolicyFail' exception.
- Set up 'onError' exception.
Step 4 : Configure Receive Node
1. Add the Receive Node
Drag and drop the Receive node onto the flow canvas from the left node palette under UTILITIES.
2. Configure the Receive Node Parameters.
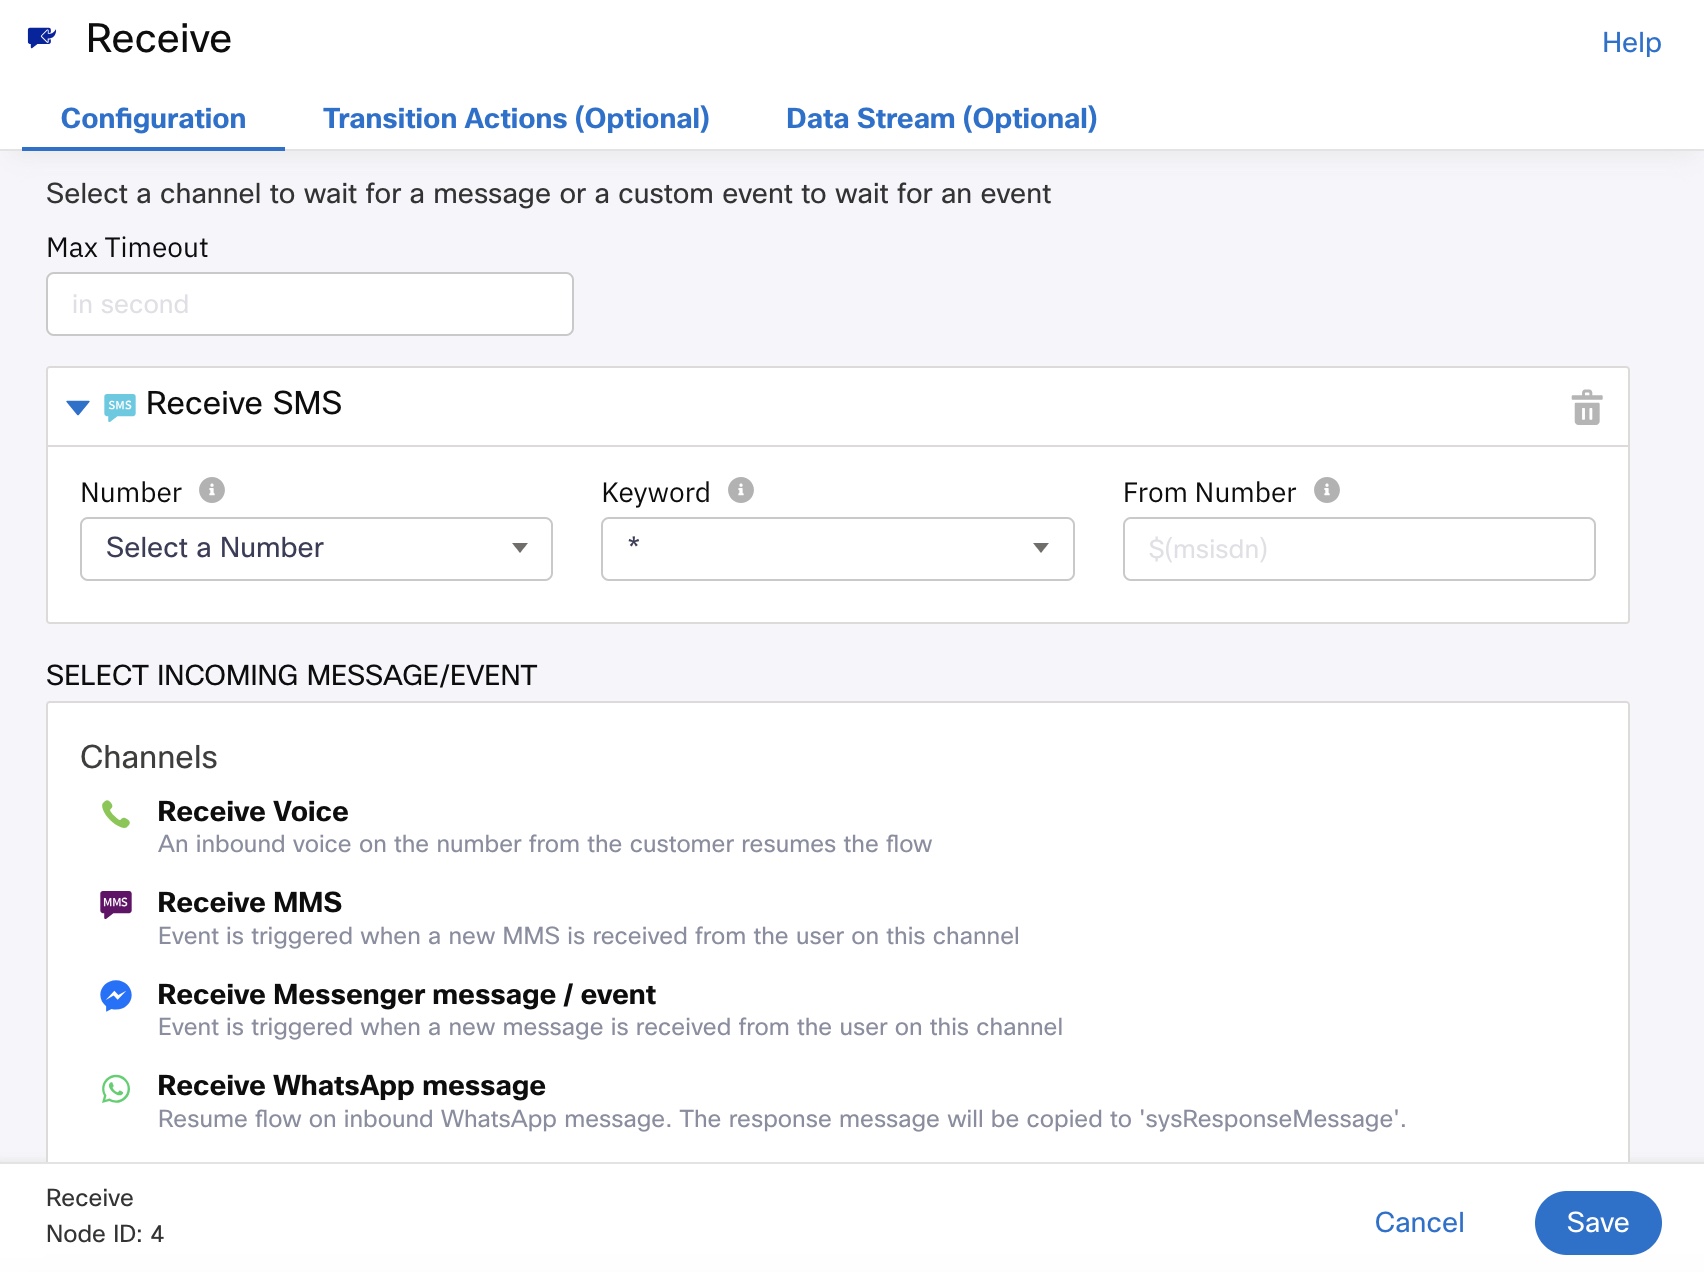
- Double-click on the Receive node to open its configuration settings.
- Enter the phone number along with the country code for the service in the Number field.
- Enter * in the keyword field.
- Enter $(msisdn) in the From number field.
- Configure the timeout duration i.e. the time the flow should be in wait-for mode for receiving the message
- Enter a name for the node in the Name field.
- Click on SAVE at the bottom.
3. Configure Exception handling for the node
- Set up 'ontimeout' exception.
- Set up 'onError' exception.
Step 5: Evaluate Customer Response
The Branch node is used to perform conditional actions based on the customer response. It evaluates the customer’s response and directs the flow to proceed further accordingly.
1. Add the Branch Node
Drag and drop the Branch node onto the flow canvas node palette to the left under UTILITIES.
2. Configure the Branch Node
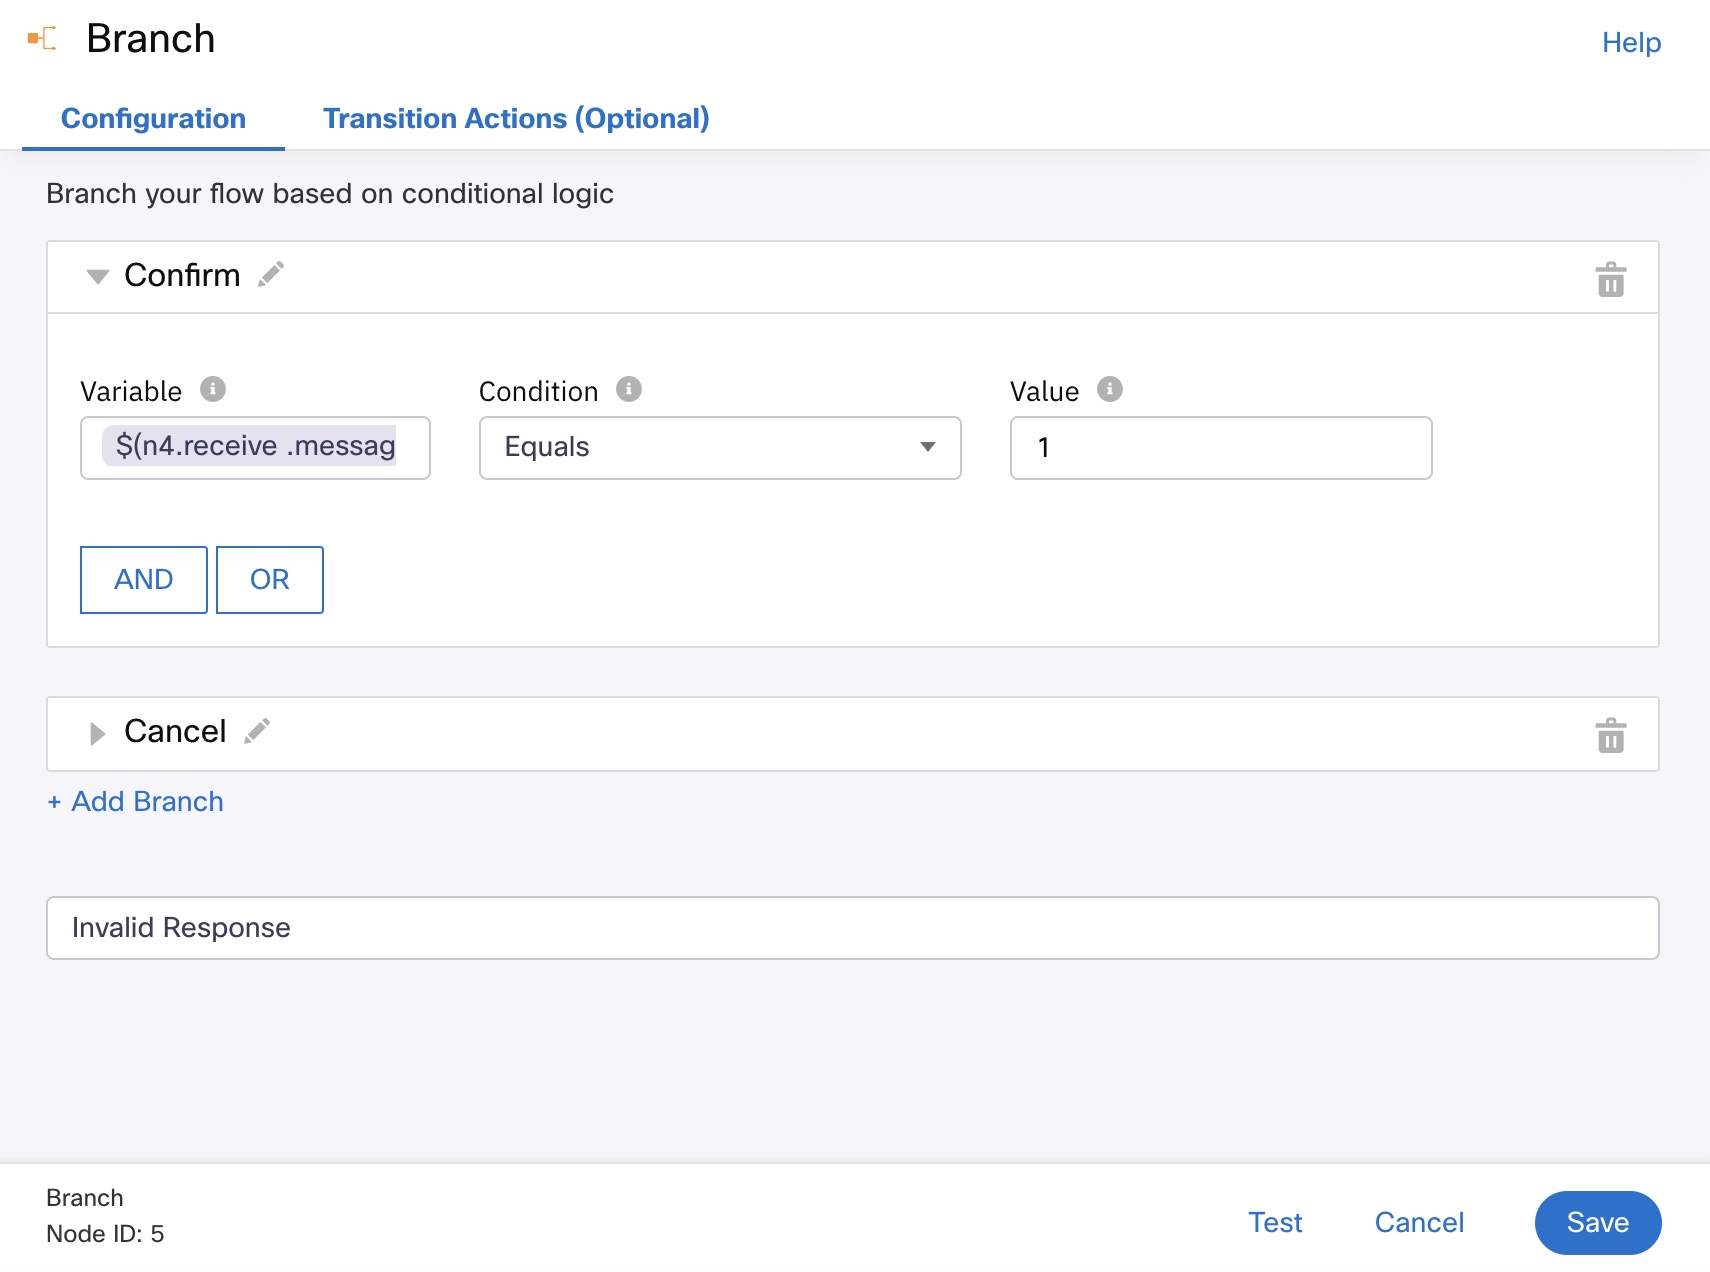
Double-click on the Branch node to configure its settings.
Configure Confirmation Conditions:
- Name the branch condition appropriately. For instance, Confirm
- Enter the system generated variable [e.g. $(n25.receive.message) in this case] in the VARIABLE field.
- Select the CONDITION as Equals from the drop-down.
- Enter the relevant value in the Value field. For example, in this case, it should be 1 as mentioned in the SMS message.
- Click on ADD BRANCH to add a new branch.
Configure Cancellation Conditions:
- Name the branch condition appropriately. For instance, Cancel
- Enter the system generated variable (i.e. $(n25.receive.message) in this case) in the VARIABLE field.
- Select the CONDITION as Equals from the drop-down.
- Enter the relevant value in the Value field. For example, 2.
- Click on ADD BRANCH to add a new branch.
Configure Other/Default Response:
- Enter a default message in the message box provided below +ADD BRANCH. In this case, Invalid Response.
3. Configure Exception handling for the node
- Set up 'onError' exception
Step 5: Send Appointment Confirmation Message
1. Add the Send Node
Drag and drop the Send SMS node onto the flow canvas node palette to the left under UTILITIES.
2. Configure the Send Node
Double-click on the Send node to configure its parameters. You will arrive at the configuration window.
- Click on SMS on the Settings window.
- Enter $(msisdn) in the Destination field. msisdn stands for Mobile Station ISDN number. It's an alternative name for the mobile number.
- Choose msisdn from the Destination Type drop-down.
- Choose Text from the Message Type drop-down.
- Choose the assigned phone number for the service from the sender id drop-down.
- Enter the message to be sent to the customer in the Message box.
- Enter a name for the node in the Name field.
- Click on SAVE.
3. Configure Exception handling for the node
- Set up 'onError' exception
Step 6: Cancelling the Appointment
1. Add the Send Node
- Drag and drop the Send SMS node onto the flow canvas node palette.
2. Configure the Send Node
- Follow the process mentioned in Step 2 of Confirming the Appointment.
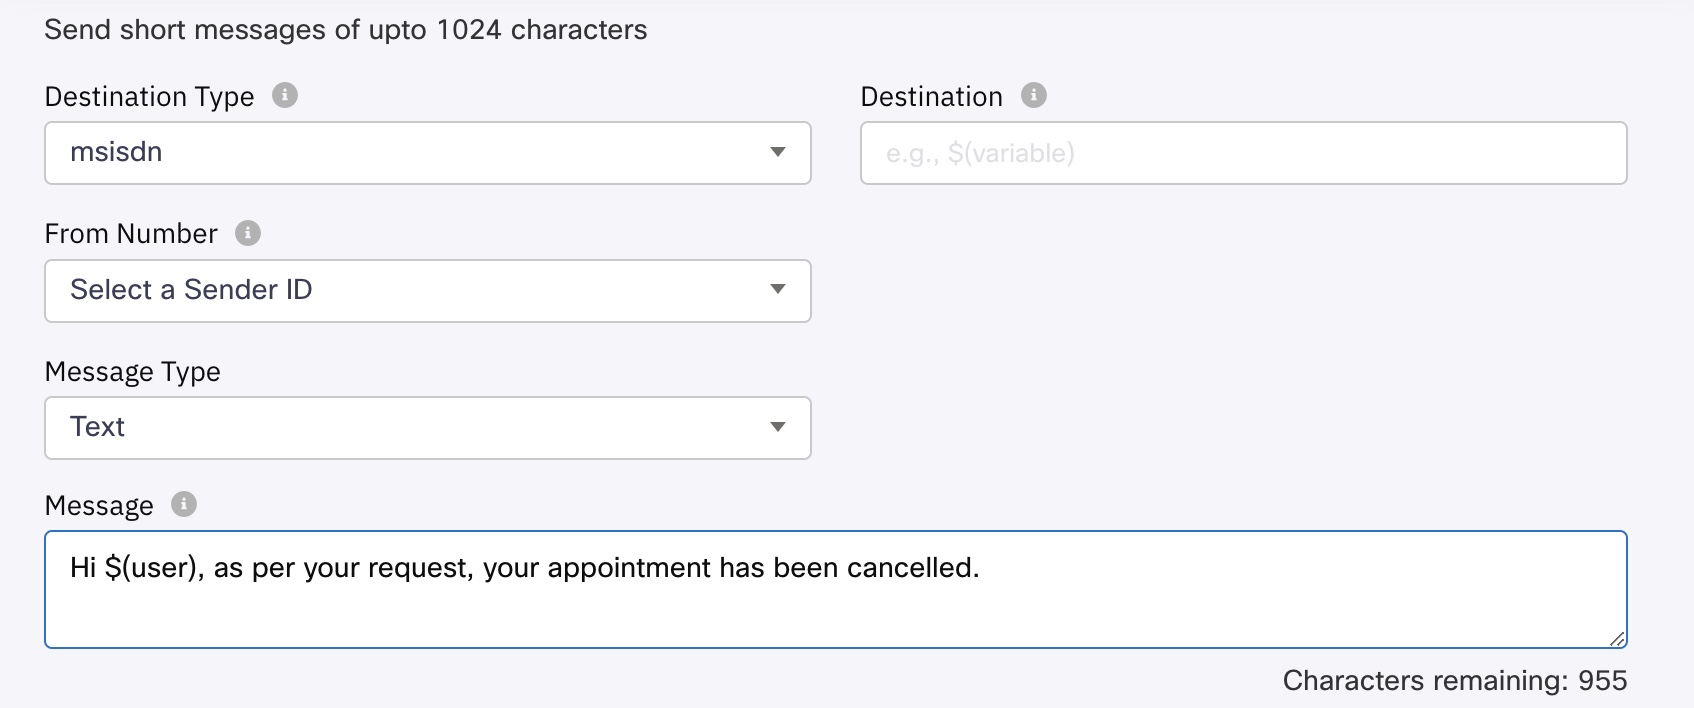
Note: The messaging in the Message box for canceling the appointment will differ from what is written in Step 2 of Confirming the Appointment. Refer to the image below.
3. Configure Exception handling for the node
- Set up 'onError' exception
Step 7: Handling Invalid Customer Responses
1. Add the Send Node for Invalid Response
Drag and drop the Send node onto the flow canvas.
2. Configure the Node
Follow the process mentioned in Step 2 of Confirming the Appointment.
3. Configure Exception handling for the node
- Set up 'onError' exception
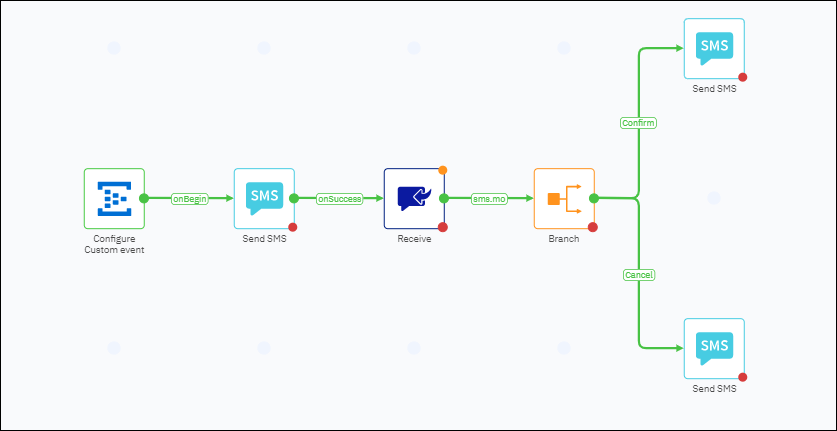
The overall flow appears as shown below:
Step 8: Publish the Flow
Step 9: Configure the Event Scheduler
Event Scheduler is used to trigger the custom event at specific time intervals that can be set as per customer preferences. It also allows large entries of data to be fed through .csv files that have variables the same as the ones defined in the custom event. All the values for each of the values can be fed through these files using the event scheduler. Follow the below procedure to create an event in the Event Scheduler for triggering the appointment reminder service:
1. Create an Event in the Event Scheduler
- After logging in to Webex Connect, click APP TRAY icon from the left Menu bar.
- Click the Event Scheduler option from the menu which will lead you to the Event Scheduler configuration window.
2. Configure Event Scheduler
- Choose a name for the event on the Create new trigger screen.
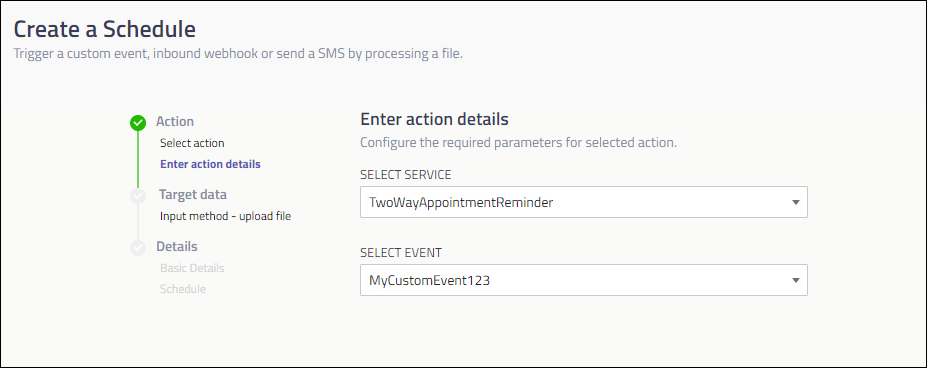
- Select the service from the Select Service drop-down.
- Select the Send Trigger notification to the Email ID checkbox.
- Enter the Email ID to which the notifications have to be delivered. However, this is optional.
- Click Next.
3. Configure Action
- Select CUSTOM EVENT under Type of Action.
- Select the custom event from the Select Event drop-down.
- Click Next.
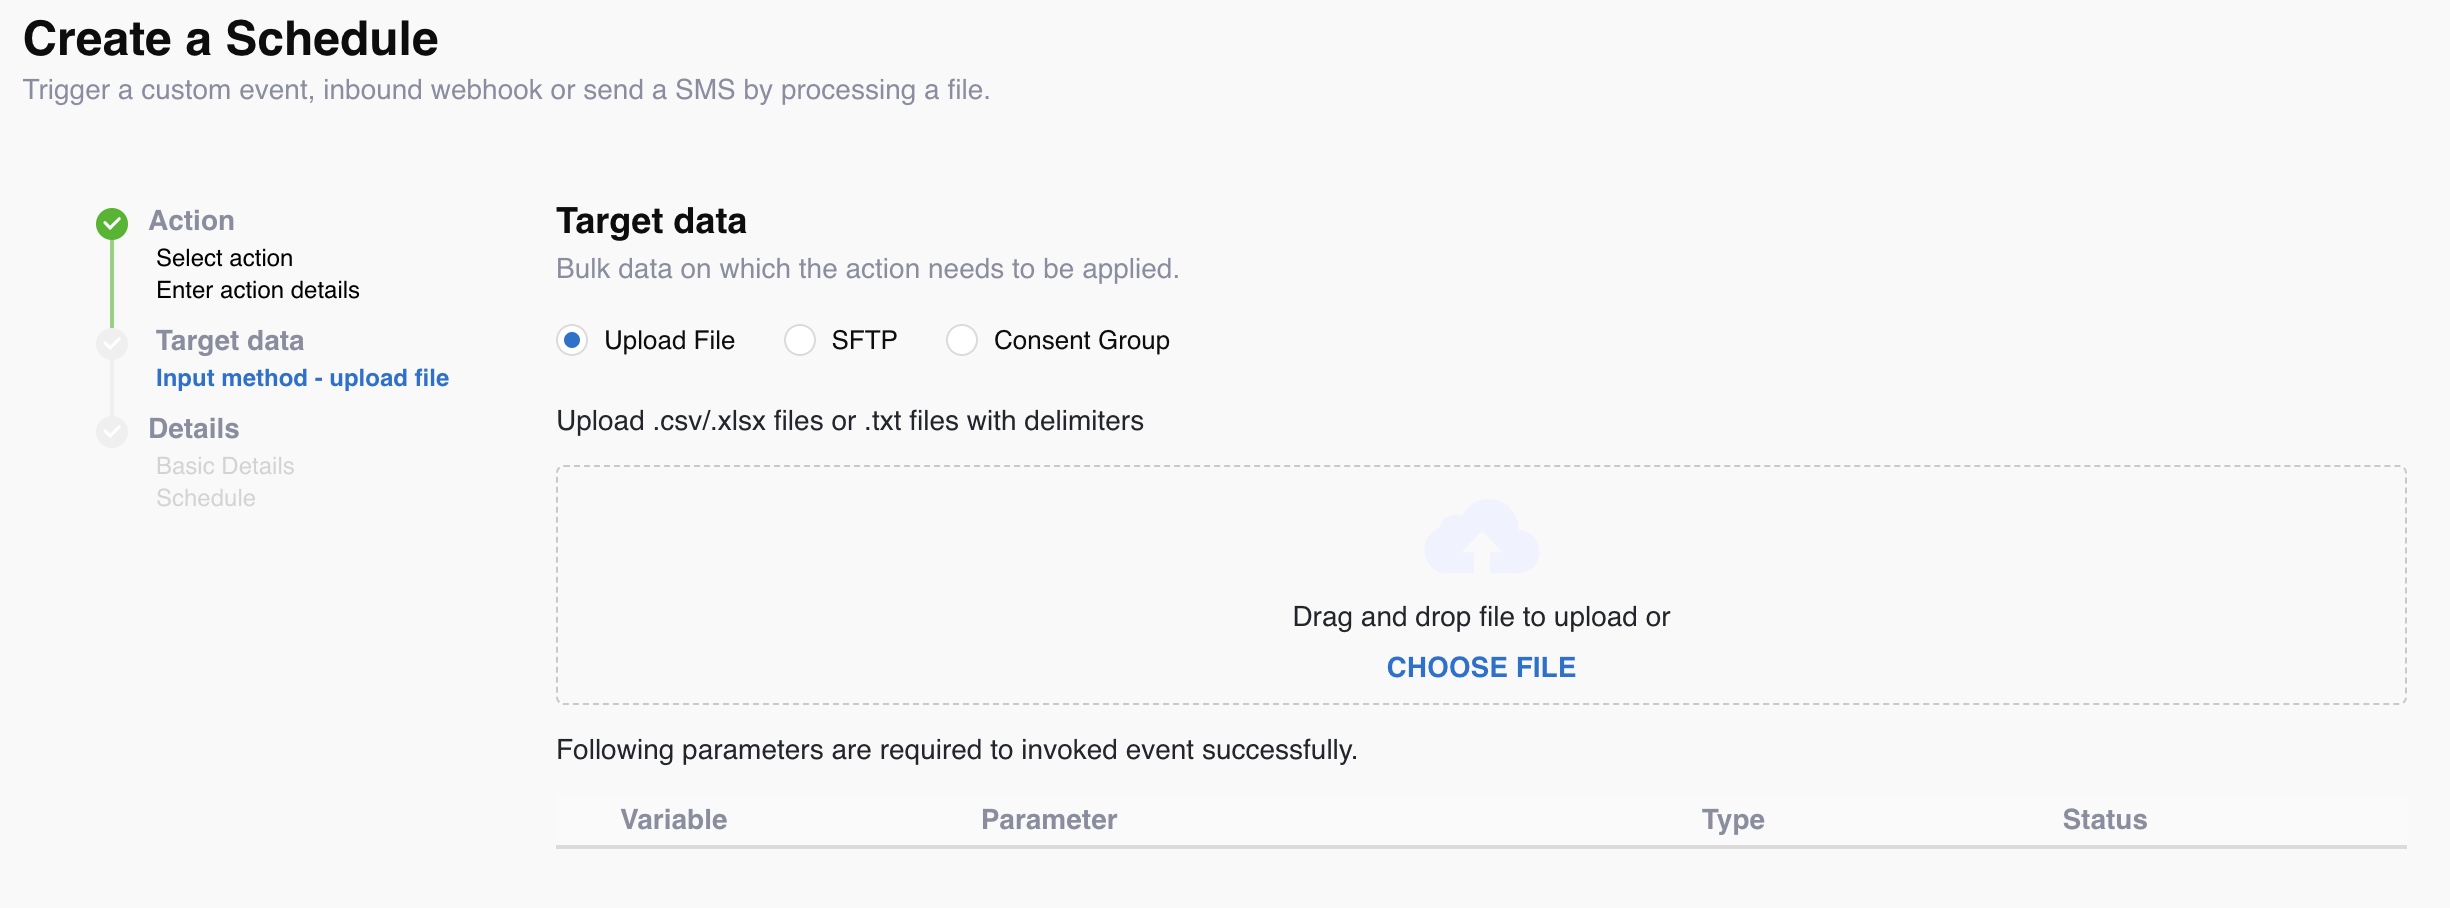
4. Configure Target Data
- Select the Upload file option.
- Upload the .csv file.
- Click Next.
5. Configure Schedule
- Select the Frequency under How Often.
- Choose the Date and Time from when the event has to be active by clicking on the popup calendar.
- Click Next.
The appointment reminder setup is now good to go!
Updated 4 months ago
