
HTTP Request Node
The HTTP Request node enables you to perform requests to external API services. The HTTP Request node makes an HTTP request to the specified server and processes the response.

HTTP Request Node
Node Configuration
Drag-and-drop the HTTP Request node onto the visual flow builder and double-click it to open the configuration window. Perform the following steps to complete the configuration:
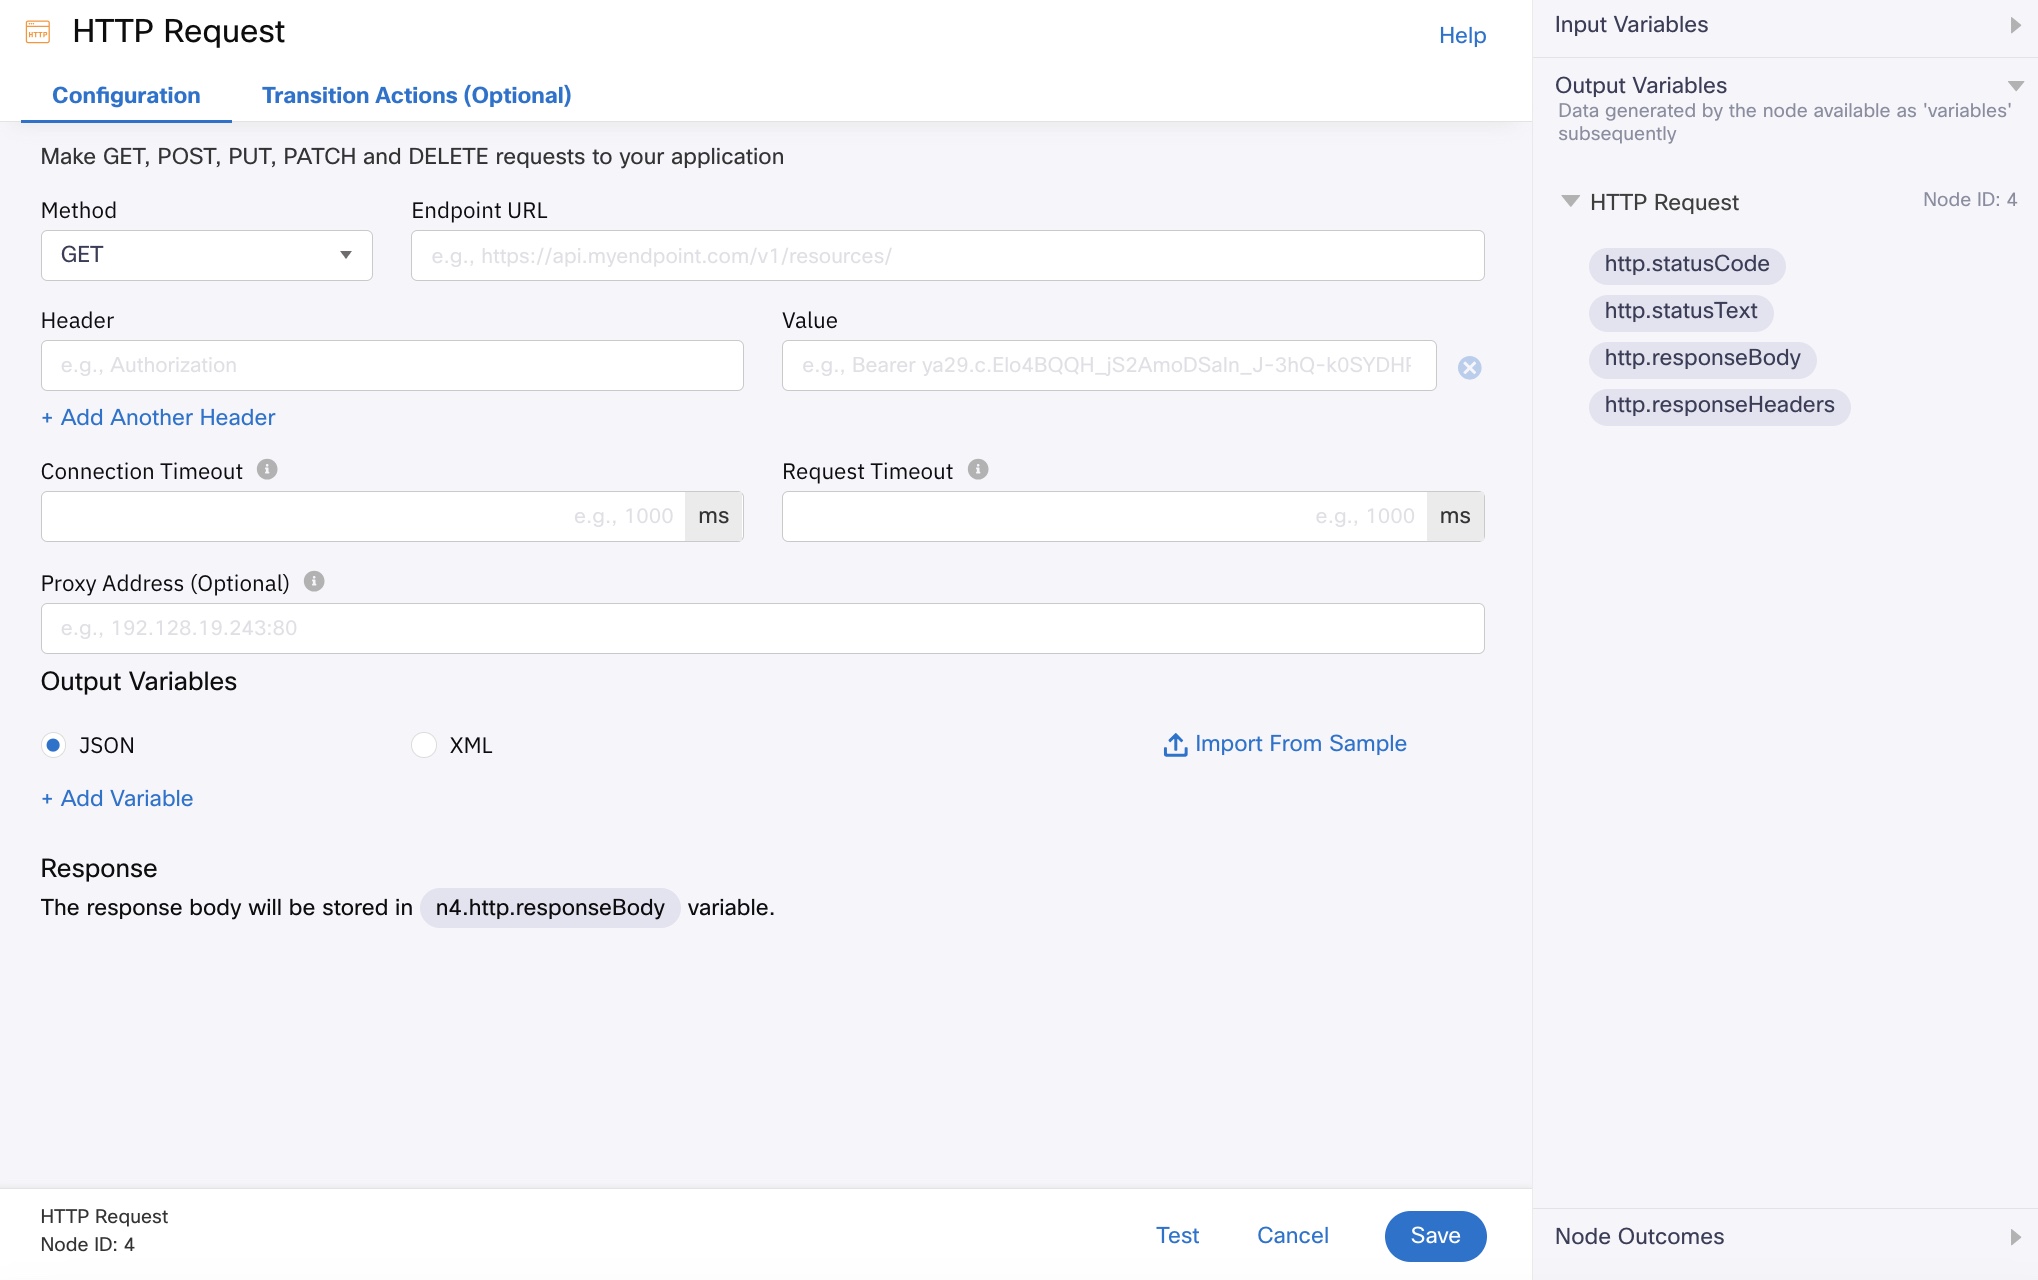
- Select the relevant Method:
- GET - use this method when you need to retrieve data from a server at the specified resource.
- POST - use this method to send data to the API server to create or update a resource.
- PUT - use this method to pass data from a server at the specified resource.
- PATCH - use this method when you need to update partial resources. For example, you can use it when you need to update only one field of the resource.
- DELETE - use this method to delete the resource at the specified URL.
- Enter the Endpoint URL to which you will send the HTTP request.
- Enter the request Header and its Value. You can add multiple headers by clicking the Add Another Header button.
- Specify the request Body. The request body is required only for POST, PUT and _PATCH _methods.
- Provide a value for Connection Timeout in milliseconds. Starting release v5.6.3 onwards, the max. timeout configuration is 20,000 milliseconds. This is the time after which the connection to the endpoint times out. If a connection is not established within the specified time, the node proceeds to the error edge.
- Provide a value for Request Timeout in milliseconds. Starting release v5.6.3 onwards, the max. timeout configuration is 20,000 milliseconds. This is the time after which the HTTP request timeout. If a response is not received within the specified time, the node proceeds to the onTimeout edge.
- Enter a Proxy Address. The proxy address is the additional IP address to access the HTTP URL. This is optional.
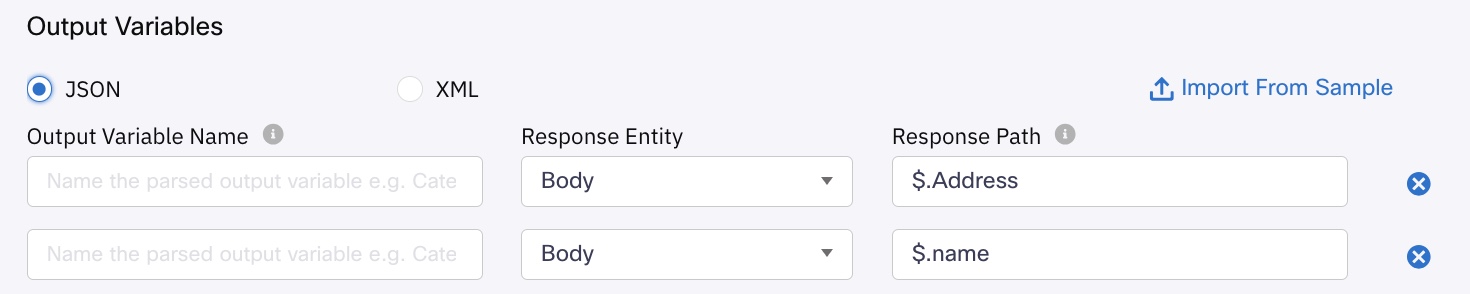
- In Output Variables, select JSON or XML.
- Click Import from Sample.
- In the Data Parser dialog box, paste your sample and click Parse.

- Click Parse. All the values will be extracted as shown below.

- Select the required parameters under the Select key paths to be extracted.
- Click Import. All the selected parameters will populate as shown below in the selected output variables.
- Click Test to test the HTTP request configuration. See the Test the HTTP Request section.
- Click Save to complete the configuration.
Note
You can only use alphabets, numbers, underscores, hyphens, and spaces in the variable names.

-
Click Save.
-
Click Test to test the HTTP request configuration. See Test the HTTP Request section.
-
Click Save to complete the configuration.
Looking to integrate with an API that supports OAuth 2.0 based authentication?
If you're looking for invoking an API that supports OAuth 2.0 based authentication mechanism, you can use Custom Integration Node capability. Please refer this page for more info.
Input Variables
You can see a list of all the flow variables available for this node under this pane. You can also search for a variable using the Search field. For more information, see the Variable Management section.
Custom Variables
You can see the list of variables that you explicitly create and configure for this node under the Custom Variables pane. For more information, see the Variable Management section.
Output Variables
You can see the data that this node generates as output variables. These variables are available for use in subsequent nodes. The standard output variables for this node are:
- https.statusCode - contains the status code of the HTTP request
- https.statusText - contains the status message of the request sent
- https.responseBody - contains the response body of the request sent
- https.responseHeaders - contains the response headers of the request sent.

Output Variables
Node Outcomes
You can see the list of possible node outcomes for this node under this pane. You can customize the node labels using the Edit (pencil) icon. The node exits through one of the node edges corresponding to the outcome of the node.
| Node Edge | Node Event/Outcome |
|---|---|
| Success (green) | * onSuccess - the flow exits through this node when the HTTP request is successfully executed |
| Error (red) | * onError - the flow exits through this node when the HTTP request cannot be processed due to invalid input |
Test the HTTP Request
After you provide all the required parameters for configuring the HTTP Request node, test it to make sure that the configuration works.
- Click Test. The Test window appears.
- Specify the Request Parameter and the Response Type.

Test Window
- Click the Test button to test the HTTP request.
Transition Actions
Use this tab to configure the transition actions for On-enter/On-leave events. However, configuring transition actions is optional. For detailed instructions about configuring the transition actions, see Node Transition Actions.
Updated 7 months ago