
Webex Engage users who want to use Email as a channel of customer support with Webex Contact Center can configure an email asset. We support the following email service providers:
- Gmail
- Office365
For the above service providers, we have two authentication methods:
- Username and Password
- OAuth 2.0
You can map your support email addresses with Webex Connect by following the steps below:
The following Email App Configuration instructions are applicable only for Webex Contact Center and Webex Connect integration. If you have a standalone Webex Connect tenant please refer to Email App configuration instructions available at this page.
Configuring Email channel asset on Webex Connect
Supported Email Providers
Currently, only Gmail and O365 is supported by the Webex Connect platform for Cisco Webex Contact Center.
Follow the below steps to map your support email addresses with Webex Connect:
- Log in to Webex Connect platform.
- Navigate to Assets → Apps.
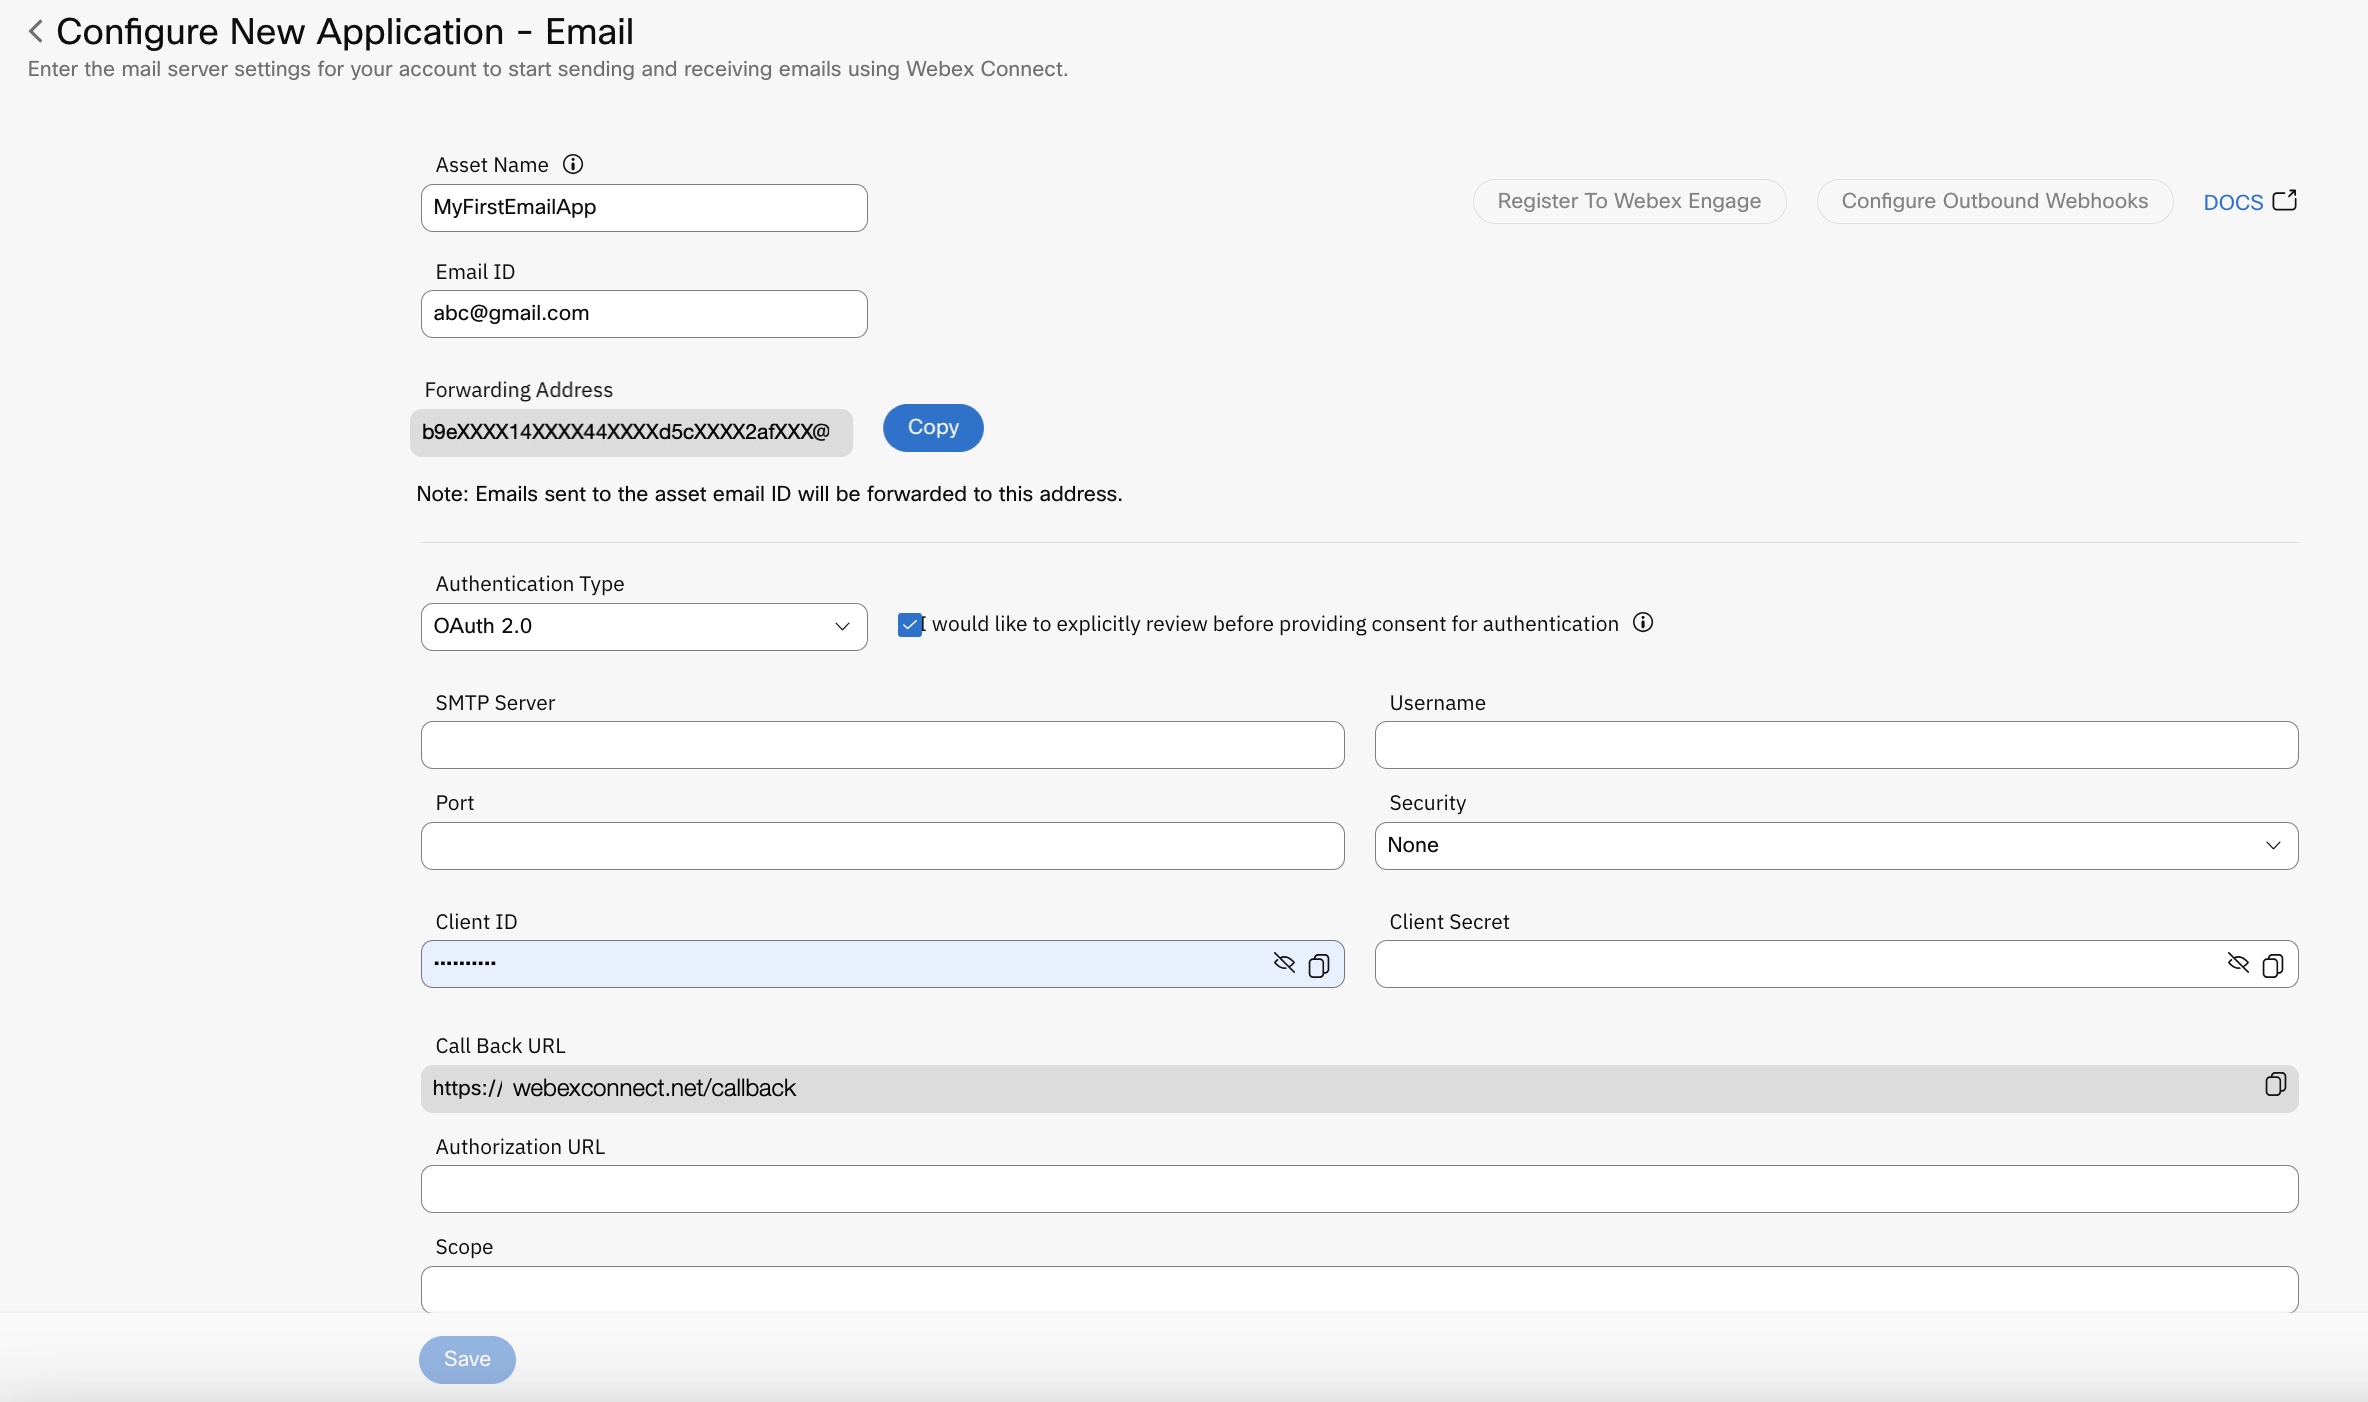
- Click Configure New App and then select Email.
Configure New Application - Email page displays.

- Enter a user-friendly name for the Asset.
- Enter a valid Email address (such as support@CLIENT-DOMAIN).
- Copy the forwarding email address and configure an email forwarding rule in your email client to forward emails sent to your support email id (i.e., same as the email id mentioned in step 5) to this email address.
- Please note that you’d need to mandatorily configure an auto-forwarding rule to forward the emails received on the email address configured in ‘EMAIL ID' field to the email address available in the ‘FORWARDING ADDRESS’ field. Webex Connect won’t receive the inbound emails unless this step is completed.
- In the case of Gmail, you must verify the email forwarding address by entering the OTP sent to the provided address. You can retrieve the OTP by decrypting the Debug Logs for the Email asset. It is found in the full email body of the logs. Earlier, the OTP was found in the subject of the email in the downloaded Export Logs.
- Enter the domain name for the SMTP Server.
- Follow one of the two authentication protocol below based on your use case:
- Username Password
- OAuth 2.0 (Recommended)

Based on your selection in step 8 in the procedure above, follow one of the two procedures below for authentication.
Authentication using Username and Password
- Enter a valid Username and Password to be used to authenticate the SMTP server connection.
- Enter the Port number to which you want to configure your email asset.
- Select the Security type as SSL or STARTTLS if required, otherwise leave it as None.
- Click Test Connection.
If the connection is successful, you will receive a confirmation message.

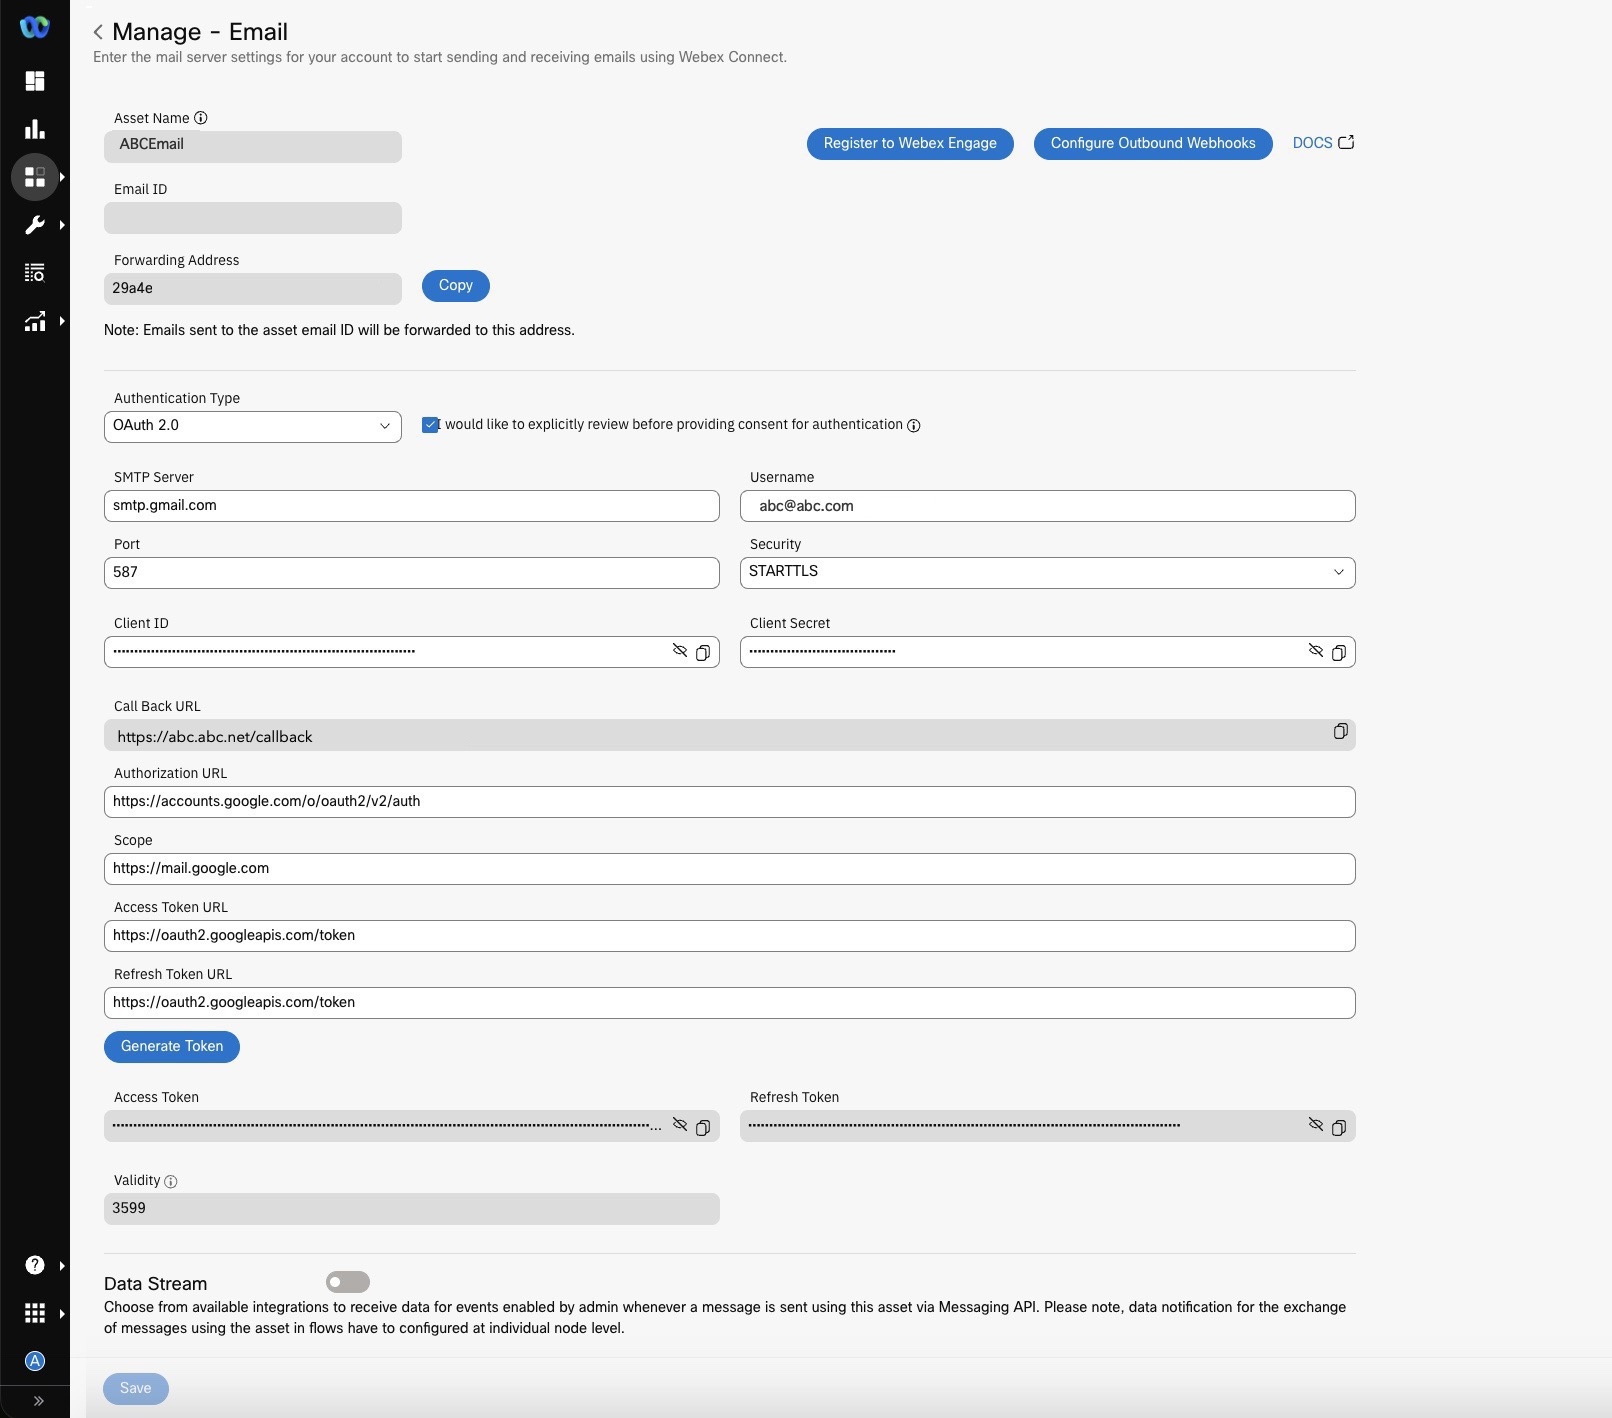
Authentication using OAuth 2.0
Follow the below steps to configure OAuth 2.0:
- Enter the SMTP Server, Username, Port, Client ID, Client Secret, Authorization URL, Scope, Access Token URL, Validity, and Refresh Token URL.
- Click Generate Token.
- Click Save to complete email channel asset creation.
Note
To get details such as Client ID, Client Secret, Authorization URL, Scope, Access Token URL, Validity, and Refresh Token URL based on your email provider, follow one of the following procedures.
If your administrator restricts the users from providing consent for applications by choosing the option “Do not allow user consent“ or a similar option in the user consent settings of the email service provider, please make sure that you clear the option “I would like to explicitly review before providing consent for authentication“, when you are trying to create an email asset. Selecting the option may result in authentication failure as you might not have permission to provide consent for application, but the authentication request expects you to provide consent.
User Consent Settings
In case of Office 365, if the user consent settings on Azure Active Directory are recently changed, please make sure that the new settings have taken effect, before adding an email asset on Webex Connect platform.
Access Token
The Access Token, Refresh Token, and Validity are auto populated after a token is generated.
In some cases, Refresh Token needs to be generated manually. Email is sent by connect to the tenant owners email ID. Clients will receive an automated email. They must navigate to the Email asset page and must re-generate the token.
Token has a fixed expiry time and the backend application automatically calls the API to regenerate token before that.
Registering on Google Cloud
- Log in to your https://console.cloud.google.com/
- Create a new project or select an existing project.

- Hover over the left-hand side menu and click APIs & Services.

The APIs & Services page appears.

- Click OAuth consent screen. The page appears.

- Select External and click Create.
The Edit app registration page appears.

- Enter the App name, User support email in App Information and email address under Developers Contact information.
- Click Save and Continue. The Scopes page appears.

Note
Click Learn more option shown in the above image to get the appropriate value of the Scope based on your use-case. Alternatively, you can find the required information here
- Click Save and Continue. The Test users page appears.

- To add test users, click + Add Users.

Note
A project can have only 100 test users at max.
- Enter the test user email address and click Add.

- Click Save and Continue.
The Summary page appears.

Adding Test Users
To add test users to an existing project.
- Navigate to OAuth Consent Screen.

- Click +Add Users to add test users.
Note
A project can have only 100 test users. It is mandatory to add the test user's email address in your tenant asset creation page.
- Add the callback URL in the ‘Credentials’ section (can be found on connect platform’s OAuth email asset creation page)


- The Client ID and Client Secret values are available in the Credentials page.

- Click Generate Token. Access Token and Refresh Token are generated.

- Click Save.
Google OAuth Playground
- Log in to https://developers.google.com
- Enter https://mail.google.com in the Step 1 and click Authorize APIs.

- Select the account associated to your OAuth 2.0 Playground.

- Click Continue.
- Copy the Access token and Refresh token generated in your tenant in Step 2.

- Click Exchange authorization code for tokens.
- In Step 3, the Authorization endpoint and Token endpoint are generated.
These values are static and are provided by Google.

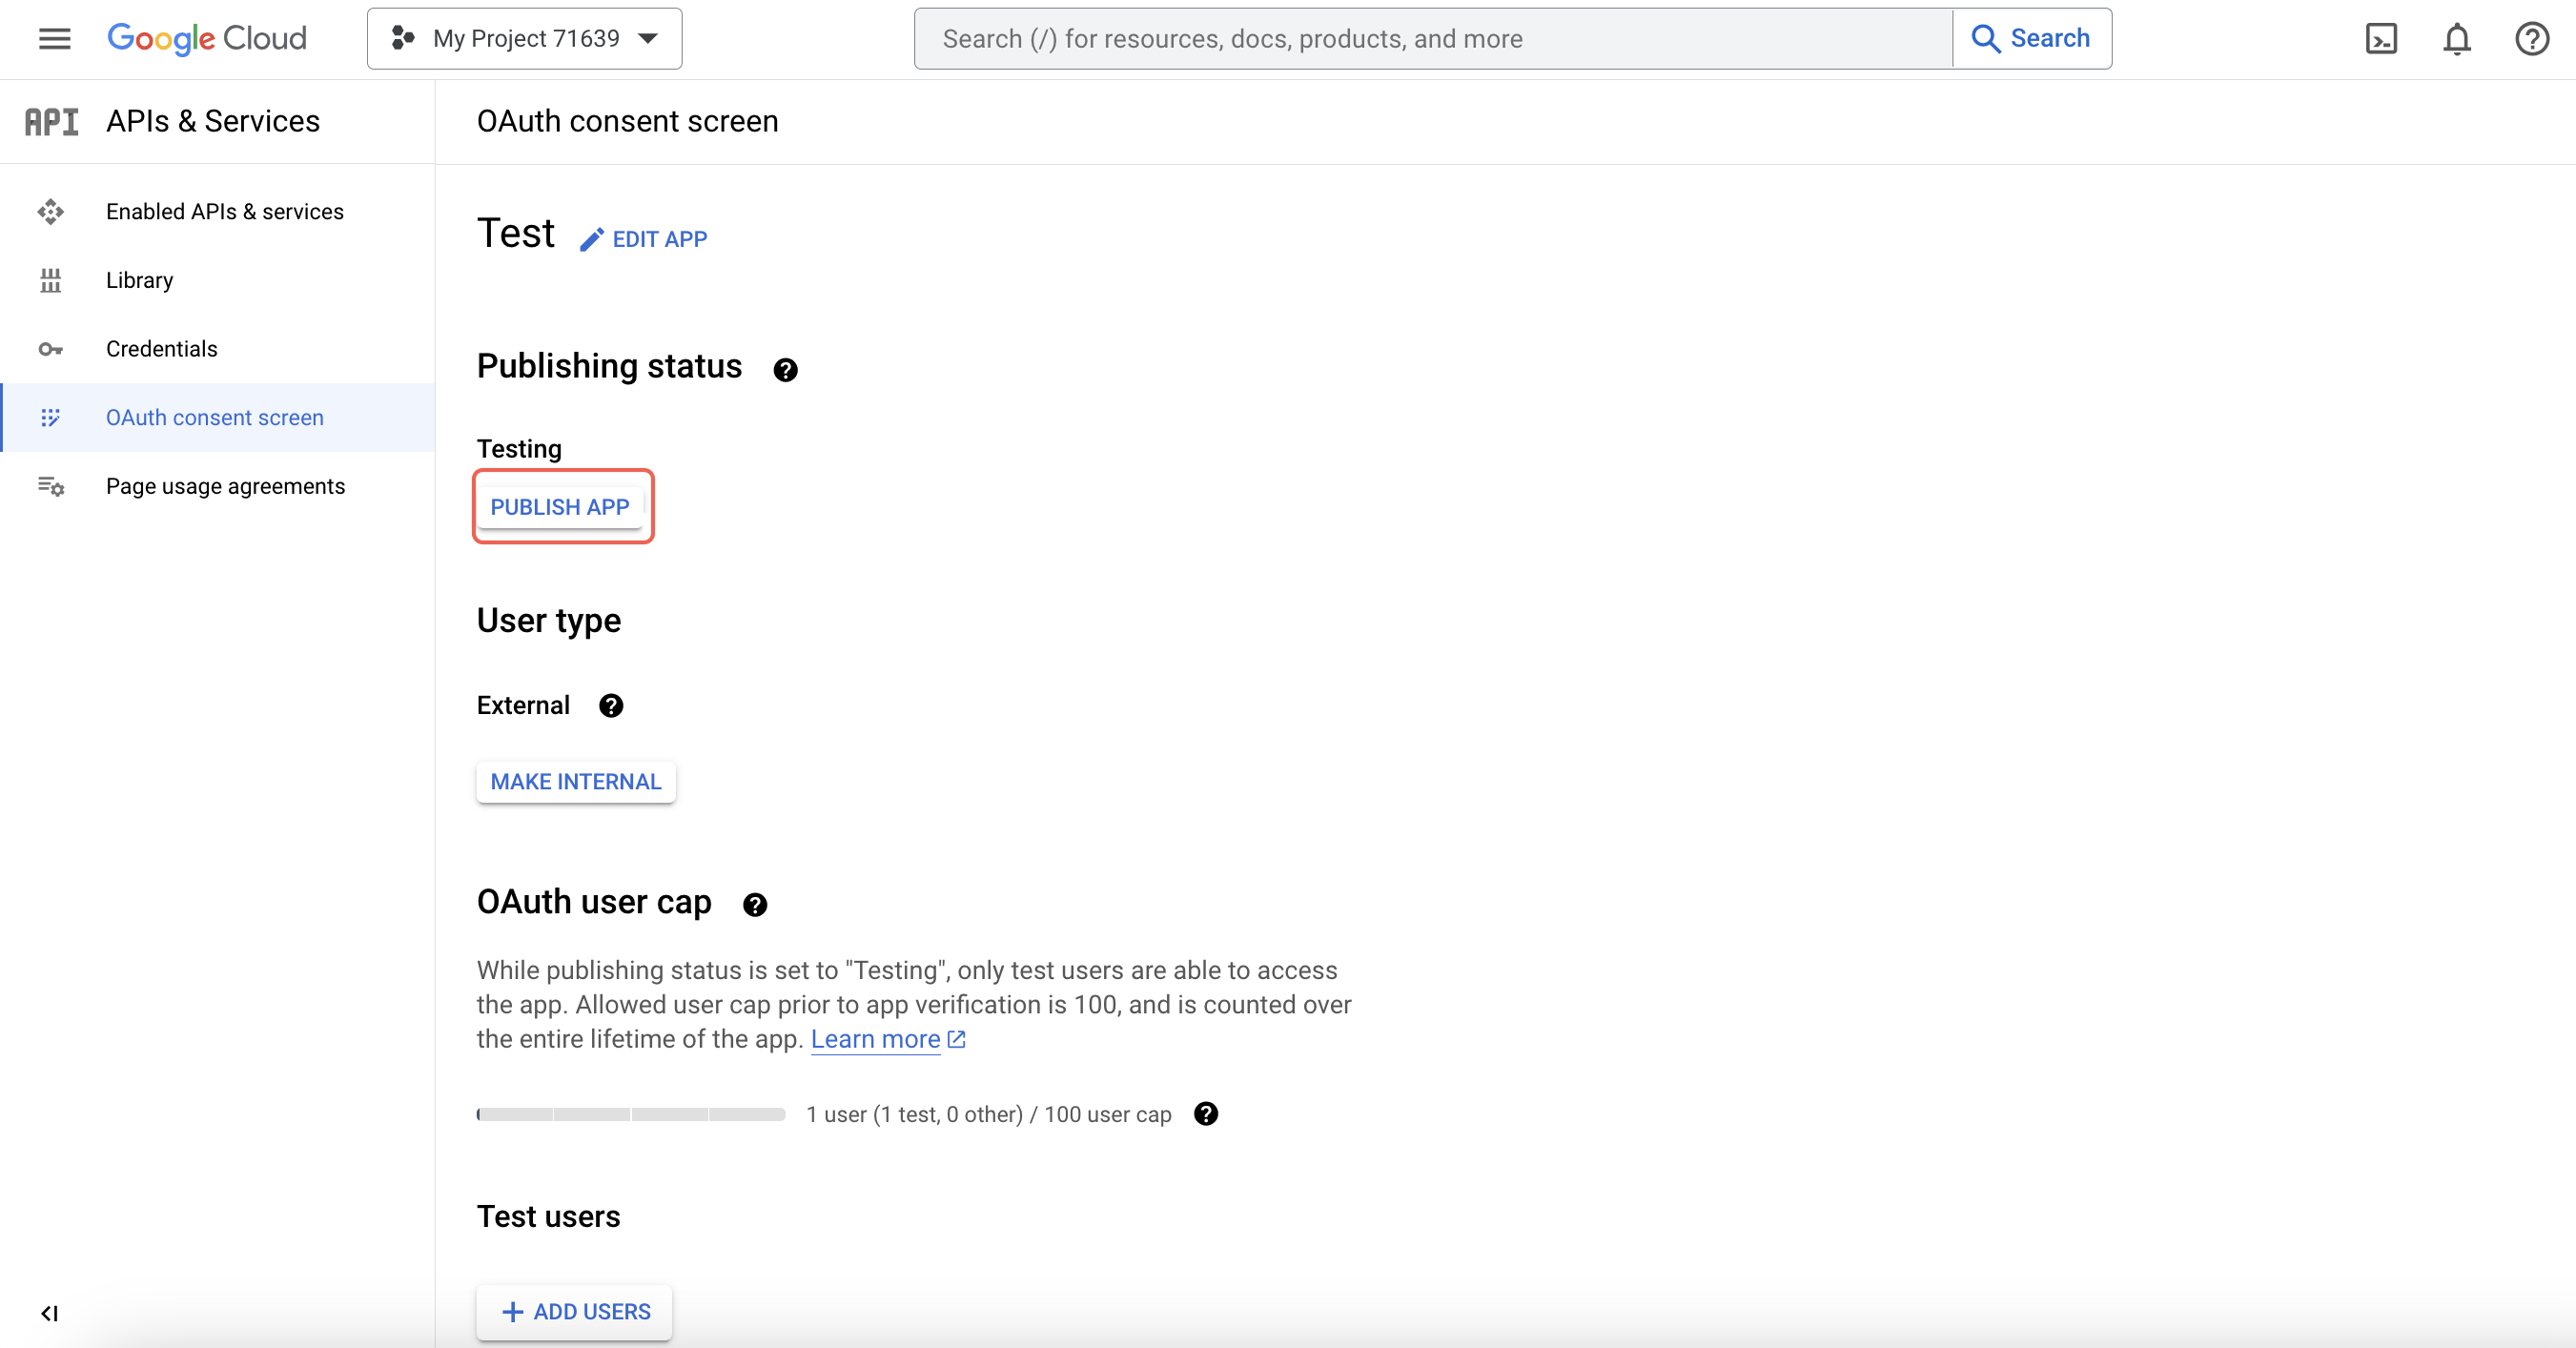
Note
Please note that, the app is still in Testing state on Gcloud. To publish the app, click "PUBLISH APP" under Publishing Status on the OAuth consent screen Dashboard as shown below.
Unless published, the authorizations by test users will expire 7 days from the time of consent.
Configure a rule in Gmail to forward incoming emails to Webex Connect
- Configure an Outbound Webhook in Webex Connect under 'Assets->Integrations' to track incoming emails. This would require you to select the email channel asset configured newly in the Entity dropdown. Refer this link for more details.
- Navigate to the email channel app asset configuration screen again and copy the value of the Forwarding Address.

- Now, navigate to the Settings page in your Gmail account and click Forwarding and POP/IMAP tab and paste the Forwarding Address in that field and then click Add. Gmail will send an OTP to this forwarding address at this stage.
- You can retrieve the OTP by decrypting the Debug Logs for the Email asset. It is found in the full email body of the logs. Earlier, the OTP was found in the subject of the email in the downloaded Export Logs.
- Select Forward a copy of Incoming mail to radio button in Gmail and click Save changes.

Registering on Office 365
- Create app in Azure portal.
Please check link on how to create app on Office 365
a. Enter the App Name.

b. Click Authentication on the left panel, to add the Redirect URLs. This value should be taken from your app asset

c. Select the required Tokens and types for authentication from Authentication page.

d. Click Certificates & secrets on the left panel and click Client secrets tab to generate and copy the value of the Client Secret ID field.

e. Click API Permissions on the left panel to add and grant permissions to send mail through SMTP.

-
Enabling SMTP authentication for User - Login as admin and enable SMTP for a user for which the above app has been created.
Use the Microsoft 365 admin center to enable or disable SMTP AUTH for specific mailboxes
a. Open the Microsoft 365 admin center and go to Users > Active users.
b. Select the user, and a flyout appears, click Mail.
c. In the Email apps section, click Manage email apps.
d. Verify the Authenticated SMTP setting: unchecked = disabled, checked = enabled.
e. When you're finished, click Save changes. -
Once app is created ,you can find Tenant ID, Client ID, and other details. Copy Tenant ID.
In the below screenshot Tenant id is “7fXXXXXX-e6XX-4aXX-bXXX-9XXXXXXXX”.

- Create an Email asset in Webex Connect with above details.
a. Replace respective Tenant ID in authorization, Access Token and Refresh Token urls. For example if tenant id is “tenant_abcd_123” then below are the urls to be configured
- Authorization URL: https://login.microsoftonline.com/tenant_abcd_123/oauth2/v2.0/authorize
- Scope: offline_access https://outlook.office.com/SMTP.Send
- Access Token URL: https://login.microsoftonline.com/tenant_abcd_123/oauth2/v2.0/token
- Refresh Token URL: https://login.microsoftonline.com/tenant_abcd_123/oauth2/v2.0/token
- Click Generate token to authorize and save the asset.
To enable SMTP authentication for an Active User
- Log in to the Admin.microsoft.com
- Click the three horizontal lines on the left-hand side menu and click Users.
- Under Users, click Active Users.

Active Users page is displayed.

- Select the required user from the list and click Manage product licenses under settings.
A pop-up appears to the right-hand side menu of the window.

- Click Mail tab and click Manage email apps under Email apps.

A pop-up appears.

- Select all the fields and click Save changes.
Configure Anti-spam policies
- Click the three horizontal lines on the left-hand side menu and under Show all > click Settings.

Welcome to Microsoft 365 Defender page appears.

- Click Policies & rules on the left-hand side menu
- Click Threat policies and click Anti-spam under Threat Policies.
Anti-spam policies page appears.

- Click + Create policy and select Outbound from the drop-down.
Name your policy page appears. - Enter the Name, Description and click Next.

- Enter the username in Users field and select the required user from the suggested contacts in User, groups, and domains page.

- Click Next.
- Enter values in the Set an external message limit, Set an internal message, and Set a daily messages.

- Select Restrict the user from sending the mail until the following day from Restriction placed on users who reach the message limit drop-down.
- Select On - Forwarding is enabled from Automatic forwarding rules.
- Select Notify these users and groups if a sender is blocked due to sending outbound spam from Notifications and enter the email address of the user.
- Click Next and click Create.
A New anti-spam policy created page is displayed with a message “Your anti-spam policy OutboundEmail has been created. It will go into effect immediately”.
Registering your Webex Connect Email App Asset with Webex Engage
Once you’ve successfully configured your Email asset with Webex Connect and saved it, you can register it with Webex Engage by following the below steps:
- Go to Assets →Apps.
- Select Email in the App Type drop-down list box.
- Click the required Email.
- Click Register To Webex Engage.
The Register To Webex Engage page displays.

- Select the required service (Note: this should be the Webex Connect service that would be used for configuring Email flows for Webex Contact Center integration)
- Click Register.
- You cannot change the service mapping once done. Hence, the asset registration on Webex Engage should be done after the service to be used has been decided.
- Do not delete an Email asset once it's been registered with Webex Contact Center. Once deleted it cannot be restored. Doing so would lead to asset deletion within Webex Connect alone while the entry continues to be in Webex Contact Center and Webex Engage.
A message displays “Asset registered successfully”. This completes the asset registration for Webex Engage integration.
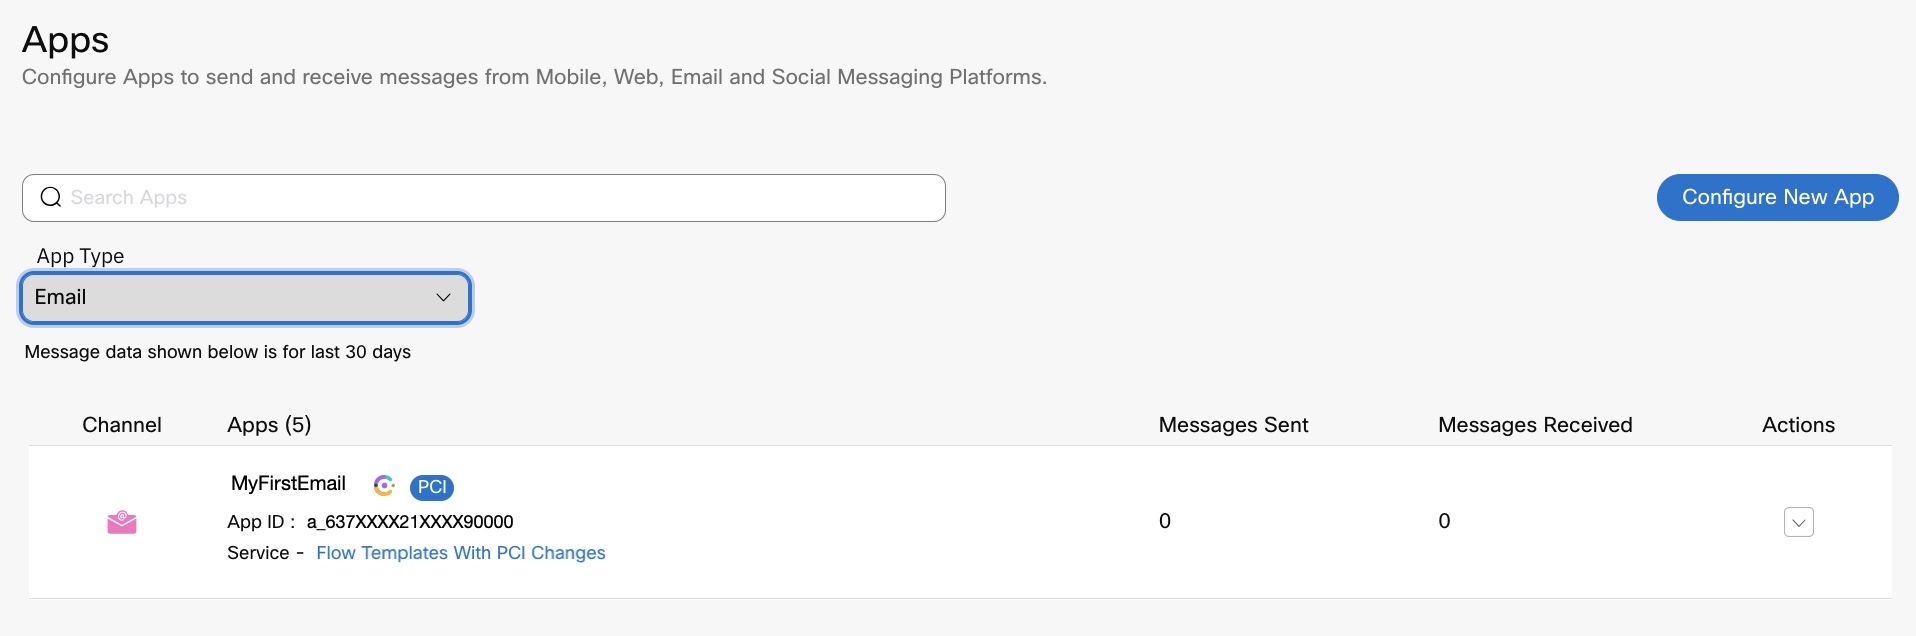
As shown above, you will see a Webex Engage icon and a PCI check enabled flag next to the email asset once it's been successfully mapped with Webex Contact Center.
Updated 15 days ago