
Email Node
Understand what an Email node is and how to configure it
The Email node enables you to send emails. You can either configure the Email text within the node, or select one of the HTML email templates configured using the Email Composer by setting Email Type to Template. Once you select the available template, all the replaceable parameters from the template are loaded and you can map them to session variables in the flow.
Webex Connect offers the ability to send Emails via two routes. One of the following two routes will be available in your tenant depending on the tenant configuration at the time of onboarding:
- AWS SES for sending and receiving emails.
- SMTP for sending emails and email forwarding for sending a copy of incoming emails to Webex Connect.

Email Node
Node Configuration
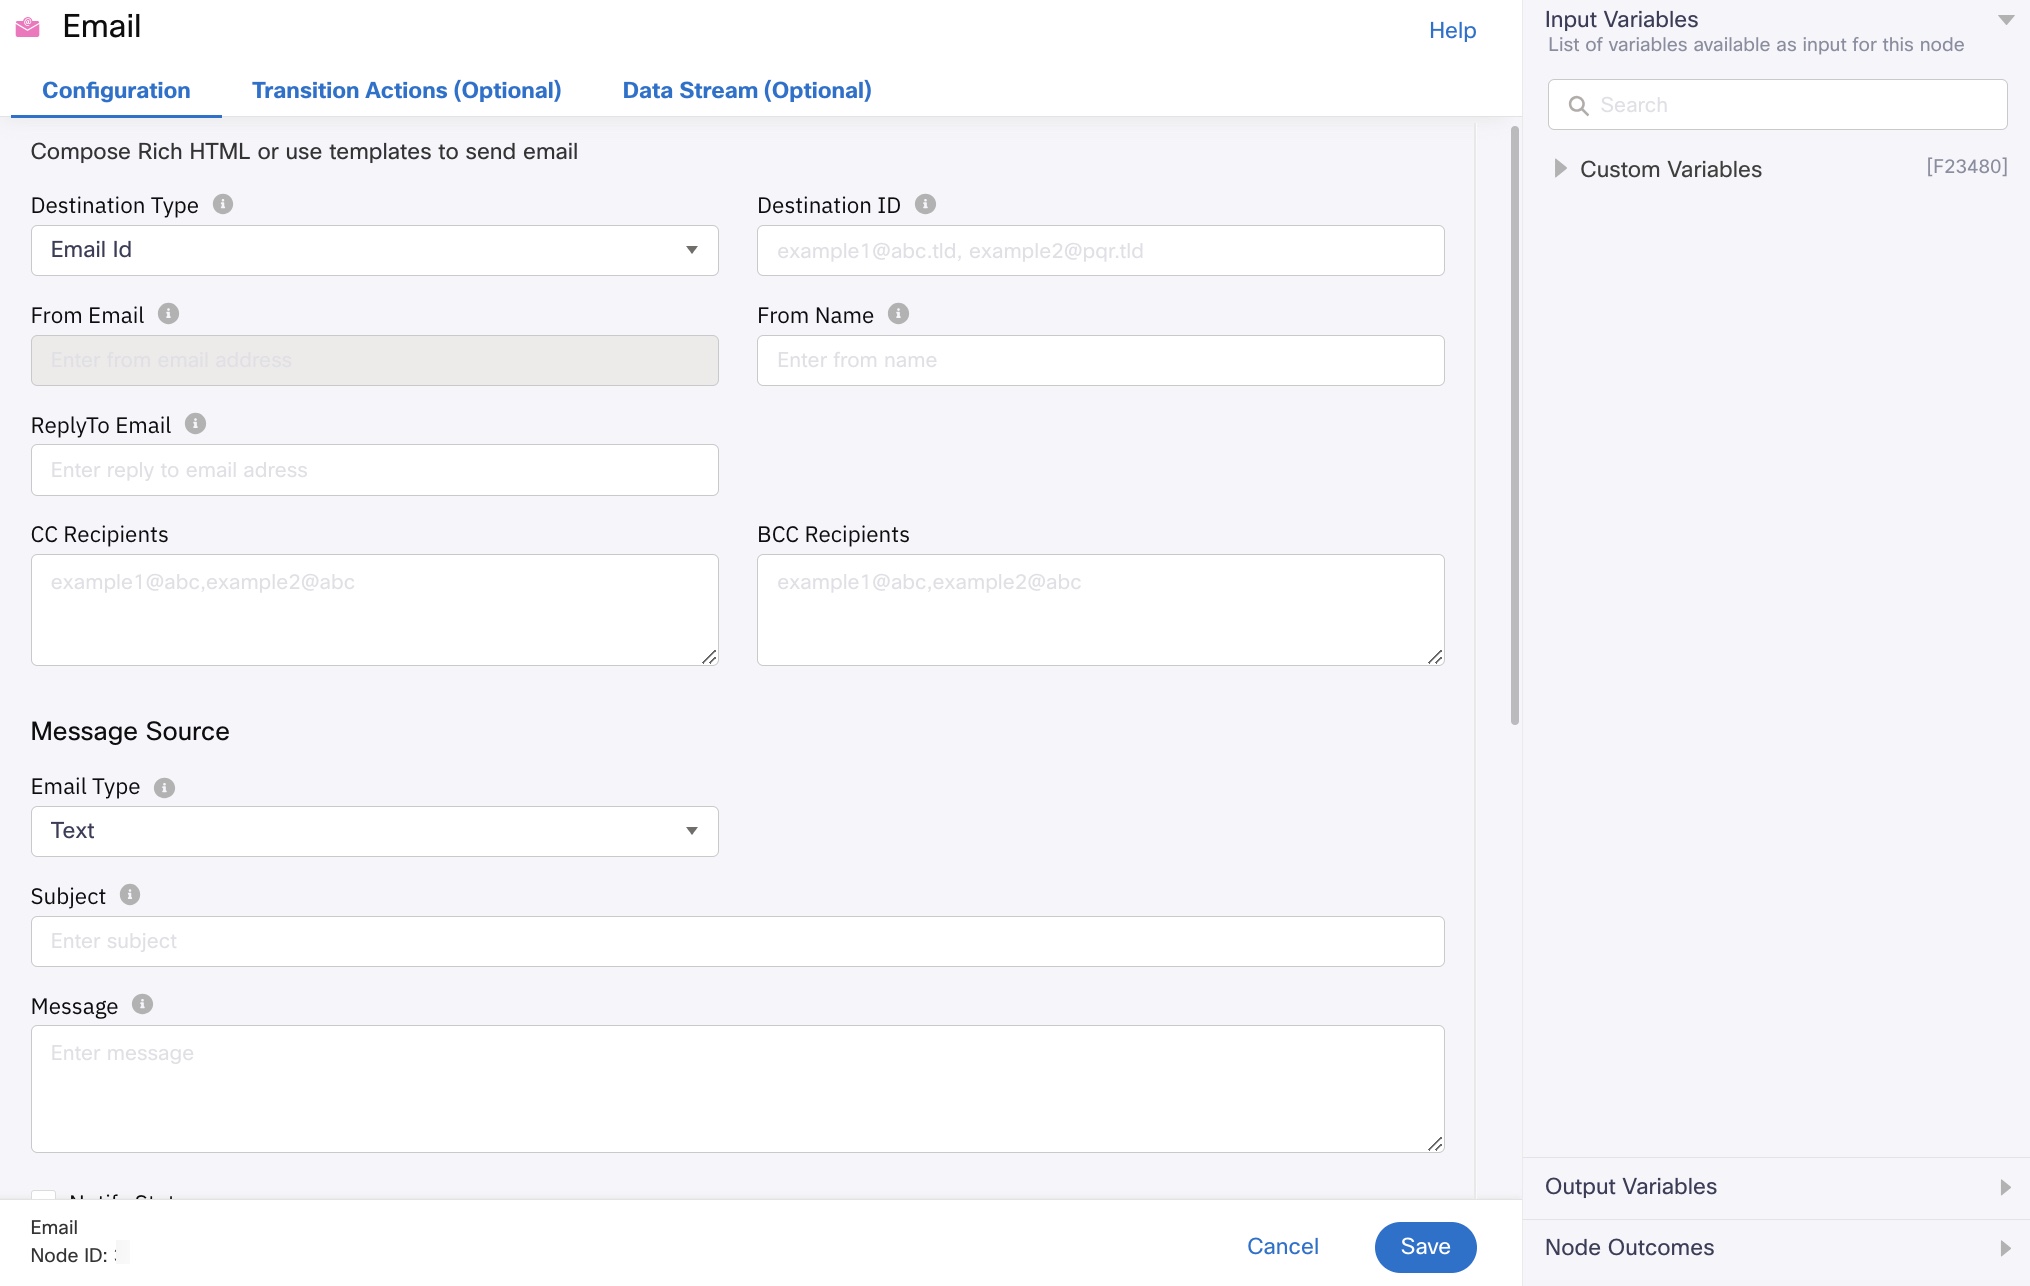
Destination type
For sending an Email, Webex Connect supports the below two destination types:
-
Customer Id is a master ID that is linked to all different channel-specific destination IDs of a user. It is useful in cross channel communication. For e.g: You want to send an exclusive promo code to a user’s email address, because of previous positive feedback that they have given via Messenger. In that case, you can use the Customer-ID of the user since it will remain constant across both the channels.
-
Email Id
Destination ID
This field contains the destination value corresponding to the selected Destination Type. The value can be static or dynamic. For example, if the destination type is Customer Id, the destination can be made dynamic by declaring the path of the value, such as $(customerID).
If the destination is an email id, SES does not support the SMTPUTF8 extension, as described in RFC6531 [1]. The part of the email address that precedes the @ sign can only contain 7-bit ASCII characters[2]. If the domain part of an address (the part after the @ sign) contains non-ASCII characters, they must be encoded using Punycode, as described in RFC3492 [3].
You can enter multiple values separated by commas.
FROM EMAIL
The email address that you are going to use, to send this email, needs to be provided here.
This field is disabled and will be picked up from the app asset configuration of the app you select while making the flow live.
FROM NAME
You can specify the name by which you want to send the email, in this field.
ReplyTo Email
You can specify the email address to which the replies will be sent instead of the sender.
CC Recipients
Comma separated list of email addresses to be kept in CC.
BCC Recipients
Comma separated list of email addresses to be kept in BCC.
Message Source
Email type
- Text
- Template
- HTML
When you select the type as Template or HTML, you can see a new textbox Fallback Text is added. You can provide the fallback text in this field. This text will be displayed to the customers when HTML content within the template is not supported by their email application.
Fallback Text for Email
Subject
Email subject line.
Template Type and Template
Select 'Full template' in case the entire email content is available in a single email template configured using Email Composer. Select the Template name from 'Template' dropdown.
Alternatively, select 'Partial template' in case you want to combine multiple partial templates that you want to combine in runtime to build a complete template (e.g., you may have configured three partial templates for Header, Body and Footer content respectively using Email Composer). Use 'Add More Partial Templates' option to select various partial templates you want to combine.
HTML Content
If you select HTML as Email Type, the Message field changes to HTML Content. Enter the HTML email body.
Enable link tracking
You can use the Enable link tracking option to track any link clicks from within the email. the tracked links will be sent as Clicked delivery receipt in the outbound webhook. For the format of the outbound webhooks, see the Email Delivery Receipts section.
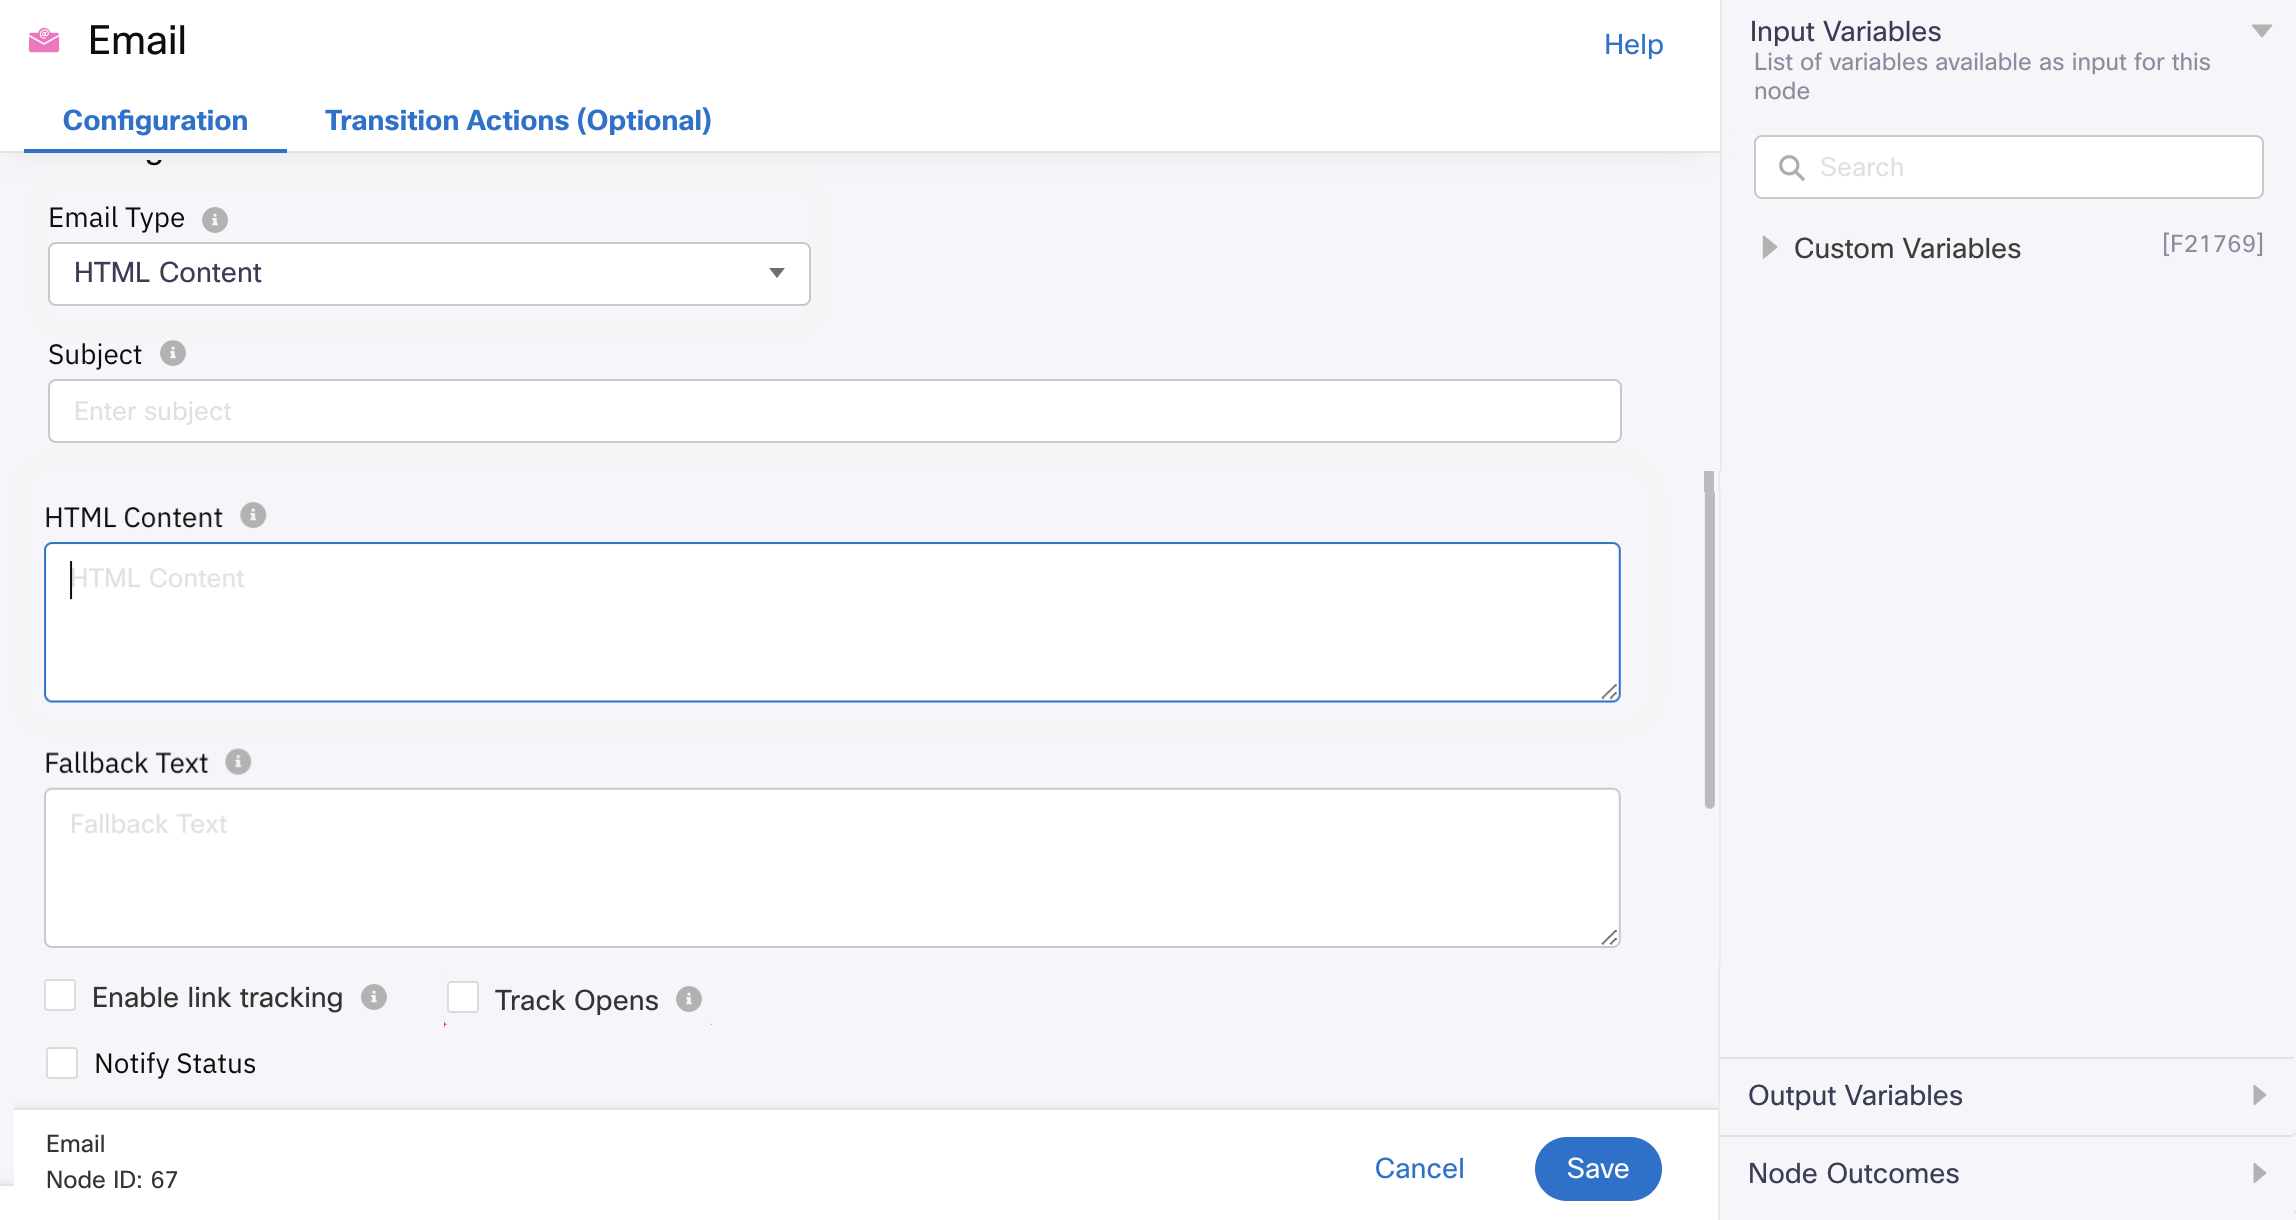
Link Tracking
Track Opens
You can use the Track Opens option to track the event of email opening.
Correlation ID
You can assign a unique ID of your choice to each Email. This ID is returned to the platform with the delivery report and can be used to identify the message.
Callback Data
In case there is additional data to be sent along with the delivery reports to the URL, you must specify that here.
Validations for Callback Data & Correlation ID:
- Callback Data, Correlation Id fields are optional for all the channels. Send node can be saved without providing these fields.
- All characters, Alphabets, Numbers, and special characters are accepted.
- Variables can be added.
- Hard coded values are accepted.
- On Platform side, there is no Max or Min length validation for these fields.
Notify Status
Please note that email delivery status tracking is available for emails sent via AWS SES or SMTP based Email App Assets.
Read receipts are not generated for emails sent as plain text, i.e., when the email type is text.
Notify URL
You can choose to notify a URL with the delivery report for the Email. This field accepts only a valid URL or a variable. If an invalid URL is passed in API request or via a variable, then such request will not be considered eligible for retries.
Validations for Notify URL:
- It is an optional field optional for all the channels. Send node can be saved without providing these fields.
- Notify URL should be filled with proper URL format. Otherwise, error message ‘Invalid URL, field accepts only valid URL or variable’ will be displayed.
- When space is provided in front of the URL, Invalid URL, field accepts only valid URL or variable’ will be displayed.
- When space is provided at the end of the URL, space gets trimmed and ignored and DRs are received to the URL.
- No Max length validation.
- Variables can be added to this field.
For AWS SES based email app assets:
You can choose to notify a URL about the status of the transaction, for each of the following events:
- Sent
- Delivered
- Read
- Bounce
- Spam
- Rejected
- Answered
Note
The default retention period for email bounce list is Seven days for email via AWS SES. To change the retention period, reach out to your account manager.
For SMTP based email app assets:
You can choose to notify a URL about the status of the transaction, for each of the following events:
- Sent
- Failed
If an invalid URL is passed in API request or via a variable, then such request will not be considered eligible for retries.
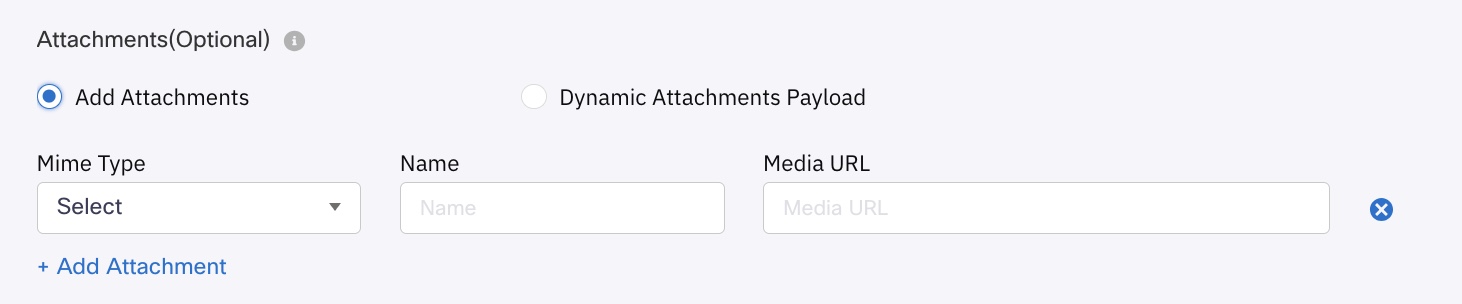
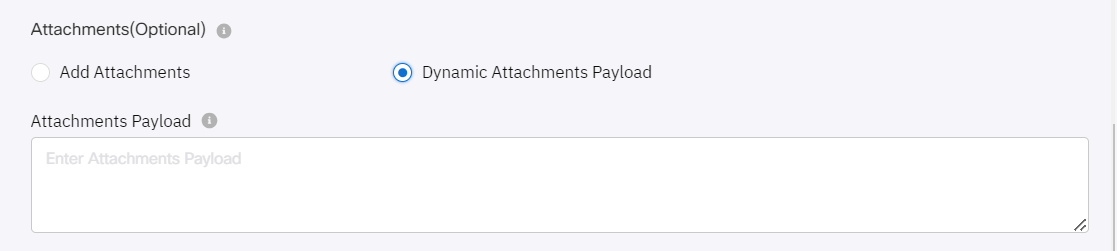
Attachments (Optional)
The email node supports attachments and dynamic attachments payload.
Webex Connect recommends uploading the required attachments to Media Manager and use that URL in the attachments section. The URL is valid and complete only when it ends with the file extension.
To add an attachment:
- Select Add Attachments.
- Click Add Attachment.
- Select the MIME Type. The different MIME types supported for the attachments are mentioned below.
- Provide a Name and the Media URL for the attachment.
You can add up to 5 attachments and the size cannot exceed 10 MB including all the attachments
To add a dynamic attachment payload:
- Select Dynamic Attachments Payload.
- In the Attachment Payload field, enter the variables or the json payload representing the attachment block as configured in the Messaging API v2.

- Provide attachments payload as mentioned below:
[
               {
                              "mimeType": "application/msword",
                              "name": "doc file1 with dynamic payload",
                              "mediaUrl": http://iiswc.org/iiswc2012/sample.doc
               },
               {
                              "mimeType": "application/pdf",
                              "name": "pdf file test",
                              "mediaUrl": https://imichat-preprod-app-share.s3.amazonaws.com/consoleuploads/7202003240541972020032405252SAMPLEPDF_5MB.PDF
               }
]
SMTP Headers (Applicable only when SMTP based Email Sending option is enabled for your tenant)
- Select one of the following as the Header Parameter.
- Cc when you want to send a copy of the email to anyone else
- Bcc when you want to send a copy of the email to undisclosed recipients
- In-Reply-To when you want to send a reply to a previous message
- Enter the Value for the selected header parameter.

Advance Options
Wait For
Before proceeding to the next node, you can choose to wait for a delivery report. You can also limit the maximum wait time by defining it in the Timeout field.
Expiry
You can define the maximum time, within which the node execution must complete by providing the expiry time in UTC or seconds.
MIME Types for Sending Email Attachments
| Supported MIME Types | File Extension(s) |
|---|---|
| application/msword | doc, docx |
| application/pdf | |
| application/rss+xml | rss |
| application/vnd.google-earth.kml+xml | kml |
| application/vnd.google-earth.kmz | kmz |
| application/vnd.ms-excel | xls, xlsx |
| application/vnd.ms-powerpoint | pps, ppt, pptx |
| application/vnd.oasis.opendocument.presentation | odp |
| application/vnd.oasis.opendocument.spreadsheet | ods |
| application/vnd.oasis.opendocument.text | odt |
| application/vnd.sun.xml.calc | sxc |
| application/vnd.sun.xml.writer | sxw |
| application/x-gzip | gzip |
| application/zip | zip |
| audio/basic | au snd |
| audio/flac | flac |
| audio/mid | mid, rmi |
| audio/mp4 | m4a |
| audio/mpeg | mp3 |
| audio/ogg | oga, ogg |
| audio/x-aiff | aif, aifc, aiff |
| audio/x-wav | wav |
| image/gif | gif |
| image/jpeg | jpeg, jpg, jpe |
| image/png | png |
| image/tiff | tiff, tif |
| image/vnd.wap.wbmp | wbmp |
| image/x-ms-bmp | bmp |
| text/calendar | ics |
| text/comma-separated-values | csv |
| text/css | css |
| text/html | htm, html |
| text/plain | asc, c, diff, log, patch, pot, text, txt |
| text/x-vcard | vcf |
| video/mp4 | mp4 |
| video/mpeg | mpeg, mpg, mpe |
| video/ogg | ogv |
| video/quicktime | qt, mov |
| video/x-msvideo | avi |
Updated 1 day ago