
Intents and Entities
Intents
An intent represents a task or action the user wants to perform in each conversation turn. Bot developers define all intents that correspond to tasks the users want to accomplish in the bot. When a consumer writes or says something, Webex Bot Builder matches their utterance to the best intent in your bot. Matching an intent is also known as intent classification.
To access and configure intents, navigate to the Training section of your bot.

On the creation of a task bot, three system intents and four small talk intents are added by default.
System Intents
Default Fallback Intent
Any bot is limited by the scope of what all intents it has been configured to respond to. But once a bot is taken live, the enterprise will not have control over the kind of questions its customers ask the bot. To ensure that users are not taken into uncontrolled conversational loops, the default fallback intent can be leveraged by the bot developers to gracefully bring the conversation back into the configured scope.
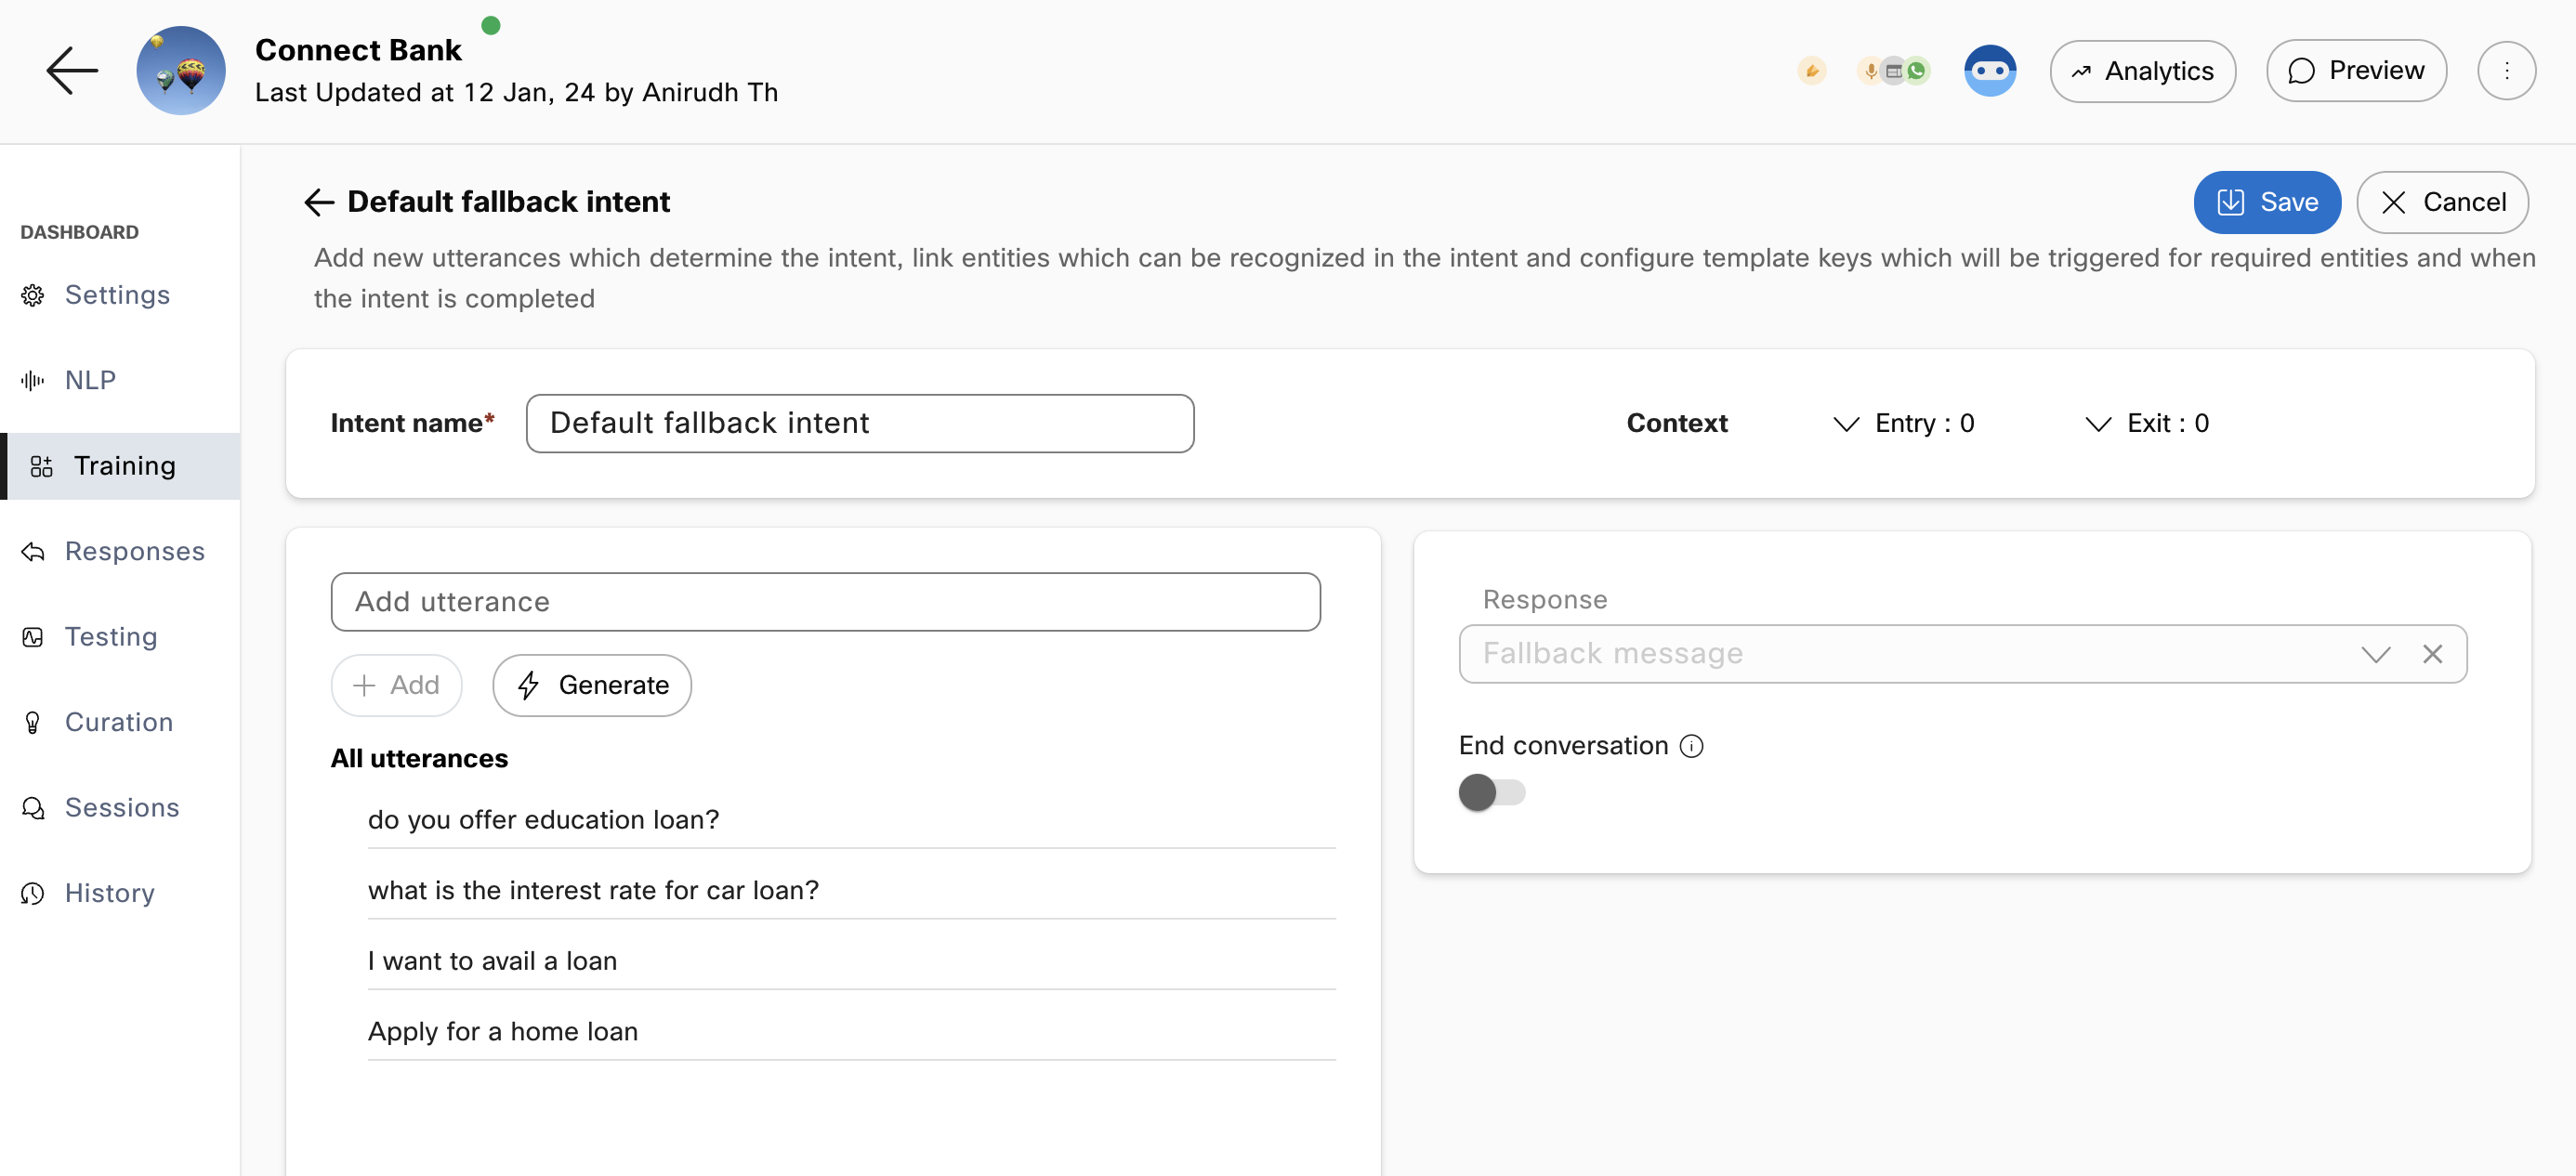
Default fallback intent in task bots
Default fallback intent configuration
Bot developers are not required to add any utterances to the fallback intent. The bot can be trained to trigger the fallback intent for known out-of-scope questions that might otherwise be misclassified into other intents
For example, in a banking bot, consumers might try to ask questions about loans. If the bot supports other banking intents but doesn't support intent related to loans, such queries can be added as training phrases in fallback intent. When consumers ask about loan at any point in the conversation, they will get a fallback response rather than being misclassified into any other intent.
The fallback intent cannot have any slots and must use the default fallback template key for its response. The response message itself can also be modified in the responses section.
Help
This intent enables consumers to query the bot’s capabilities as they tend to ask for 'help' when they are unaware of what they can accomplish with the bot or if stuck at any point in the flow. The response for this article is mapped to Help message template key by default. Bot developers can change the response or the template key associated with the intent. It is recommended to convey bot capabilities at a high level in this response, giving user conversational cues about what they can do next.
Talk to an Agent
This intent allows the user to ask for an escalation to a human agent at any point in the conversation. The response template for this intent is 'Agent handover'. Any other intents using 'Agent handover' as the response template key will also lead to agent handover. There is no restriction in the UI to change this response template key. However, changing this won't lead to a human handoff when this intent is invoked.
Small Talk Intents
All new bots also have four small talk intents that handle user utterances for:
- Greetings
- Thank you
- The bot was not helpful
- Goodbye
These intents and responses are available in every bot by default. These can be modified or deleted to suit the bot use-case.
Creating an Intent
Use this procedure to create an intent.
Note: Before creating an intent, it is recommended that you create entities to link to the intent. The entities are required to complete the task. For information, see create entities
- Select a specific task bot in which the intent must be added. The Bot Configuration screen appears.
- Click the Training tab on the left-side vertical navigation bar.
- Click +Create intent. The Create intent screen appears where the intent’s name, training utterances, linked entities, and response template key can be configured.

- Specify the intent name in the Intent name field and add utterances, which are example phrases that an end-user might ask to trigger this intent.

- If any entities are present in the added utterances, they will be auto-annotated in the utterances and will appear in the 'Slots' section on the right. If you wish to add more entities as slots in an intent, click +Link entity to see the list of entities that are created.
Note: Navigate to the Entities tab to create an entity. For information, see create entities
Each slot displays the entity name, whether it is required for intent completion, the number of retries the bot will attempt to get this slot value from the user, and the template key. - Select the Required check box, if the entity is mandatory to be filled by the consumer.
- Enter the number of retries allowed for this slot when it is incorrectly filled by the consumer. By default, the number is set to three.
- Select the Template key from the list. If you want to create a new response template key for the entity, click +Create new.
Note: The response content for these template keys is configured in the Responses section. Each template key is configured with a response that is sent to the user when this intent is triggered.

Creating a new response template key
- Enter the final response template key to be returned to users on completion of the intent in the Response section on the right.

Final response template key
- Enable the Reset slots after completion toggle to reset the slot values collected in the conversation once the intent is complete.
Note: If this toggle is disabled, the slot retains the old values and displays the same response. - Enable the Update slot values to update the slot value during the conversation with the consumer. The last value filled in the slot is considered by the bot to process the data. Values for filled slots will be updated when users provide new values for the same slot type if this feature is enabled.


Slot value is updated when the user provides a new date and 'Update slot values' is enabled
- Click Save. The model needs to be trained again by clicking the Train button on the top right of the Training tab to reflect any changes made in intents and entities.
Note: Rasa and Mindmeld NLU engines require a minimum of two training variants for intent. If there are less than two training variants (utterances) for intent or if there are less than two annotations for each slot, the Train button is made unavailable until the issues are fixed. After all the issues are resolved, the bot developer can train the bot. The warning icon is displayed indicating the same corresponding to the intent name. This condition is not applicable for default fallback intent.

Less than two variants in an utterance
A warning icon corresponding to the intent name

Less than two annotations for a slot
Linking Entities with Intents
Once an intent is created, it will need some information to fulfil the intent. Linked entities dictate how this information is obtained from user utterances. It is recommended that the entities are created and linked before adding utterances. This will auto-annotate the entities while utterances are added. There are two ways to link entities to intents:
- Link an already created entity by clicking the Link entity button on the top right.

- By adding entities while adding utterances - select the part of the utterance that is a sample slot for that intent and select an already created entity or create a new entity by clicking the New entity button.

Linked entities start appearing in the slots section. An entity can be marked as required to open additional configuration to map retries and a template key. This template key is triggered when the bot receives an utterance that activates the intent without the required entity in it. This will go on until the maximum configured retries are reached for that entity. If the required entity is still not provided, the intent will not be fulfilled and a fallback response template is triggered.

Once an intent is detected and all its required slots are filled, the bot sends back the message associated with the final template key configured in the intent. The reset slots after completion toggle, if enabled, wipes out the entities recognized in the conversation up until that point for that intent.
Training Data Generation
Training data generation capability focuses on the “cold start” problem with bot building - developers having to manually add training data to their intents to get the bot working at a reasonable accuracy. The training data consists of different ways in which a user can invoke the same intent. We recommend that users add at least 15-20 variants for each intent to improve bot accuracy. Creating this training corpus manually can be quite tedious and time consuming. In practice, we have observed that developers tend to cut corners in this crucial part of bot building by adding only a few variants, or by adding only keywords as variants instead of meaningful sentences.
To overcome this, users can use the with Large Language Model (LLM)-powered training data set generation by clicking the 'Generate' button in their intents.
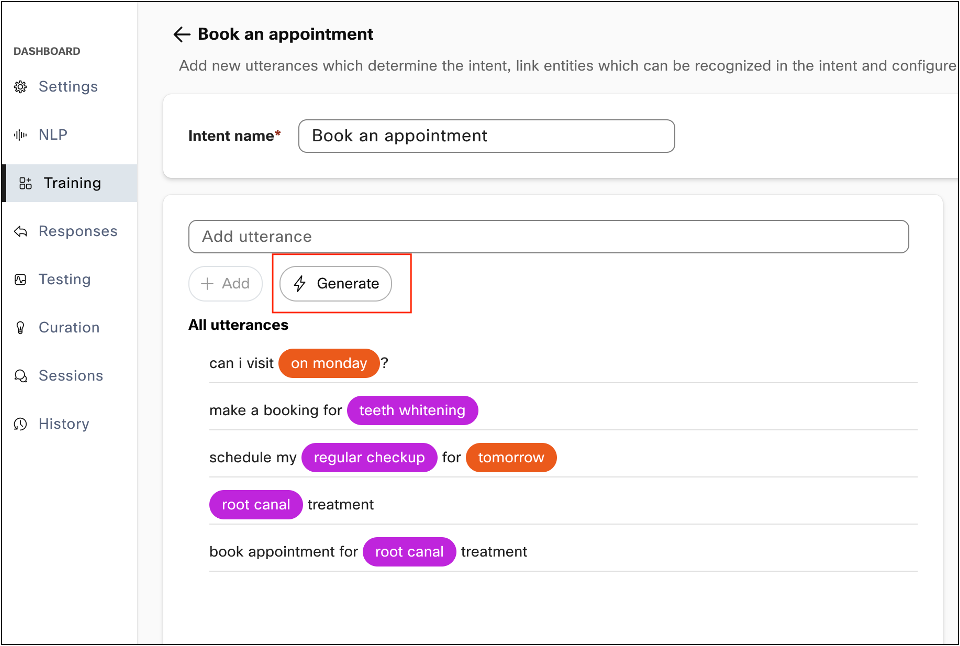
Generate button in the intent configuration screen in task bot
Developers can supplement each intent’s training data by clicking on the ‘Generate’ button after providing the intent name and adding one sample utterance. This will open a dialog box where users can provide a brief description of the intent. This description plays a crucial role in the quality of variants generated. Developers can also select the number of variants they would like to generate and how creative they would like the underlying LLM to be while generating these variants.
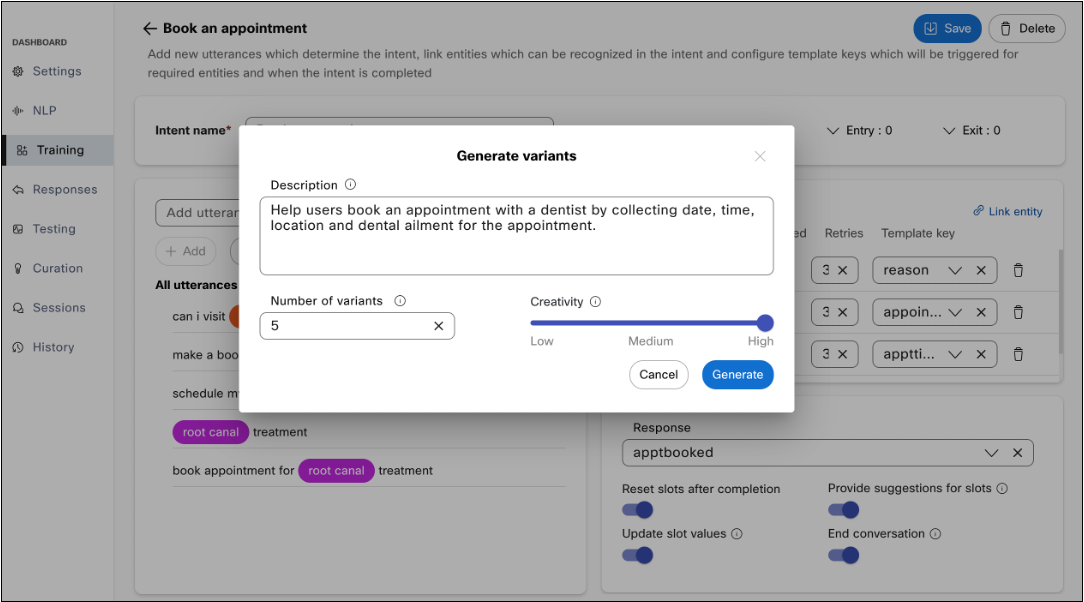
Generate variants dialog box
Tips for generating training data
- A higher number of variants being generated in one go may lower the quality of generated variants, a maximum of 20 variants can be generated in one go.
- Lower creativity can make the generated variants less diverse.
- The generation operation can take a few seconds depending on the number of variants being generated.
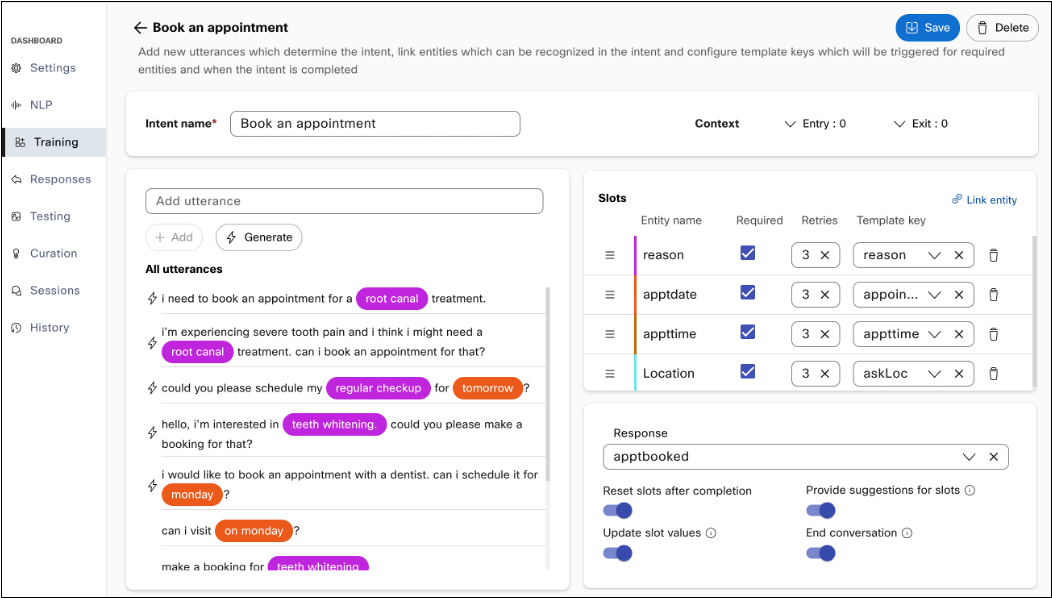
AI Generated variants are distinguished using a prefix icon
AI generated variants are distinguished from user defined training data by the lightning icon.
Flagging Generated Variants
In compliance with Cisco’s commitment to responsible AI usage, developers will have the option to flag AI generated outputs that will be reviewed to prevent any harmful or biased outputs. An option to flag AI generated output is added to each generated utterance.
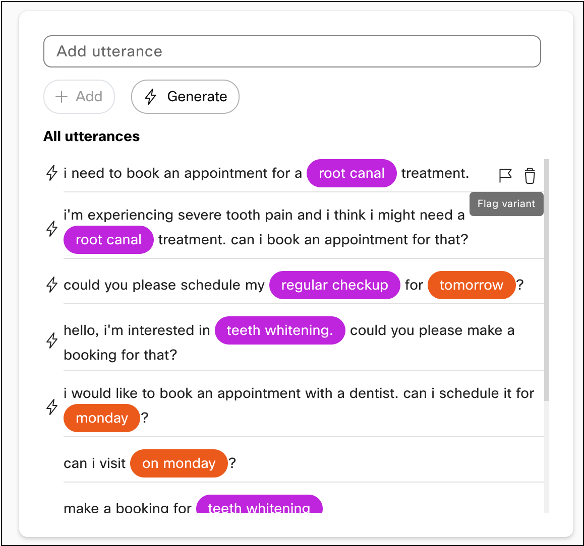
Flag variant option next to a generated utterance
While flagging an output, developers can provide additional feedback in the form of a comment and by selecting why they thought the variant warranted flagging.
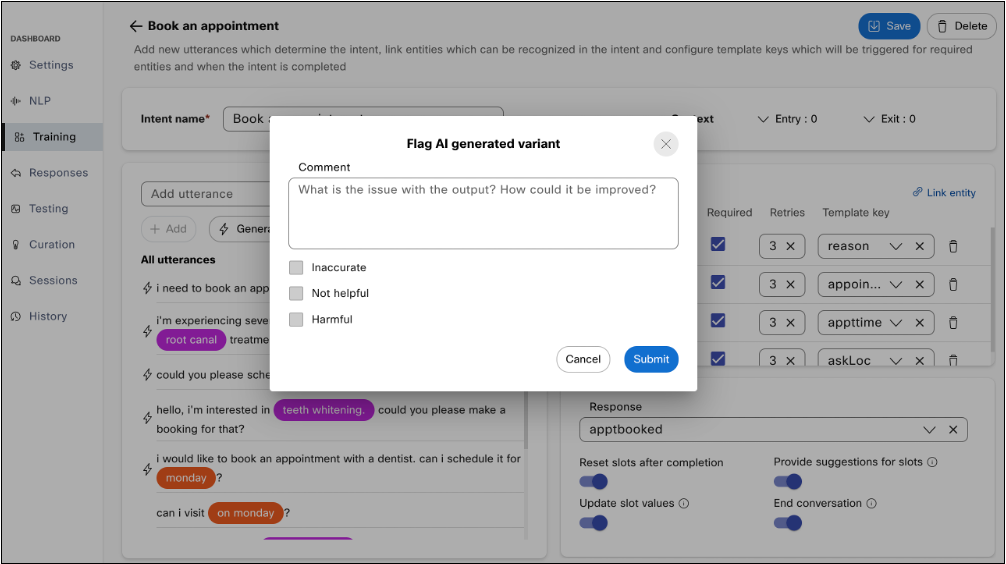
Flag AI generated variant dialog box
This additional feedback is passed on to the technical support team for review.
Usage limits for training data generation
This feature will be released with a monthly usage cap of 500 generate operations per month. Developers can reach out to their account owners for increasing this limit.
Entities
Entities represent the data you want to extract from user utterances, such as product names, dates, quantities or any significant group of words. An utterance can include many entities or none at all. Each entity has a type associated with it.

Create entity option on the Entities screen
Entity Types
Webex Bot Builder has 11 pre-built entity types that can match many common data types. You can also create one of 6 custom entities to match custom data.
Custom entities
These entities are configurable and allow developers to capture use-case specific information from consumers
- Custom list: Custom entities can be used for things not covered by system entities. They can contain a list of strings that are expected from the users. You can add multiple synonyms against each one. For example, a custom Pizza size entity:


- Regex: Regular expressions used to identify specific patterns and slot them as entities. For example, a phone number regex (ex:123-123-8789):

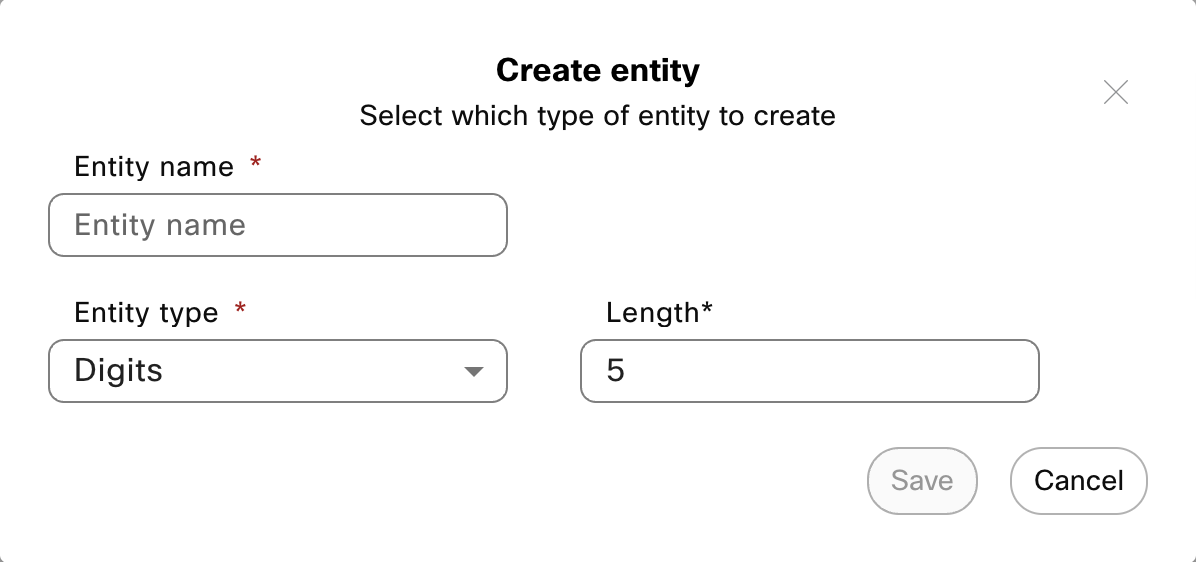
- Digits: Used to gather information where the expected input is a number of fixed length. For voice use-cases, digits spoken out by the user can be detected with a higher accuracy. In non-voice use cases this can be used as an alternative to cardinal and regex entity types. Developers can configure a digit entity by providing the length of the expected input. For example, to detect a 5-digit account number, the length of 5 should be defined.
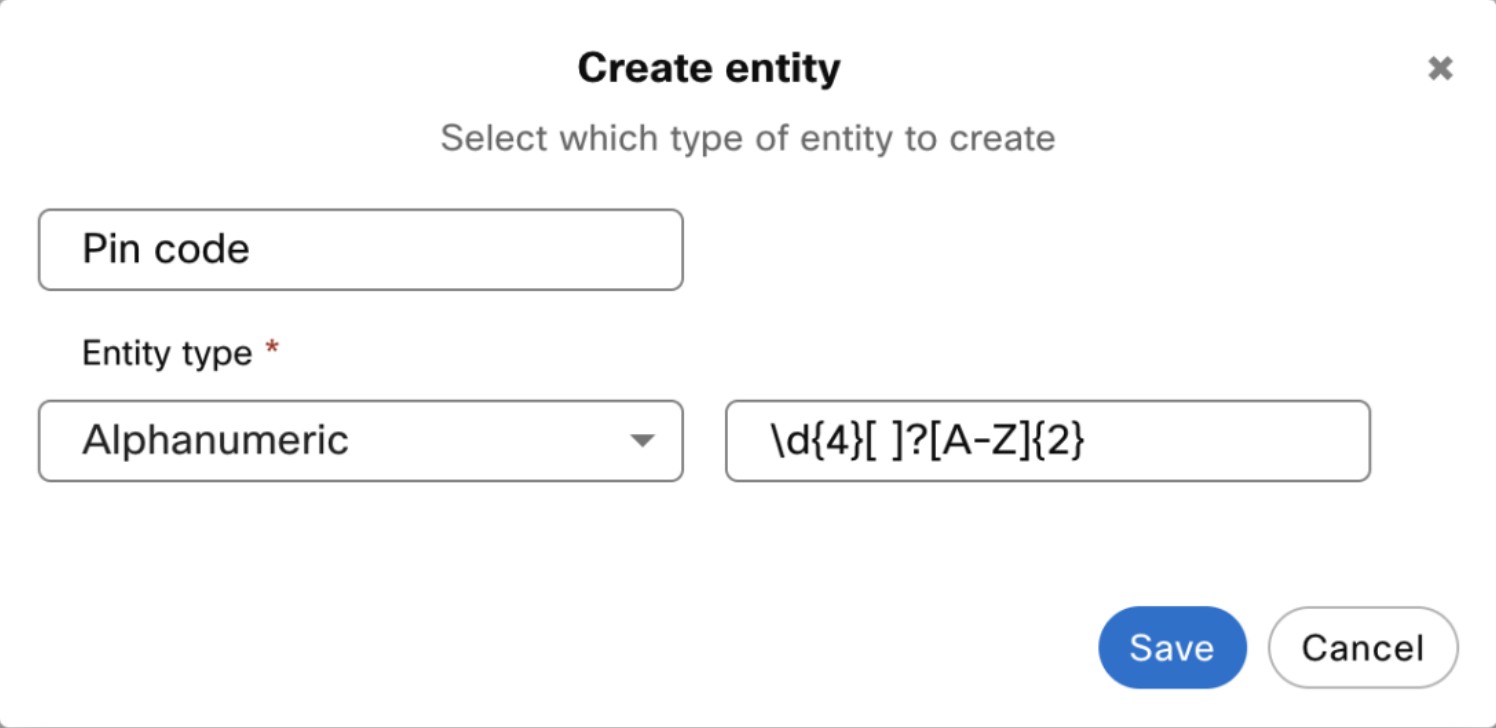
- Alphanumeric: Used where the expected user input is a combination of letters and numbers. Such voice inputs can be detected with a higher accuracy when this entity is used. For non-voice bots, it serves the same purpose as a regex entity type as the developers have to define a regex pattern to capture this entity.
- Free form: Used to capture data points that are hard to define and validate. When free form entity type is used for a slot, it will capture whatever the user provides when prompted for it. This entity type can be useful for less common names, address, etc.
- Map location (WhatsApp): Used to parse and use the current location shared by consumers through WhatsApp channel.
System entities
| Entity name | Description | Example input | Example output |
|---|---|---|---|
| Date | Parses dates in natural language to a standard date format | “july next year” | 01/07/2020 |
| Time | Parses time in natural language to a standard time format | 5 in the evening | 17:00 |
| Detects email addresses | write to me at [email protected] | [email protected] | |
| Phone number | Detects common phone numbers | call me at 9876543210 | 9876543210 |
| Monetary units | Parses currency and amount | I want 20$ | 20$ |
| Ordinal | Detects ordinal number | Fourth of ten people | 4th |
| Cardinal | Detects cardinal number | Fourth of ten people | 10 |
| Geolocation | Detects geographic locations (cities, countries etc.) | I went swimming in the Thames in London UK | London, UK |
| Person names | Detects common names | Bill Gates of Microsoft | Bill Gates |
| Quantity | Identifies measurements, as of weight or distance | We’re 5km away from Paris | 5km |
| Duration | Identifies time periods | 1 week of vacation | 1 week |
Created entities can be edited from the entities tab. Linking entities to an intent will annotate your utterances with detected entities as you add them.
Entity Roles
The need for entities to have roles arises for use-cases where the same entity must be collected more than to complete an intent.
For instance, you want to book a flight ticket from point A to point B with a layover at Point C. Create an entity with the name Airport and define three different roles for this entity, such as origin, destination, and layover. Link the entity to each of these roles in the slots section. Subsequently, annotate the training utterances in intents with these roles. The roles arranged in a specific pattern will allow the chatbot to learn the pattern in consumer utterances and have a seamless conversation with the consumer.

Create entity roles

Link entities to roles
Entity roles are only supported for Mindmeld (custom and system entities) and Rasa (custom entities only), developers need to check the 'Entity roles' checkbox under advanced settings of the NLU engine selector dialog box.
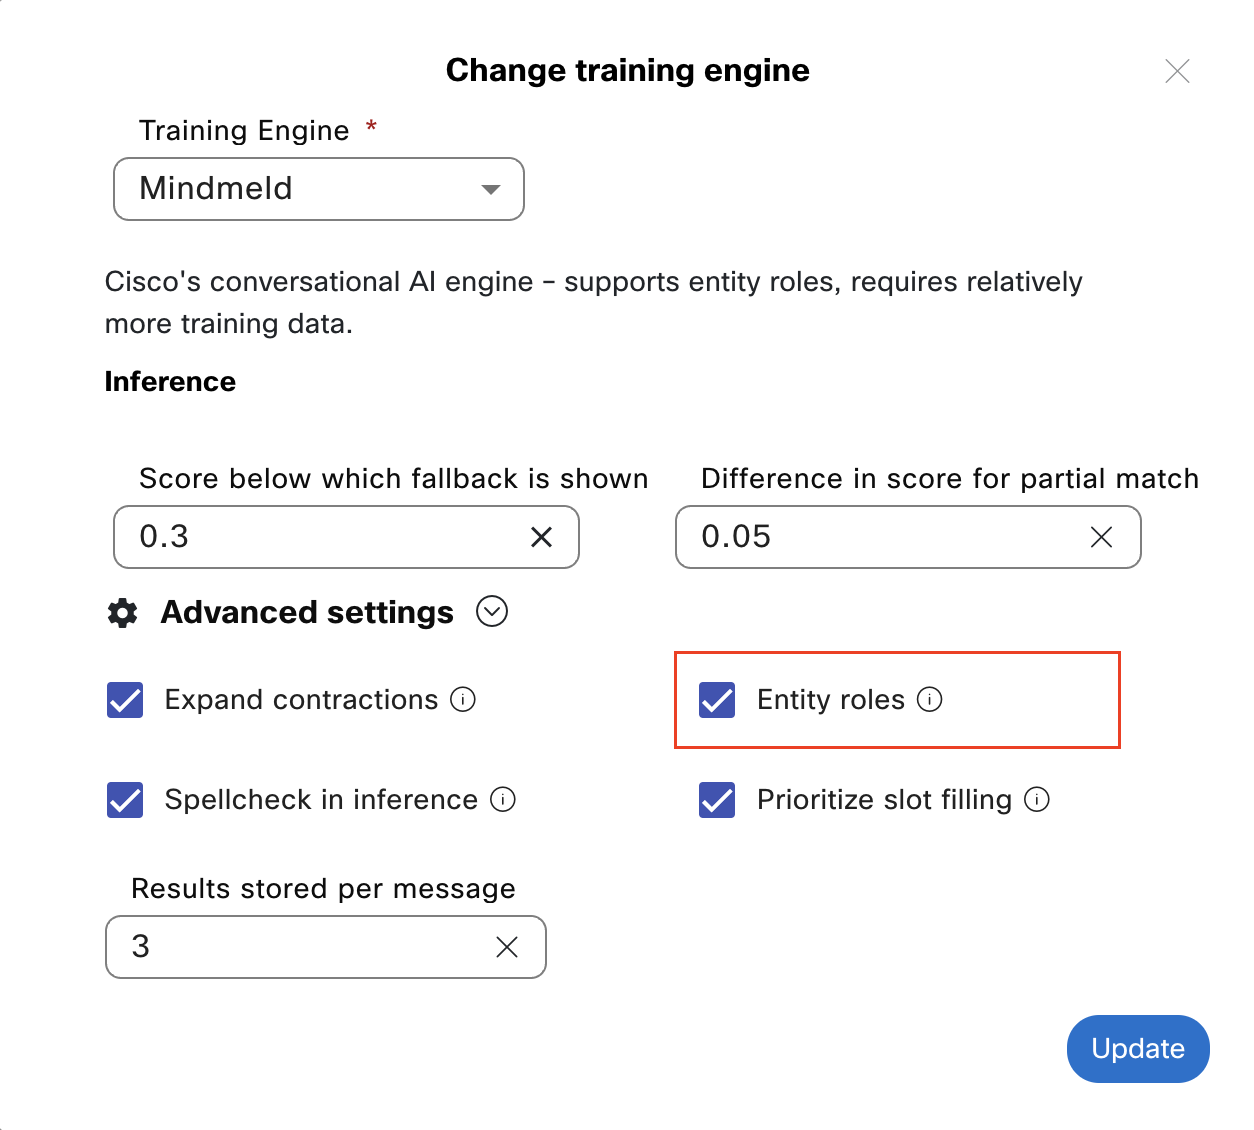
Checkbox to enable roles for Mindmeld
Note:
Developers cannot switch from RASA or Mindmeld to Swiftmatch while entity roles are in use. Roles must be removed from intents to disable the entity roles from advanced NLU engine settings.

Message displayed when switching from RASA (or) Mindmeld to Swiftmatch with roles still in use
Creating an Entity with Entity Roles
Use this procedure to create an entity and entity roles.
- Select a task bot from the dashboard.
- Click the Training tab. The Training data screen appears.

Training data screen
- Click the Entities tab.

Training data screen to create an entity
- Click +Create entity. The Create entity window appears.

Creating an entity
- Enter the Entity name
- Select the Entity type to the Custom list. The Entity roles field is displayed.

Creating an entity and adding entity roles
Note: Roles field is displayed while creating a custom entity only if entity roles are enabled in the Advanced Settings section of Change training engine window for RASA and Mindmeld NLU engines.
- Enter the entity roles and click Save. The newly created entity with entity roles can be viewed in the entities list on the Entities tab.

Entities list
Note: You can use the edit button corresponding to an entity to modify the entity or entity role details and use the delete button to delete the entity. Deleting the entity deletes the entity roles associated with this entity.
Linking Roles to an Entity
Use this procedure to assign roles to an entity for collecting the same entity twice for an intent.
- Select a task bot from the dashboard.
- Click the Training tab. The Training data screen appears.

- Click the Intents tab and select an intent to link entities and entity roles
- Click +Link entity to add entity to the slots for an intent
- Select the entity role for the entity name, wherever applicable.

Linking entities to entity role
- Click Save.
Multi-lingual changes to intent and entity creation
Users can create their training data in multiple languages. Users need to define utterances in each language that is configured for the bot. The slots will remain the same for each language with the template key being the unique identifier for the responses in each language.
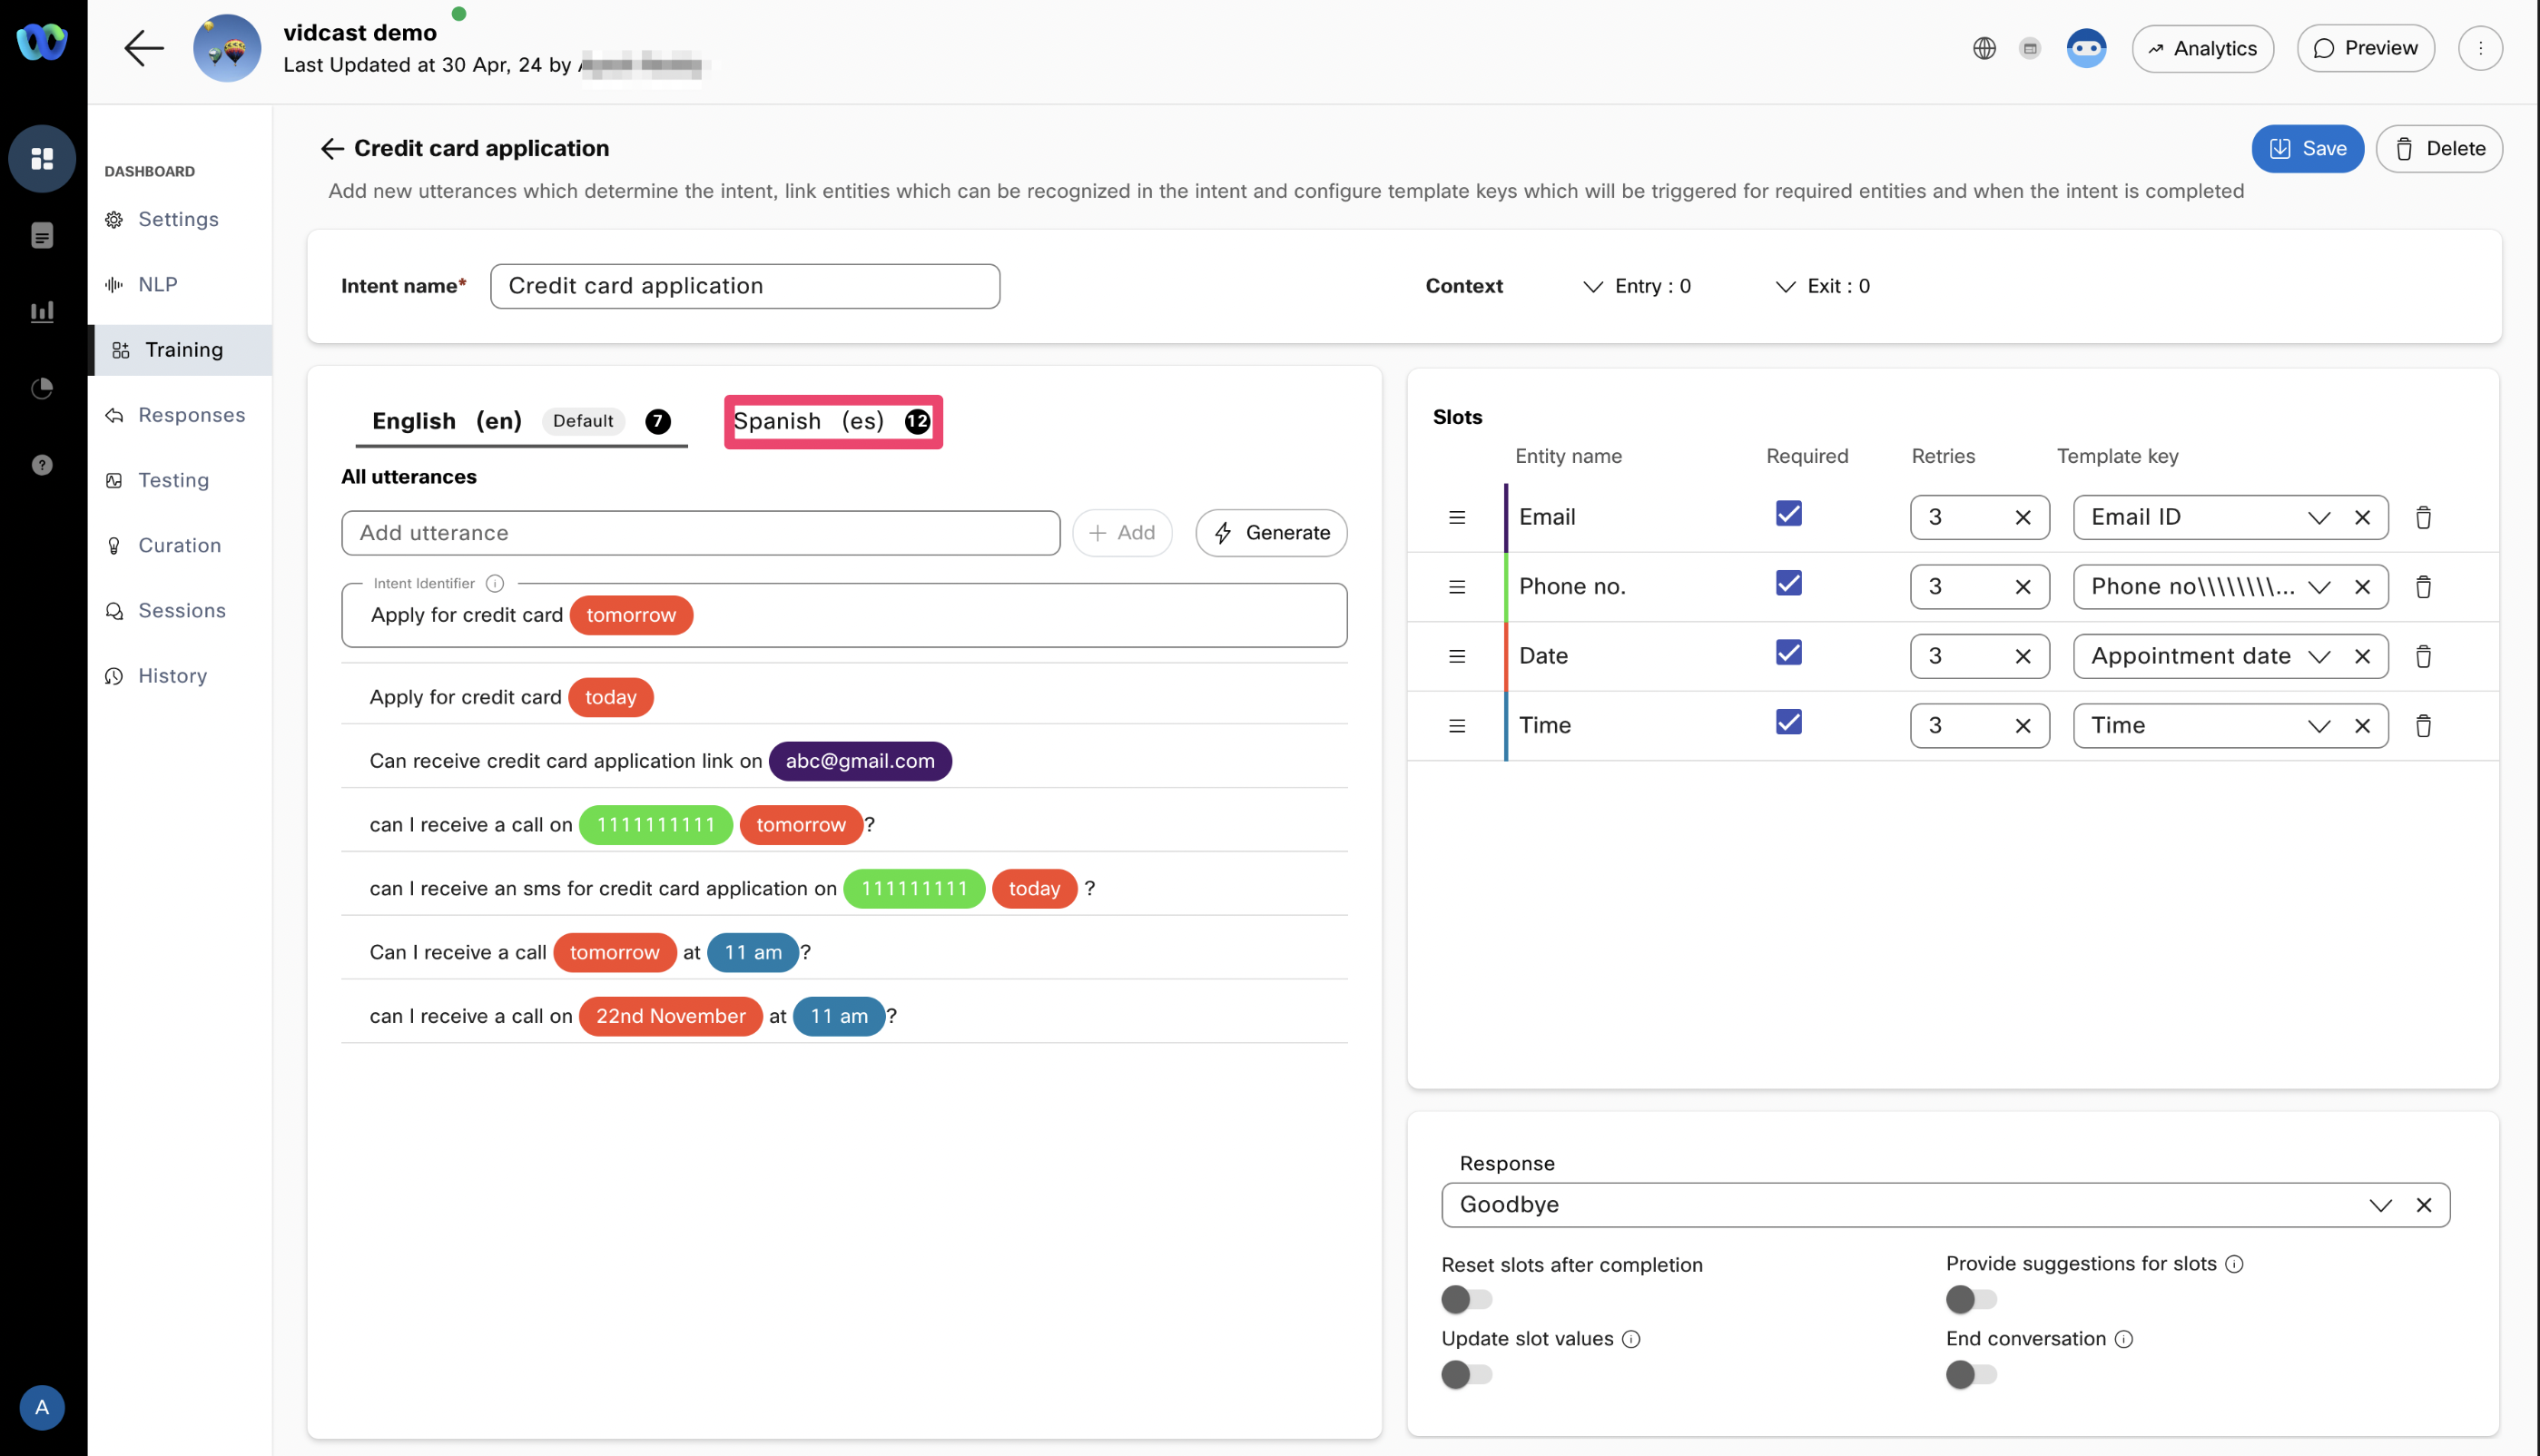
Configuring training data in multiple languages
Not all languages support all entity types. To check out the list of entity types each language supports on our platform please check our languages supported by task bots page.
Updated 3 months ago