
WhatsApp Node
WhatsApp node allows you to send text messages, messages with media attachments (audio, video, document and image), and template messages to your WhatsApp customers using a verified WhatsApp business account.

WhatsApp Node
Prerequisites
The following are the prerequisites to use the WhatsApp node in your flows.
- Configure a WhatsApp app on Webex Connect from Assets -> Apps -> Configure New App' section to authorize Webex Connect to use your WhatsApp account to send and receive messages.
- To send proactive notification messages to your customers, you should create and submit a respective message template which should be approved by WhatsApp for the allowed messaging use-cases. You should configure these templates, submit them for approval and track the approval status from 'Tools -> Templates' section within Webex Connect.
Get Opt-In for notification messages
You are required to obtain opt-in before opening marketing, utility, and authentication conversations with customers outside the 24-hour window. You can obtain opt-in in a multitude of ways, both on and off WhatsApp. Refer this section for more details.
Node Configuration
Drag and drop the WhatsApp node on the flow canvas. Double-click the node to configure a message request.

Node Configuration
Destination type
The destination type can be one of the following two options:
- WA ID : WhatsApp ID (phone number including country code) of your customer/ recipient of this message.
- Customer ID : Primary key of customer profile. A customer profile can be created to link one or more channel-specific identifiers. Webex Connect intelligently looks up for the corresponding channel identifier under a given customer profile based on the channel context. This allows for cross-channel communication.
Destination
The destination value corresponding to the selected Destination Type. The value can be static or dynamic.
For e.g., on an incoming message/event to your WhatsApp business number, the WA ID of the sender will be stored in a session variable that can be accessed using $(whatsapp.whatsappId) while replying.
Note
If +E.164 format is enabled for your tenant - all the numbers in the To field should follow the "+E.164" format.
This format displays the number with a "+" followed by the country code and the phone number.
+E.164 format is not applicable to the numbers in the From field.
Message Type
WhatsApp supports the following message types:
- Text: Text message; the length of the message is limited to 4096 characters.
- Media: Media attached messages including audio files, video files, documents, stickers, and images along with a caption (optional).
- Template: Rich message templates that can include media objects (image/video/document), header, footer, and/or interactive components (like Call-to-action - CTA buttons and Quick Replies).
- Location: Send location by specifying latitude and longitude with an optional name and address.
- Contact: Share contacts to customers including details like addresses, phone numbers, websites, and so on.
- List Messages: Messages including a menu of up to 10 options. This type of message offers a simpler and more consistent way for users to make a selection when interacting with a business.
- Reply Buttons: Messages including up to 3 options —each option is a button. This type of message offers a quicker way for users to make a selection from a menu when interacting with a business. Reply buttons have the same user experience as interactive templates with buttons.
24 hour rolling window
Once a user contacts a business, the business can respond with any type of message in the next 24 hours. But if the business is contacting the user before user sends a message, or after 24 hours have passed, it can only send message using the template message type leveraging an approved template, created from within Tools->Templates section.
Free-form text messages, media, location, contact message, reply buttons or list messages will not work outside this 24 hour window. They will result in a failure callback with error.
Text
- Text body: The content of the text message, which can contain URLs and formatting. The length of the message is limited to 4096 characters. To format your messages use the following formatting symbols:
| Formatting | Symbol | Example |
|---|---|---|
| Bold | Asterisk(*) | Input:Your total is *$10.50*.Output: Your total is $10.50. |
| Italics | Underscore (_) | Input:Welcome to _WhatsApp_!Output: Welcome to WhatsApp! |
| Tilde (~) | Input:This is ~better~ best!Output: This is | |
Monospace | Three backticks (```) | Input:print 'Hello World';Output: print 'Hello World'; |
- Preview URL (Optional): WhatsApp recognizes a URL in a text message and makes them clickable. Enable the checkbox to include a preview for the URL. The majority of the time when you send a URL, whether with a preview or not, the receiver of the message will see a URL that they can click on. URL previews are only rendered after one of the following has happened:
- The business has sent a message template to the user.
- The user initiates a conversation with a "click to chat" link.
- The user adds the business phone number to their address book and initiates a conversation.
Media
- File type & MIME type: Select the appropriate file type and the corresponding MIME type. Here is a list of supported File types and MIME types.
| File type | MIME types | Maximum Size |
|---|---|---|
| Audio | AAC, AMR, MPEG, OGG, OPUS Note: For OGG MIME Type, only media codec supported by WhatsApp is OPUS. Also, OPUS MIME Type is no longer supported by WhatsApp. | 16MB |
| Document | PDF, DOC, DOC(X), PPT, PPT(X), XLS, XLS(X), .TXT | 100MB |
| Image | JPG, JPEG, PNG | 5MB |
| Video | MP4, 3GPP Note: Only H.264 video codec and AAC audio codec is supported for MP4 Mime Type. | 16MB |
| Sticker | WEBP | Static stickers: 100KB Animated stickers: 500KB |
- Payload: Publicly accessible URL that is a direct link to the media.
Payload
The publicly accessible URL must end in the same file format set under the 'File MIME type'. It should not have any geo-restriction and should be accessible from a server located within USA premises.
-
File Name - Applicable for document media type. The document file will be saved as the entered 'file name' on the user’s device.
-
Caption: Applicable for images and videos. The caption text is displayed along with the attachment.
Caption field had been previously used to identify filename for a document attachment in some scenarios. Make sure to copy the filename here as well for a document media attachment.
Stickers
Users can now send and receive custom Stickers through WhatsApp. You need to follow the below steps if you want to send a sticker.
- Select WhatsApp from the panel and double-click.
- Select Message Type as 'Media'.
- Select Sticker from the File Type dropdown in the Message Configuration
- Select WebP from the MIME Type dropdown (currently only WebP is available).
Note
WebP is a modern image format that provides superior lossless compression and creates smaller and richer images that makes web faster. The source libraries to use for converting an image to WebP file-format are available here [<https://developers.google.com/speed/webp>]. You can also use various third-party converters publicly available to convert images to WebP file-format.
- Enter the direct URL pointing to the sticker in Payload.

Stickers
Note
Custom stickers must meet the following requirements:
- Each sticker has a transparent background.
- Stickers must be exactly 512x512 pixels.
- Each sticker must be less than 100 KB.
Apart from the above, the below points are also recommended while customizing a sticker:
- Adding an 8-pixel #FFFFFF stroke to the outside of each sticker is advised to be able to work with a variety of backgrounds, including white, black, colored, and patterned.
- The sticker image and the edge of the 512x512 pixel canvas should have a 16-pixel margin in between.

Sticker Outline
Notification Messages using Templates
Once a user contacts a business, the business can respond with any type of message in the next 24 hours. These types of messages are free.
But if the business is contacting a user before the user sends a message or after more than 24 hours have passed, it can only send a message template. This is a paid notification.
Free-form text messages, media, location or a contact message will not work outside this 24 hour window. They will result in a failure callback with error.
Template
24-hour rolling window
Once a user contacts a business, the business can respond with any type of message in the next 24 hours. But if the business is contacting a user before the user sends a message or after more than 24 hours have passed, it can only send message using the template message type using an approved template from within Tools->Templates section.
Free-form text messages, media, location, contact message, reply buttons or list messages will not work outside this 24 hour window. They will result in a failure callback with error.
This message type allows you to send proactive messages using a pre-defined template to your users. A template should be registered from Tools > Templates section within Webex Connect platform. Include the following as part of a notification message using the template message type:
- Attachment (Video, Image and Location)
- Header and Footer text.
- Interactive buttons (Quick Reply and Call-to-action buttons)
For more information on how to create a template, refer Template doc.
Provide the following details under Message Configuration:
| Parameter | Description |
|---|---|
| Template Name | Select the required template from the drop-down list. The drop-down list displays all the pre-defined templates for WhatsApp that are already approved. |
| Header Parameters | Under Header Parameters, enter/select the following: > Parameter Name - the name of the parameter. This field is auto-populated based on the template you have selected. > Parameter Type - the type of the parameter. Supported types are Text, Currency, Date-time. Currency and Date time should be used to localize the content based on user's locale. > Media URL - a URL pointing to the document, video or image attachment. > File Name - filename for document attachment. >* Value - the value of the parameter. |
| Body Parameters | Under Body Parameters, enter/select the following: > Parameter Name - the name of the parameter. This field is auto-populated based on the template you have selected. The parameter name is "OTP" for Authentication templates. > Parameter Type - the type of the parameter. Supported types are Text, Currency, Date-time. Currency and Date time should be used to localize the content based on user's locale. >> Currency params- Code indicates the code of the language or locale to use; Amount is the currency amount multiplied by 1000. E.g, for USD 9.99, specify the amount as 9990; the Default value is used when the localization fails. >> Date and time - Epoch timestamp is the Unix timestamp showing the number of seconds that have elapsed since 00:00:00, 1 January 1970 (UTC), minus leap seconds. JavaScript for converting local time to Unix epoch; the Default value is used when the localization fails. >* Value - the value of the parameter. The following buttons can only be configured with Authentication category Templates > - OTP - the value of the One-time-Password |
| Identity Key Hash | Enter the hash key of the customer. Use this to authenticate the identity of the customer. If there is a mismatch of the hash, the message will not be delivered. This is an optional field. |
| Footer (Optional) | Optional footer text. This needs to be specified while creating a template. |
| Buttons (Optional) | You can see the configured interactive buttons in this section. The interactive buttons can either be a Call-To-Action (CTA) or a Quick Reply (QR) button. Call-To-Action (CTA) - Supported types: Call phone and Visit website. In case of Visit website, you can define a dynamic URL path to append with URL domain (domain should be pre-defined while registering a template). You can have a maximum of one button type of each type per message, i.e, one Call Phone Number button and one Visit Website button. WhatsApp allows a maximum of two CTA buttons. Quick Replies (QR) - use this button to configure quick replies like Yes, No, Maybe. You can use a maximum of three QR buttons. Define a payload to each QR button, this will be received back as part of the Postback event in receive node. The following buttons can only be configured with Authentication category Templates _ OTP transfer buttons Auto-fill- This button type will include a button for sharing the code with your app when the customer taps the button on their device. Copy-Code -This button type will include a button for customers to copy and paste the code into their app. |

WhatsApp Message Previews for Template Messages
You can create your own templates, submit them for approval to WhatsApp, and track approval status using Webex Connect's Template Management section accessible under 'Tools > Templates'.
When you select a template that has interactive buttons within it you need to configure it. In the case of a template with CTA buttons, you need to provide the URL Suffix. The URL Suffix appends to the pre-defined URL and personalizes the link for the users. For QR buttons, you need to provide the button payload. The payload that you configure here identifies the QR button.
The following image shows the configuration for an interactive template with CTA buttons:

Interactive Template with CTA Buttons
The following image shows the configuration for an interactive template with QR buttons:

Interactive Template with QR Buttons
The following image shows the configuration for an authentication template with the Auto-fill option enabled:
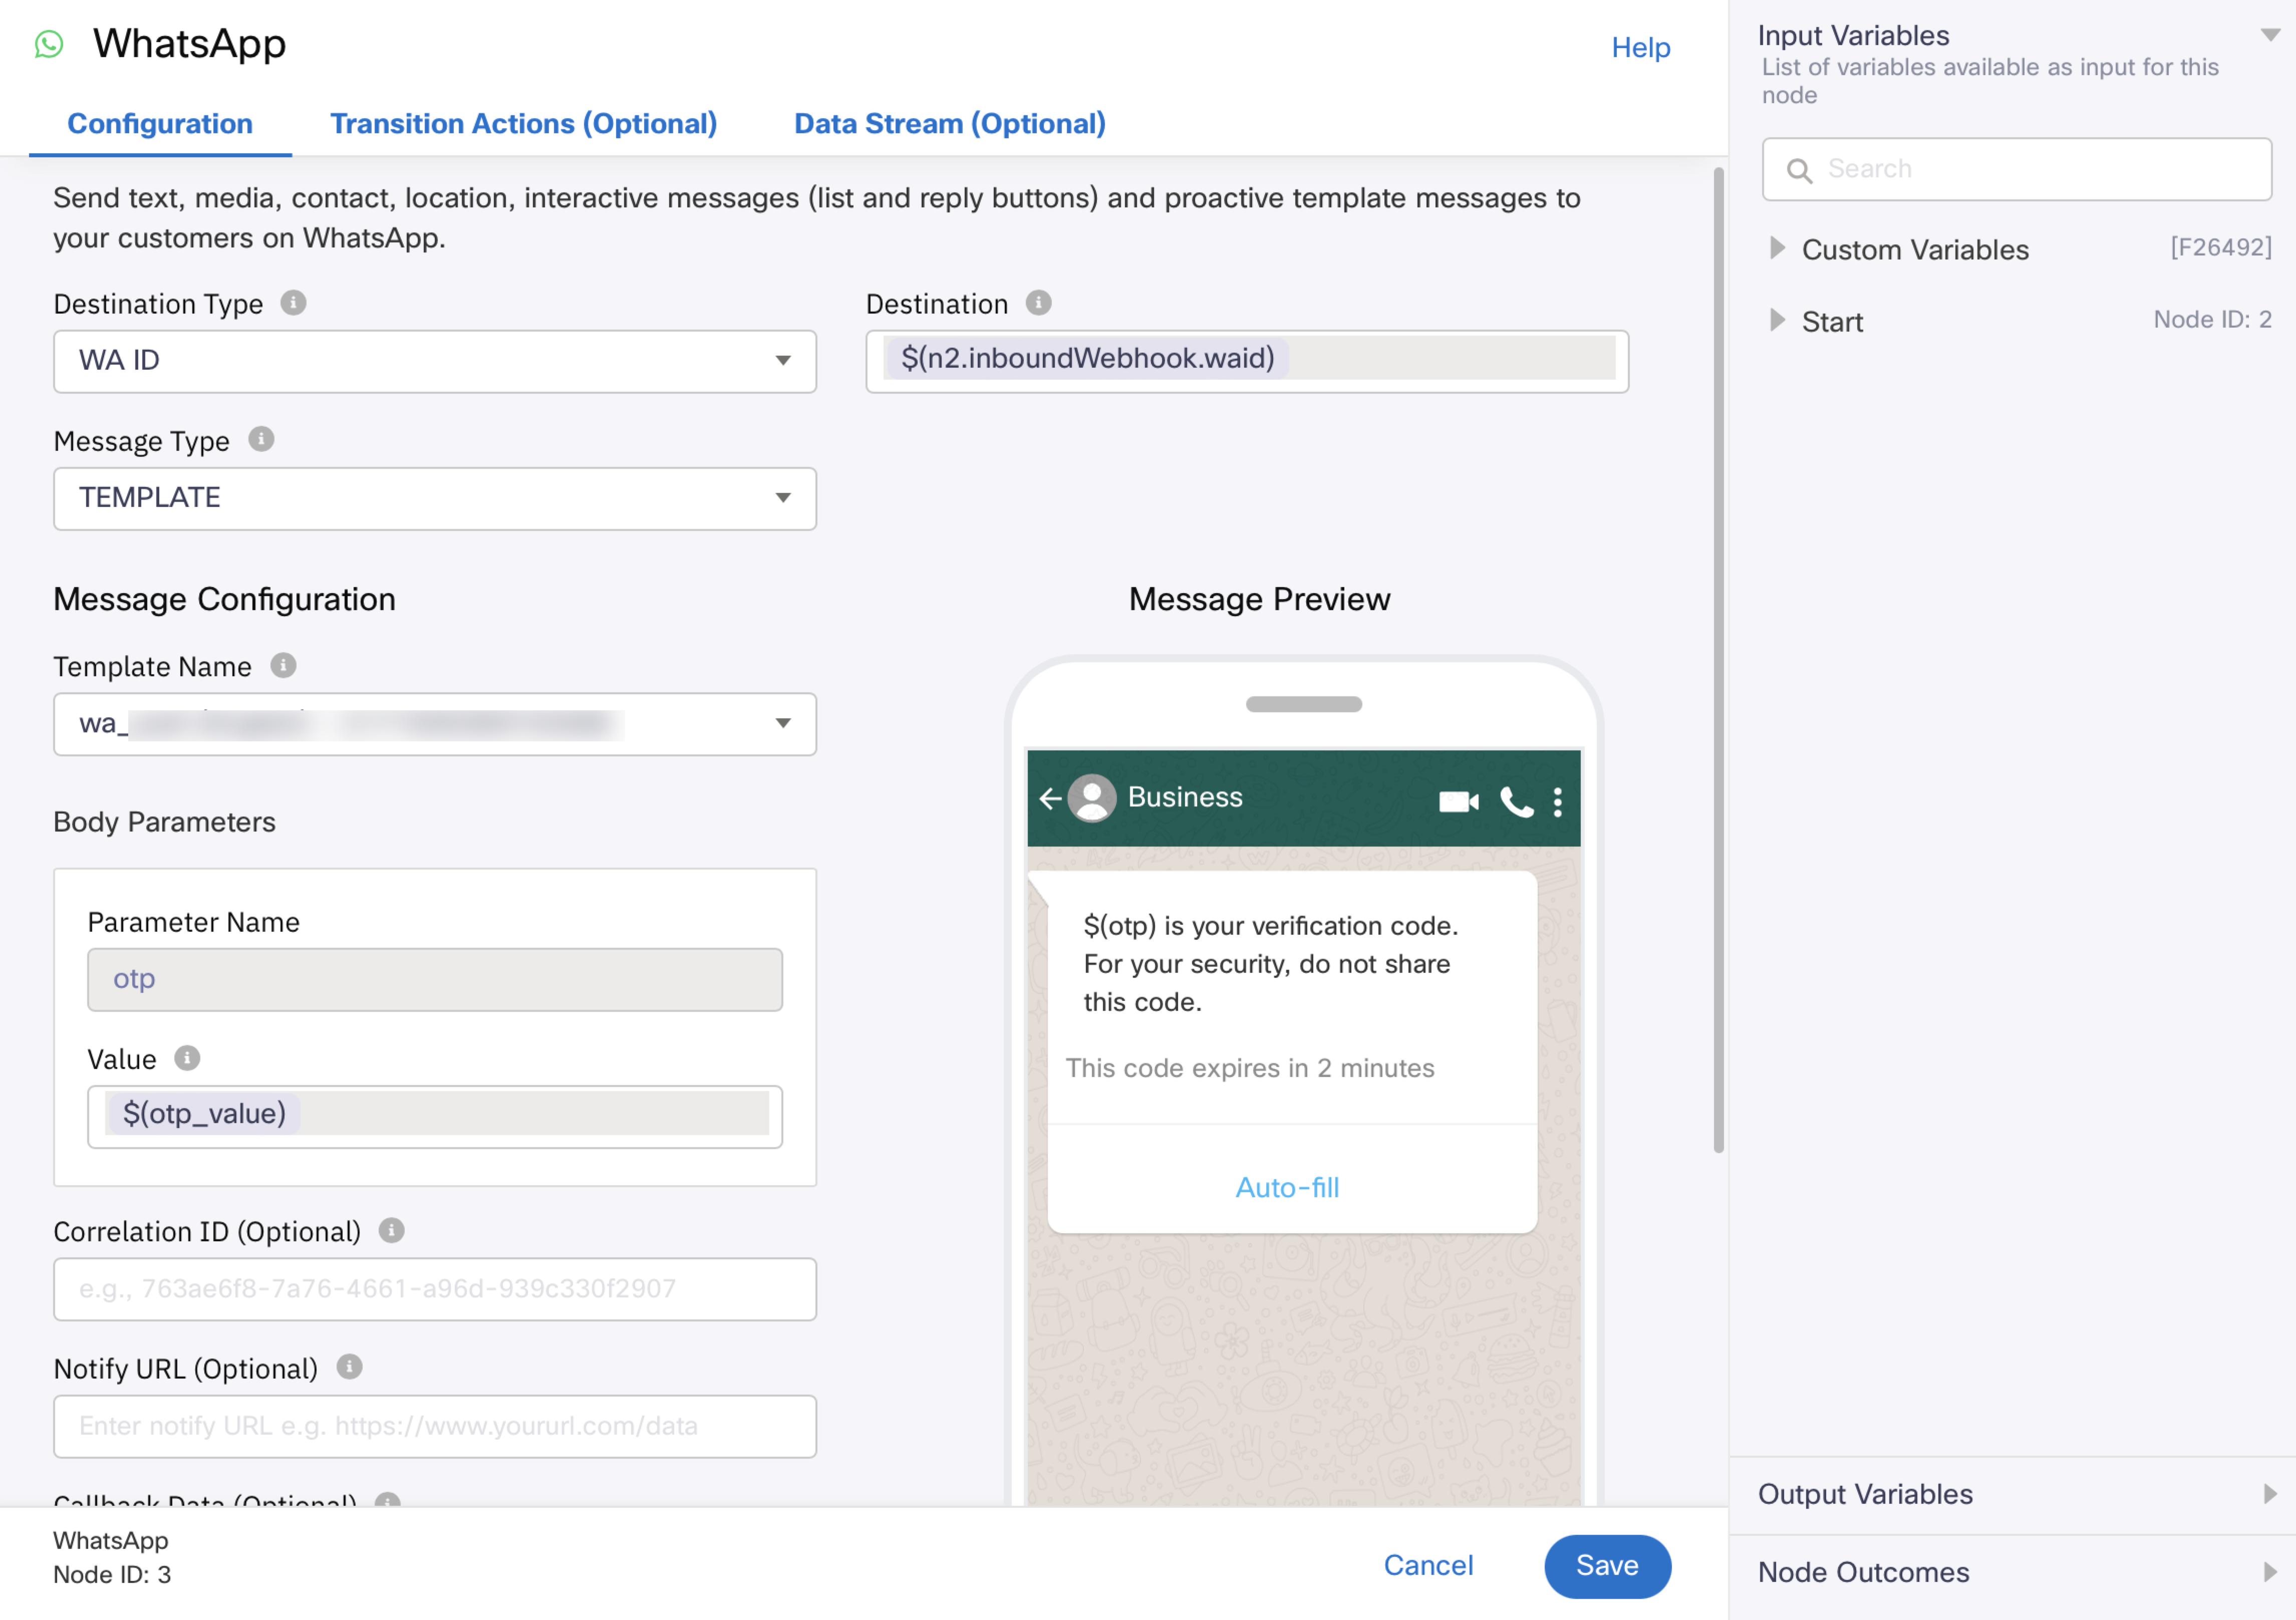
Authentication Template with Auto-fill button
Supported Media Types for Marketing and Utility category templates
| Media | Template Message - Header Media URL file format | Maximum Size |
|---|---|---|
| Document | TXT, PDF, PPT, DOC, DOC(X), PPT(X), XLS(X) | 100 MB |
| Video | 3GPP, MP4 | 16MB |
| Image | PNG, JPEG | 5MB |
Location
This message type allows you to send location details to your users. Provide the following details under Message Configuration:
| Parameter | Description |
|---|---|
| Latitude | The latitude of the location |
| Longitude | The longitude of the location |
| Name | The name of the location |
| Address | The address of the location. The address is displayed only if the location has a name. |
Contact
This message type allows you to send contact details to your users. Provide the following details under Message Configuration:
| Parameter | Description |
|---|---|
| Formatted Name | The full name of the contact as it normally appears |
| Prefix | The prefix of the contact like Mr, Ms, Mrs, Dr, Col etc. Do not use punctuation in this field. |
| First Name | The first name of the contact |
| Last Name | The last name of the contact |
| Middle Name | The middle name of the contact |
| Suffix | The prefix of the contact like Jr, Sr, PhD, MD, Ret etc. Do not use punctuation in this field. |
| Address(es) (optional) | The address or addresses of the contact, if any |
| Email(s) (optional) | The email or email addresses of the contact, if any |
| Phone Number(s) (optional) | The phone number(s) of the contact, if any |
| Birthday (optional) | The birthday fo the contact, if you wish to provide |
| Website(s) (optional) | The website of the contact, if any |
| Organization (optional) | The organization of the contact, if you wish to provide |
List Message
- Header Text – Description about the list. It must be in text format. This is an optional field. Maximum of 60 characters is supported.
- Message Body – Body of the message. Maximum of 1024 characters is supported.
- Footer Text – Additional notes. It must be in text format. This is an optional field. Maximum of 60 characters is supported.
- List Title – Title of the list button. Maximum of 24 characters is supported.
- Configure List Items – Click this to configure the list of the options.
- List Section: Must contain a title and at least one row. You can add a maximum of 10 sections.
- Row Title: Title of the row.
- Identifier: A unique identifier for the row. This is returned as part of the incoming event when the row is selected by the user. Maximum of 200 characters is supported.
- Description: Optional description about the row. Maximum of 72 characters is supported.
- Add Row: Click this to add another row in the section.
- '+' icon: Click this to add another section in your list.
- '>' icon: Use this to navigate between sections.
- Save: Click this to save the list options.
- List Messages are best for presenting several options, such as:
- A customer care or FAQ menu
- A take-out menu
- Selection of nearby stores or locations
- Available reservation times
- Choosing a recent order to repeat
Reply Buttons
- Reply Buttons: Messages including up to 3 options —each option is a button. This type of message offers a quicker way for users to make a selection from a menu when interacting with a business. Reply buttons have the same user experience as interactive templates with buttons.
- Header Type – Text, image, video, or document. Provide a media URL for video, image, and document. For text, add a text field with the required content. Maximum of 60 characters is supported for text.
- Message Body – Body of the message. Maximum of 1024 characters is supported.
- Footer Text – Additional notes. It must be in text format. This is an optional field. Maximum of 60 characters is supported.
- Replies – You can configure up to 3 reply buttons.
- Reply Title: Unique title for the reply option. Maximum of 20 characters is supported.
- Identifier: A unique identifier for the reply option. This is returned as part of the incoming event when the option is selected by the user. Maximum of 200 characters is supported.
- Add New: Click this to add a new reply option.
- Save: Click this to save the configuration.
Reply Buttons are best for offering quick responses from a limited set of options, such as:
- Airtime recharge
- Changing personal details
- Reordering a previous order
- Requesting a return
- Adding optional extras to a food order
- Choosing a payment method
Reply buttons are particularly valuable for ‘personalized’ use cases where a generic response is not adequate.
List Message and Reply Buttons Specifications
- List Messages and Reply Buttons can be combined together in the same flow.
- A user can only select one option at the same time from a list or button message, but they can go back and re-select a previous message.
- List or reply button messages cannot be used as notifications. Currently, they can only be sent within 24 hours of the last message sent by the user. If you try to send a message outside the 24-hour window, you get an error message.
- Supported platforms: iOS, Android, and web.
See how text messages compare to interactive messages:

See an example of how List messages and Reply buttons can be combined in the same flow:
Identity Hash Field
WhatsApp enables you to authenticate the identity of the customer to make sure you are communicating with the intended person. For this, WhatsApp manages a cryptographic identity hash key unique for the customer’s phone number and matches it with the message requests sent from Webex Connect platform.
You can capture the identity hash key of a trusted WhatsApp customer (at the time) as part of the output variables of Start Node, Receive Node, and within the Delivery Receipt payloads
The identity hash key should be included within the WhatsApp send node or messaging API when sending any sensitive information, PII data or an authentication template message (containing one-time password).
Whenever there is a potential identity change (due to theft or user updating to a new device), WhatsApp updates the hash key. When you send a WhatsApp message to that customer including the old hash in the message, the delivery of the message fails because the hashes do not match. Subsequently, an error code is sent to notify you that the delivery has failed. This indicates that the customer’s phone number can no longer be authenticated.
To re-authenticate, contact the customer using any of the non-WhatsApp channels and verify the customer’s identity.
Messages without hash key
Messages sent without including the identity hash key will continue to be delivered as expected, disregarding any number ownership change or potential impersonation of the intended customer.
After re-authenticating the customer, you should capture the new hash key:
- By sending a message to the WhatsApp user id without including the hash. You will receive the updated hash as part of the delivery receipt.
- As part of incoming message payload within Outbound webhooks, Export Logs, Debug logs, Start Node, and Receive Node, when the customer messages you.
You can save it for future use and include the new hash in the messages going forward.
Correlation ID
You can assign a unique ID of your choice to each WhatsApp message. This ID is returned to the platform with the delivery report and can be used to identify the message.
Callback Data
In case there is additional data to be sent along with the delivery reports to the URL, you must specify that here.
Validations forCallback Data & Correlation ID:
- Callback Data, Correlation Id fields are optional for all the channels. Send node can be saved without providing these fields.
- All characters, Alphabets, Numbers, and special characters are accepted.
- Variables can be added.
- Hard coded values are accepted.
- On Platform side, there is no Max or Min length validation for these fields.
Notify URL
You can choose to notify a URL with the delivery report for WhatsApp message. This field accepts only a valid URL or a variable. If an invalid URL is passed in API request or via a variable, then such request will not be considered eligible for retries.
Validations for Notify URL:
- It is an optional field optional for all the channels. Send node can be saved without providing these fields.
- Notify URL should be filled with proper URL format. Otherwise, error message ‘Invalid URL, field accepts only valid URL or variable’ will be displayed.
- When space is provided in front of the URL, Invalid URL, field accepts only valid URL or variable’ will be displayed.
- When space is provided at the end of the URL, space gets trimmed and ignored and DRs are received to the URL.
- No Max length validation.
- Variables can be added to this field.
Optional Parameters
- Wait For: The flow waits for one of the following conditions to be met for exiting the node.
- None: The default option, exits the node immediately after executing the send
- Gateway Submit: Exits the node upon submitting the message to WhatsApp
- Delivery Report: Waits until receiving the delivery receipt for the message sent
- Read: Waits until the customer has read the message.
- Timeout: Maximum time in seconds until which the node should wait for one of the 'Wait for' conditions to be met. The node exits via the 'onDeliveryReportFail' node outcome edge when the set time elapses.
Wait for condition on Read
If a customer disables read receipt in their WhatsApp privacy settings, the node keeps waiting for the read receipt until the set expiry time.
- Expiry: 2 types of message expiry checks are supported
- UTC: Time in UTC within which the message send should be attempted. For example, if the value is set to 2019-23-04 03:06:48 AM, the message is suppressed if a send attempt is made beyond the set time.
- Seconds: Maximum time in seconds within which the message must be submitted to WhatsApp.
The node exits via the 'onPolicyFail' node outcome edge when the expiry condition cannot be met.
Output Variables
You can see the data that this node generates as output variables. These variables are available for use in subsequent nodes.
| Output Variable | Description | Example |
|---|---|---|
| send.deliveryStatusCode | List of status codes | |
| send.deliveryStatusDescription | Status code descriptions | Success |
| send.sentDateTime | Send request initiation timestamp in UTC | 2019-06-02T17:17:15.575Z |
| send.gatewayTid | Unique TransactionID (TID) of the message send request | 48ceebcb-8035-40d0-8f22-3608b915e2b6 |
| send.response_interactive | Captures if the interactive button in the message is tapped | |
| send.response_data | [{"code":"1001","transid":"48ceebcb-8035-40d0-8f22-3608b915e2b6","description":"Queued"}] |
Node Outcomes
The node exits via one of the node edges correspondings to the outcome of the node.
| Node edge | Outcome name |
|---|---|
| Green | onSuccess - When waiting for the condition is set to _none and upon successfully executing the send request onSubmit - When waiting for the condition is set to wait for _Gateway Submit and upon successfully submitting the message within the set timeout value _ onDeliveryReportSuccess - When wait for the condition is set to _receive delivery report* and upon successfully receiving the DR within the set timeout value |
| Yellow / Amber | * onTimeout - When one of the waits for conditions is set and no acknowledgment is received within the timeout window set |
| Red | onError - When node execution failed. Any errors arising from passing invalid field values List of response codes corresponding to onError outcome onPolicyFail - When one of the policy checks failed. E.g. Send was attempted after the expiry time _ onDeliveryReportFail - When wait for the condition is set to receive _delivery report* or and when no corresponding DR is received within the timeout window set. |
WhatsApp Business Platform Onboarding Guide for Developers
By now, you would have set yourself up on Webex Connect with your WhatsApp number. If not, click here to know how.
1. Testing
After adding your number to Webex Connect, you can test it by sending a message to the number from your phone. You will be able to respond to it using the APIs or Flows.
To send proactive outbound messages, you will need to submit a template for approval. You can do this from Tools > Templates within your Webex Connect account.
2. Receiving Messages & Webhooks
To receive incoming messages and events from your customers, you can configure outbound webhooks under integrations by choosing the WhatsApp Business API app from the entity dropdown.
Once you set up your webhook successfully, you will see that your messages start landing on your webhook endpoint.
3. Messaging API
You can also test outbound messages through our API collection here
You will need to update your service key in the API collection.
4. Message Types
We support the following message types offered by WhatsApp today:
- Text
- Media
- Contact
- Location
- Templates
- Reply Buttons Message
- List Message
5. Entry Points
WhatsApp supports free entry points that are user generated. You can send a link, like the one below, to your customers to get them to initiate a chat.
https://wa.me/15551234567?text=I'm%20interested%20in%20your%20car%20for%20sale
This link can also be converted to a QR code or embedded as a button on a website or an email.
Updated 3 months ago