
Export Logs
Export transaction logs for Inbound and Outbound Messages sent or received using the platform
The Export Logs feature allows you to export transaction logs for inbound and outbound messages sent using various channels, supported by the platform in .zip file format. The logs are available for the past 30 days by default. However, you can download the logs for any time range within the last 30 days period.
The downloaded Outbound logs are segregated at channel-level. Whereas, for Inbound logs, they are segregated at channel event-level.

Export Logs
The access to download the logs depends on your decryption access. If you have decryption access, you can download the decrypted log files. If you do not have decryption access, you can download only encrypted files.
Download Limits
You can currently download up to 100,000 messages at once. If you select a time period with more than 100,000 messages, only the first 100,000 will be downloaded. Please contact your account manager to increase the limit of messages beyond the 100,000 downloaded messages.
Webex Connect supports AWS and Azure environments.
Bulk Export Logs
After the download limit for export logs is increased for your tenant, you will see an updated interface. You can now download up to 10 million records per selection. Select a service, channel, and required period. Click Download to download Outbound or Inbound logs.
When you click the Download button, a new row is added to the Recent Downloads/Exports tables, which indicates that the status is ‘Pending’. Later, the status changes to ‘In-progress’ and the download icon appears in grey color.
Note
The time taken to prepare the zip for download depends on the number of records in the file. In the case of a large number of records, it can take up to 30 minutes.
When the file is ready to download the status changes to ‘Completed’ and counter in the row increases by one. The download icon changes to a green color.
To download logs:
- Navigate to Tools > Export Logs page.
- For Outbound Logs, select the Service, Channel, and the Period. Click Download.
- For Inbound Logs, select the Number or App, Channel Event, and the Period. Click Download.

- While the log files are being prepared, the status appears as ‘Pending’ and then changes to ‘In-progress’. When the log file is ready for download, the status changes to ‘Completed’ along with an icon to download the logs.
- A list of recent 20 downloads appears under the Recent Downloads section. For each of the log files, this section also shows the period for which the log is downloaded, the number of records within the log files, and the timestamp at which the log file is downloaded.
- In case of Outbound logs, the record in the Recent Downloads section follows the - naming convention. For Inbound Logs, the naming convention is - .
Channels not supported
The Export Logs capability for Instagram and Google Business Messages is not supported, but they are incorrectly displayed as options in the drop-down menu.

Export Logs to SFTP/AWS S3
Note
This feature is not enabled for all tenants by default. Please reach out to your account manager if you want to get the 'Download' and 'Export to SFTP/ S3' options enabled for your tenant.
The Export to SFTP/S3 option can be enabled within the Export Logs page alongside the shift to URL-based download of export log files that is required to increase the Export Logs limit to 10 million rows per file. This option allows you to do a one-time download of data to an SFTP or AWS S3 location.
To export a log file to a desired location:
- Click Export Log > Download.

- Click Export to SFTP/S3 option to go to the configure log page.
- Select the Outbound Logs, Channel, and the required Period under the Configure log section.

- Select File Type (.csv or .txt) from the dropdown.
- Enter Filename.
- Select the Delimiter (tab, semi-colon, space, comma, others-user input).
- Select the required options for your export file from the following:
- Include column headers
- Add end of file
- Password protect my file
- Select SFTP or AWS S3 from the drop-down.
- For SFTP:
- Enter the User Name, Password, Host Name, Port Name, Path Name.
- Enter File Export Notify URL.
- Enter the email address in the Notify on Email textbox.
- You can upload the private key for SFTP configuration when you select the File Destination as SFTP using the Upload button.
- For AWS S3:
- Enter the User Name, Bucket Name, Access Key, Secret Key, and Region.
- Enter File Export Notify URL.
- Enter the email address in the Notify on Email textbox.
- For SFTP:
- In the pop-up, click Export or Cancel as per your requirement.
If you would like to configure a scheduler to export logs to your desired SFTP or AWS S3 location on a regular frequency, you can use the 'Schedule Export' section as mentioned below.
Download Export Logs
- Navigate to Tools > Export Logs.
- For Outbound Logs, select the Service, Channel, and the Period. Click Download.

- For Inbound Logs, select the Number or App, Channel Event (Incoming Message, Postback, List Message, or Reply Buttons Message), and the Period. Click Download.

After you click Download button, the status appears as 'Pending' while the log files are being prepared. The status changes to 'In-progress' when the log files are downloaded.
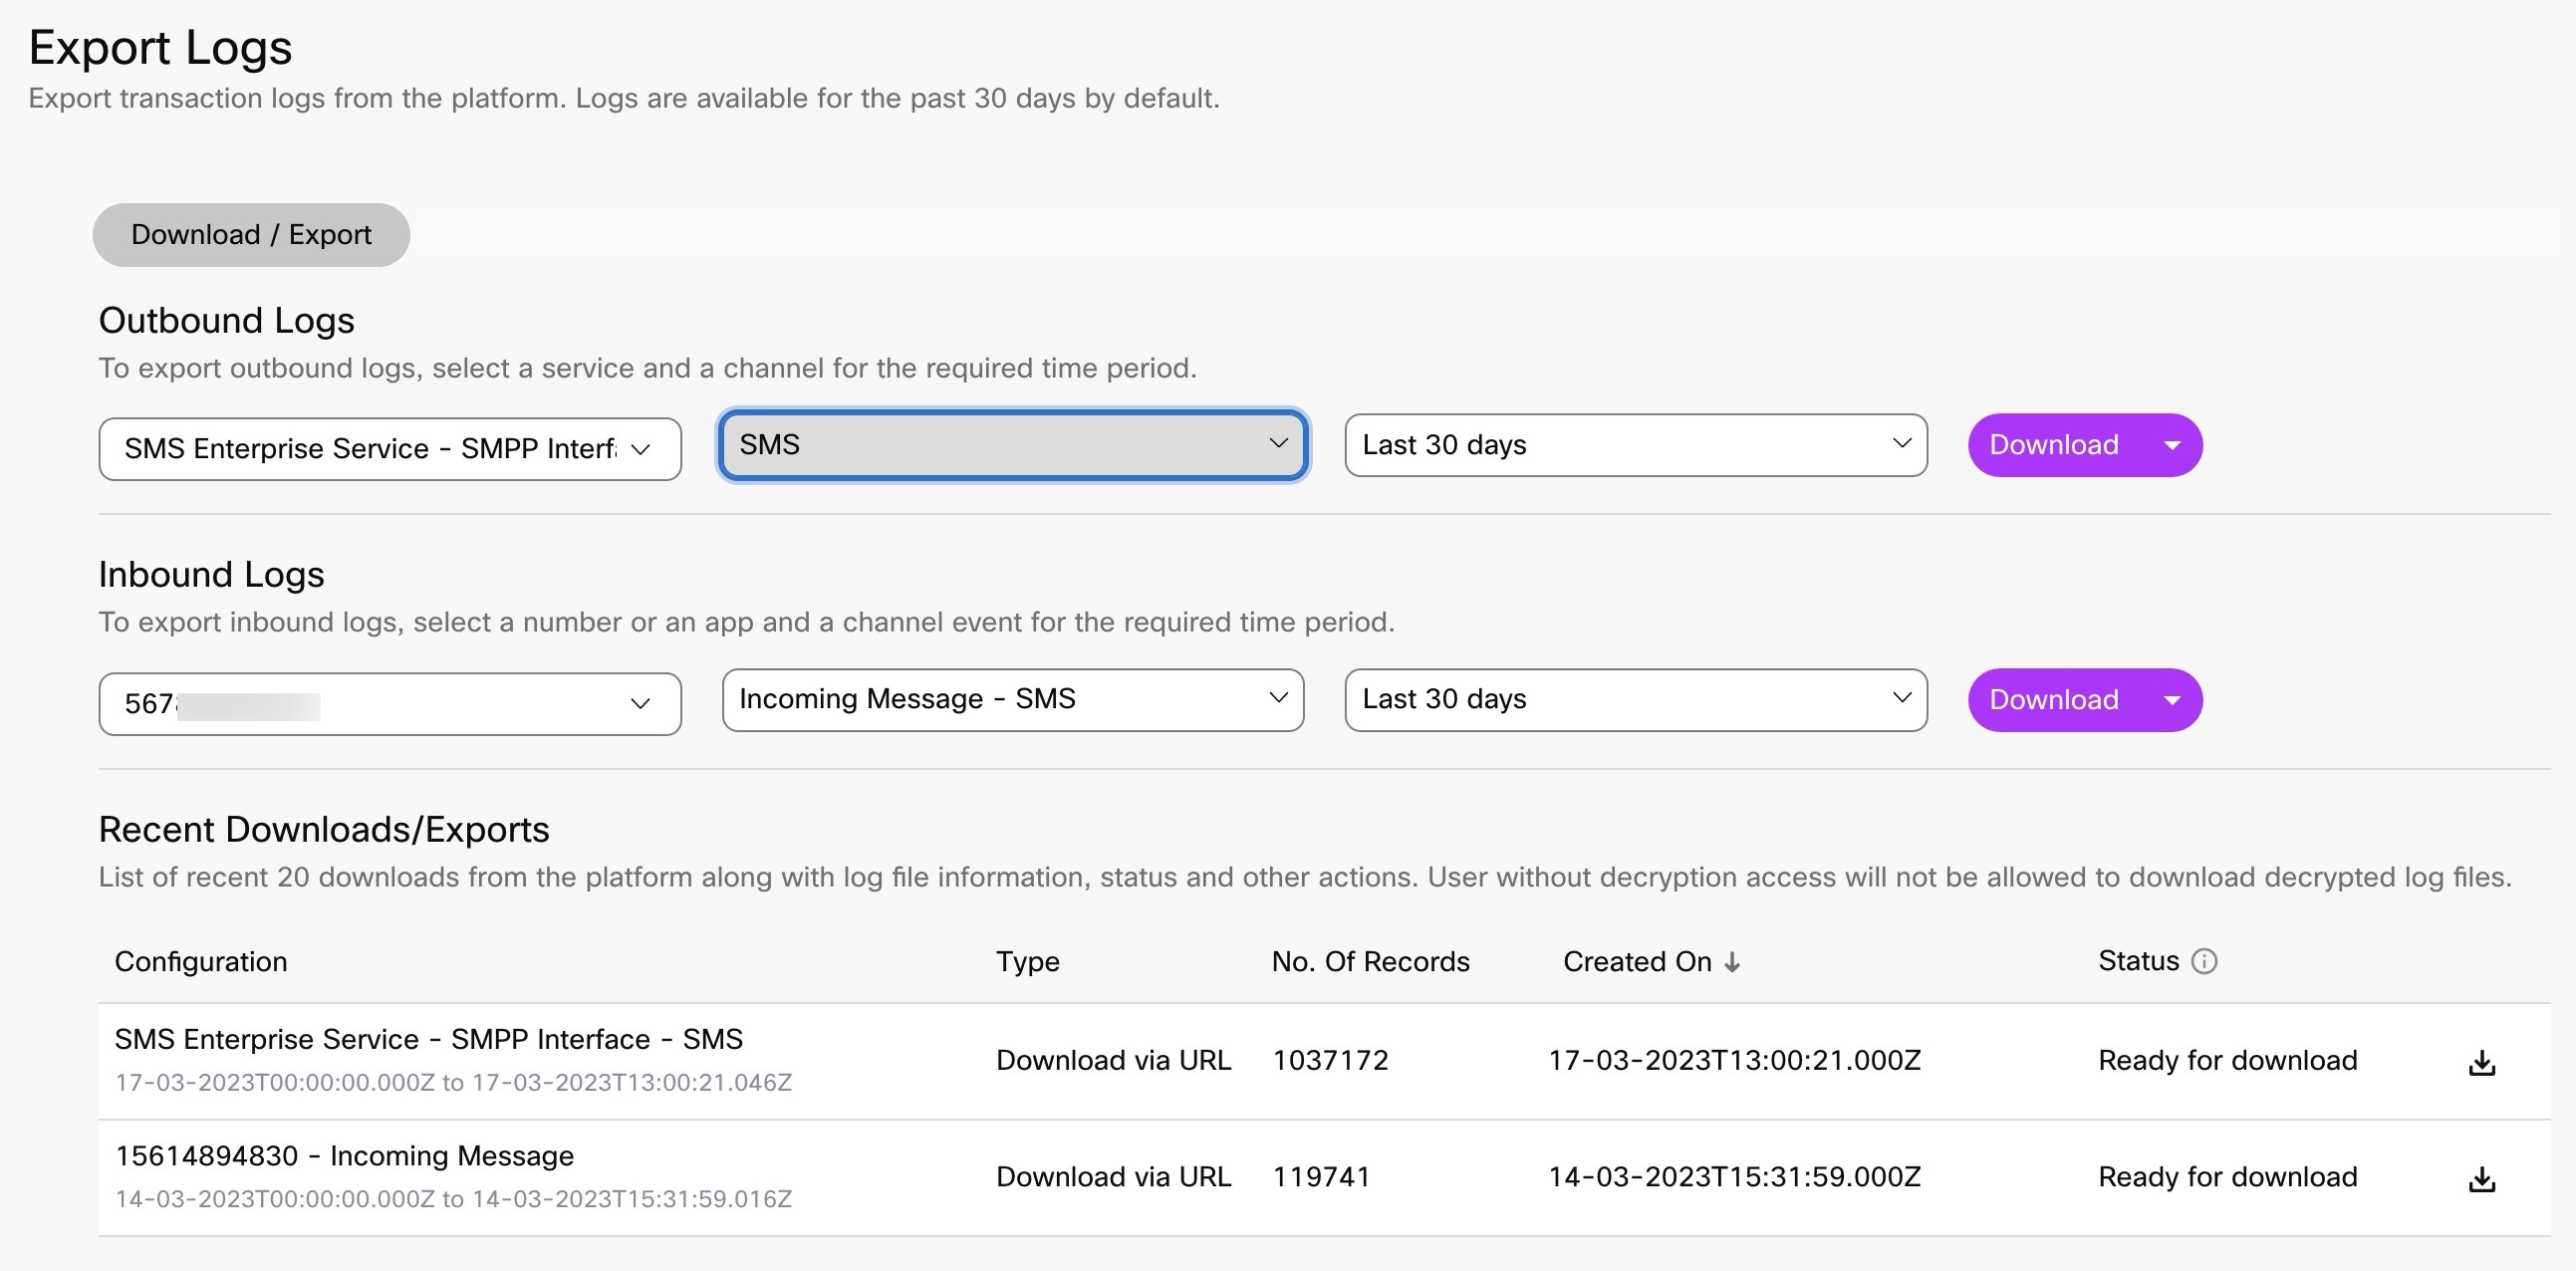
Downloading SMPP Logs
To download logs via SMPP:
- Navigate to Tools > Export Logs.
- For Outbound Logs, select the Service as SMS Enterprise Service - SMPP Interface, Channel - SMS, and the Period, and then click Download.
- For Inbound Logs, select the Number or App, Channel Event as Incoming Message - SMS, and the Period. Click Download.
After you click Download button, the status appears as 'Pending' while the log files are being prepared. The status changes to 'In-progress' when the log files are downloaded.
Schedule Export
Schedule Export enables you to view the list of log files that are scheduled for export, along with their status and other details to add a log for schedule, manage log schedule, delete and view logs of each log (can be done by selecting service and channel).
Note
Schedule Logs feature is a paid add-on and may not be enabled for your tenant by default. Please reach out to your account manager if you would like to enable this feature.
To schedule export:
- Navigate to Tools > Export Logs > and click Schedule Export tab.

- Click Add Schedule Log to go to the Schedule Export Log page.

- Under Export Schedule section, Select Frequency (Daily, Hourly) from the drop-down.
- Enter Offset Days (allowed daily offset range is -7 to 0).
Note
"Everyday the log file is exported between 0000 hours to 0100 hours. When an offset is set, logs of the previous day are exported as per the offset specified. Allowed offset range is -7 to 0 (default)."
- Select Schedule Ends (in 1 day, 7 days, 15 days, 30 days, custom or do not expire) from the drop-down. By selecting custom you can choose a particular day and time when you want the schedule to end.
- Select Add empty file when no records are found, option if you want to add a blank file in case of no records.
Note
The validity of do not expire schedule type would be 15 years.
You can configure the log selection based on service and channel, selected for outbound logs and number or apps and events selected for inbound logs. However, same schedule can only be scheduled once, else an alert message "same log configuration already exists with schedule"
Note
Only the Tenant Owner can configure file settings or schedule settings for exporting the logs.
Export Schedule
- Rotation policy: Frequency is only limited to hourly (export file of a previous hour within a fixed time-period) and daily (the export log file of the previous day to the specified location in the 00:00 - 01:00 hour of next day).
- Mention schedule end date: User selection for date same as date picker with 1 day, 7 days, 30 days, custom and do not expire.
- Offset selection: For daily, there should be day offset (-1 to -7), for hourly, there should be hour offset (-1 to -23).
Note
You can configure max. of 10 schedules by default. Please reach out to your account manager if you would like to get this increased for your tenant.
File Destination (Export)
You can export the file to a specified SFTP or AWS S3 by selecting a new location.
You can also provide an email (recommended) to get a notification email for the file export. You will be notified about any failures also on the same email id.
Note
A notification via email is sent 7 days and 1 day prior to the scheduled end date."
The Schedule Export Logs displays a table with columns such as Schedule, Frequency, File Destination, Created Date, Status (Enable/Disable), and Actions.

For each log schedule (row item), the information is shown as per the column along with a dropdown button to Manage, View Logs, and Delete Options.
- Click Actions > View Logs to view the logs in a tabular format. The table contains fields such as File Name, Schedule ID, File Size (KB), No. of Records, Created On, and Errors.
The below following line items will be available in Usage Reports:- Number of log schedules (only for schedule row)
- Number of files processed
- Total Size of files processed
Note
In the usage xls file, Export Logs tab has the same information or headers along with the date header. (i.e. format type, number of files processed, total size of files processed, number of schedules and date).
Additional columns are added for all channels to indicate timestamps for export logs and service name, flow name, etc. However, the newly added fields will be available only in the enhanced version of the Export Log. The columns include:
- Timestamps (where sent, delivered, or read, in IS8601 format)
- Error message (where not sent or not delivered)
- Time (will be in local time-zone of the tenant)
- Existing date
- Service-Name, ServiceID, FlowId, Flow Name, etc.
Access to download logs
Users with decryption access will be allowed to download decrypted log files. Whereas, users without decryption access can download only encrypted files. The users without the decryption access can see a download button only for the encrypted log file records, but not for the decrypted log files.
Fields in the Export Logs
The outbound logs and inbound logs contain the following fields channel-wise:
Note
Request Origin Timestamp filed is enabled only upon toggling on the feature.
| Channel | Outbound Logs | Inbound Logs |
|---|---|---|
| SMS | Transaction ID Correlation ID Template ID CRN Number Source Channel Asset Event Description Current Status Time Timezone MSISDN Message Segments * Request origin timestamp | Transaction ID CRN Number Channel Asset Event Description Current Status Time Timezone MSISDN Message * Segments |
| Voice | Transaction ID Correlation ID Template ID CRN Number Source Channel Asset Event Description Current Status Time Timezone MSISDN _ Duration * Request origin timestamp | Transaction ID CRN Number Channel Asset Event Description Current Status Time Timezone MSISDN Duration |
| In-app | Transaction ID Correlation ID Template ID CRN Number Source Channel Asset Thread ID Event Description Current Status Date Time Timezone User ID _ Message * Request origin timestamp | Transaction ID CRN Number Source Channel Asset Thread ID Event Description Date Time Timezone User ID Message |
| Push | Transaction ID Type Correlation ID Template ID CRN Number Source Channel Asset Event Description Current Status Total Sent Total Submitted OS Date Time Destination Type Destination Message * Request origin timestamp | |
| Facebook Messenger | Transaction ID Type Correlation ID Template ID CRN Number Source Channel Asset Event Description Current Status Date Time Timezone PS ID _ Message * Request origin timestamp | Transaction ID CRN Number Channel Asset Event Description Date Time Timezone PS ID Message |
| RCS | Transaction ID Correlation ID Template ID CRN Number Source Channel Asset Event Description Current Status Date Time Timezone MSISDN Payload * Request origin timestamp | Transaction ID CRN Number Channel Asset Event Description Date Time Timezone MSISDN Message * Media |
| Transaction ID Correlation ID Template ID CRN Number Source Channel Asset Event Description Current Status Date Time Timezone WA ID Message Media HSM Sent Time Delivered Time _ Read Time * Request origin timestamp | Transaction ID CRN Number Channel Asset Event Description Date Time Timezone WA ID Message | |
| Apple Business Chat | Transaction ID Correlation ID Template ID CRN Number Source Channel Asset Event Description Current Status Date Time Timezone ABC ID Message _ Payload * Request origin timestamp | Transaction ID CRN Number Channel Asset Event Description Date Time Timezone ABC ID Message |
| Transaction ID Correlation ID Template ID CRN Number Source Channel Asset Event Description Current Status Date Time Timezone From Email ID _ Subject * Request origin timestamp | Transaction ID CRN Number Channel Asset Event Description Date Time Timezone To Email ID * Subject |
Note
If +E.164 format is enabled for your tenant - all the recipient numbers will be displayed in E.164 format.
This format displays the number with a "+" followed by the country code and the phone number.
Additional fields are only available when Export Logs add-on is enabled
| Channel | Outbound Logs | Inbound Logs |
|---|---|---|
| SMS | Submitted Delivered Clicked Undelivered Failed Error Code Error Description Message Type Template Type Service name service ID Flow name Flow ID Flow transaction ID Request IP Channel Name Asset name Asset ID | Service name service ID Flow name Flow ID Flow transaction ID Request IP Channel Name Asset name * Asset ID |
| Voice | Submitted Accepted Answered Dropped Released Disconnected Trombone Release Trombone Connected Error Code Error Description Service name service ID Flow name Flow ID Flow transaction ID Request IP Channel Name Asset name Asset ID FlowName FlowTid CallTid FromNumber ToNumber OfferedAt AnsweredAt EndedAt CallType MachineDetected CallDuration CauseCode CauseDescription DisplayName DisplayNumber | Service name service ID Flow name Flow ID Flow transaction ID Request IP Channel Name Asset name Asset ID FlowName FlowTid CallTid FromNumber ToNumber AnsweredAt EndedAt CallType MachineDetected CallDuration CauseCode * CauseDescription |
| In-App | Submitted Delivered Read Failed Error Code Error Description Message Type Service name service ID Flow name Flow ID Flow transaction ID Request IP Channel Name Asset name Asset ID | Service name service ID Flow name Flow ID Flow transaction ID Request IP Channel Name Asset name * Asset ID |
| Push | Submitted Delivered Read Failed Error Code Error Description Message Type Service name service ID Flow name Flow ID Flow transaction ID Request IP Channel Name Asset name Asset ID | |
| FB Messenger | Submitted Delivered Read Failed Error Code Error Description Message Type Payload Service name service ID Flow name Flow ID Flow transaction ID Request IP Channel Name Asset name * Asset ID | Service name service ID Flow name Flow ID Flow transaction ID Request IP Channel Name Asset name * Asset ID |
| RCS | Submitted Delivered Read Failed Error Code Error Description Message Type Service name service ID Flow name Flow ID Flow transaction ID Request IP Channel Name Asset name Asset ID CarrierId MaaP | Service name service ID Flow name Flow ID Flow transaction ID Request IP Channel Name Asset name * Asset ID |
| Submitted Delivered Read Failed Error Code Error Description Message Type Payload Service name service ID Flow name Flow ID Flow transaction ID Request IP Channel Name Asset name * Asset ID | Service name service ID Flow name Flow ID Flow transaction ID Request IP Channel Name Asset name Asset ID Payload | |
| ABC | Submitted Failed Error Code Error Description Message Type Service name service ID Flow name Flow ID Flow transaction ID Request IP Channel Name Asset name Asset ID | Service name service ID Flow name Flow ID Flow transaction ID Request IP Channel Name Asset name * Asset ID |
| Submitted Delivered Invalid Bounced Complaint Opened Unsubscribed Failed Error Code Error Description Message Type Service name Service ID Flow name Flow ID Flow transaction ID CC BCC Request IP Channel Name Asset name Asset ID | Service name service ID Flow name Flow ID Flow transaction ID Request IP Channel Name Asset name * Asset ID |
Multiple 'To' Recipients
- You have the ability to send emails to multiple ‘To’ recipients in a single email transaction using Messaging API v2. This would require you to pass an additional parameter ‘multipleToRecipients’ to be passed as part of the request with its value set to ‘true’. When multiple email IDs are mentioned in the “Email” parameter of the “To” block, Webex Connect submits a single request to AWS SES or to SMTP server to send the concerned email to all - To, CC, and BCC. In this case, the API response will contain only one transaction ID for all recipients. Refer API reference for more information.
- When Webex Connect is used to send emails to multiple email recipients (To, CC, BCC), the message submitted count reflects the total number of emails sent (counting each of the recipient in To, CC, and BCC fields individually). These changes will reflect in the ‘Reports’ and in the ‘Usage’ sections for email transactions.
- The platform will not trigger or resume a flow, nor trigger a rule or an outbound webhook notification for incoming emails where Sender Email ID is same as the Recipient Email ID. However, details of such incoming emails will be available within Export Logs.
- For emails sent via SMTP channel, we do not support delivery tracking.
Levels in Scheduling Export Logs
The Exports logs can be scheduled at the following levels:
- Scheduling a export logs at client level - Contains transactions of client, group, and team where asset is present with flows configured.
- Scheduling a export at a group level - client/group/team - Contains transactions of client, group, and team where asset is present with flows configured.
- Scheduling a export log at a team level - client/group/team - Contains transactions of client, group, and team where asset is present with flows configured.
Updated 8 months ago