
Google Dialogflow ES
Understand how you can use Google Diaflowflow ES pre-built integration node
Google Dialogflow ES is a Natural Language Understanding (NLU) platform that makes it easy to design and integrate a conversational user interface into a mobile app, web application, device, bot, interactive response system, and so on. Using Dialogflow ES, one can provide new and engaging ways for users to interact with your product.
Note
Google Dialogflow ES has three versions v1.0, v1.1, and v1.2.
The v1.0 uses Dialogflow v2 version APIs, while the v1.1 and v1.2 uses Dialogflow v2beta1 version APIs. To use API version v2beta1, you must enable the Beta Features and APIs toggle button in your Dialogflow Project Dashboard.
If you want to use the Knowledge [beta] agent feature of Google Dialogflow ES and send additional query parameters to the Dialogflow ES agent, it is mandatory to use v1.1 or v1.2. Overall, we recommend you to use the latest version of this integration i.e., v1.2.
Pre-requisites
- Google Cloud project - In case of a project that is not live, you will be required to add test Gmail accounts to utilize the node.
- Dialogflow Bot configuration- Intent, Entities, Query parameters, Actions and so on should be pre-configured within the Dialogflow bot platform.
- Dialogflow bot should be linked to a specific Google cloud project within the bot platform.
- OAuth configuration - User should create a set of OAuth credentials within their GCP, additionally user should also mention Webex Connect’s callback URL within the GCP client credentials section.
- Agent Handover - User should create an Intent in Google Dialogflow to recognize the Webex Connect specific values.
Dialogflow Node – Detect Intent
Webex Connect Dialogflow ES node currently lists the Detect Intent capability as a method within the node. The Detect Intent method utilizes an in-place Google Dialogflow ES bot to process a natural language query and return structured, actionable data as a result for e.g. agent handover, query parameters, action fields etc.
Authorization
You can add an existing authorization or create a new authorization for a Dialogflow ES node.
Adding an Existing Authorization
You can add an existing authorization while configuring the node in the flow.
To add an existing authorization:
- Log in the Webex Connect platform.
- Navigate to flow canvas. Drag drop the Dialogflow ES node.
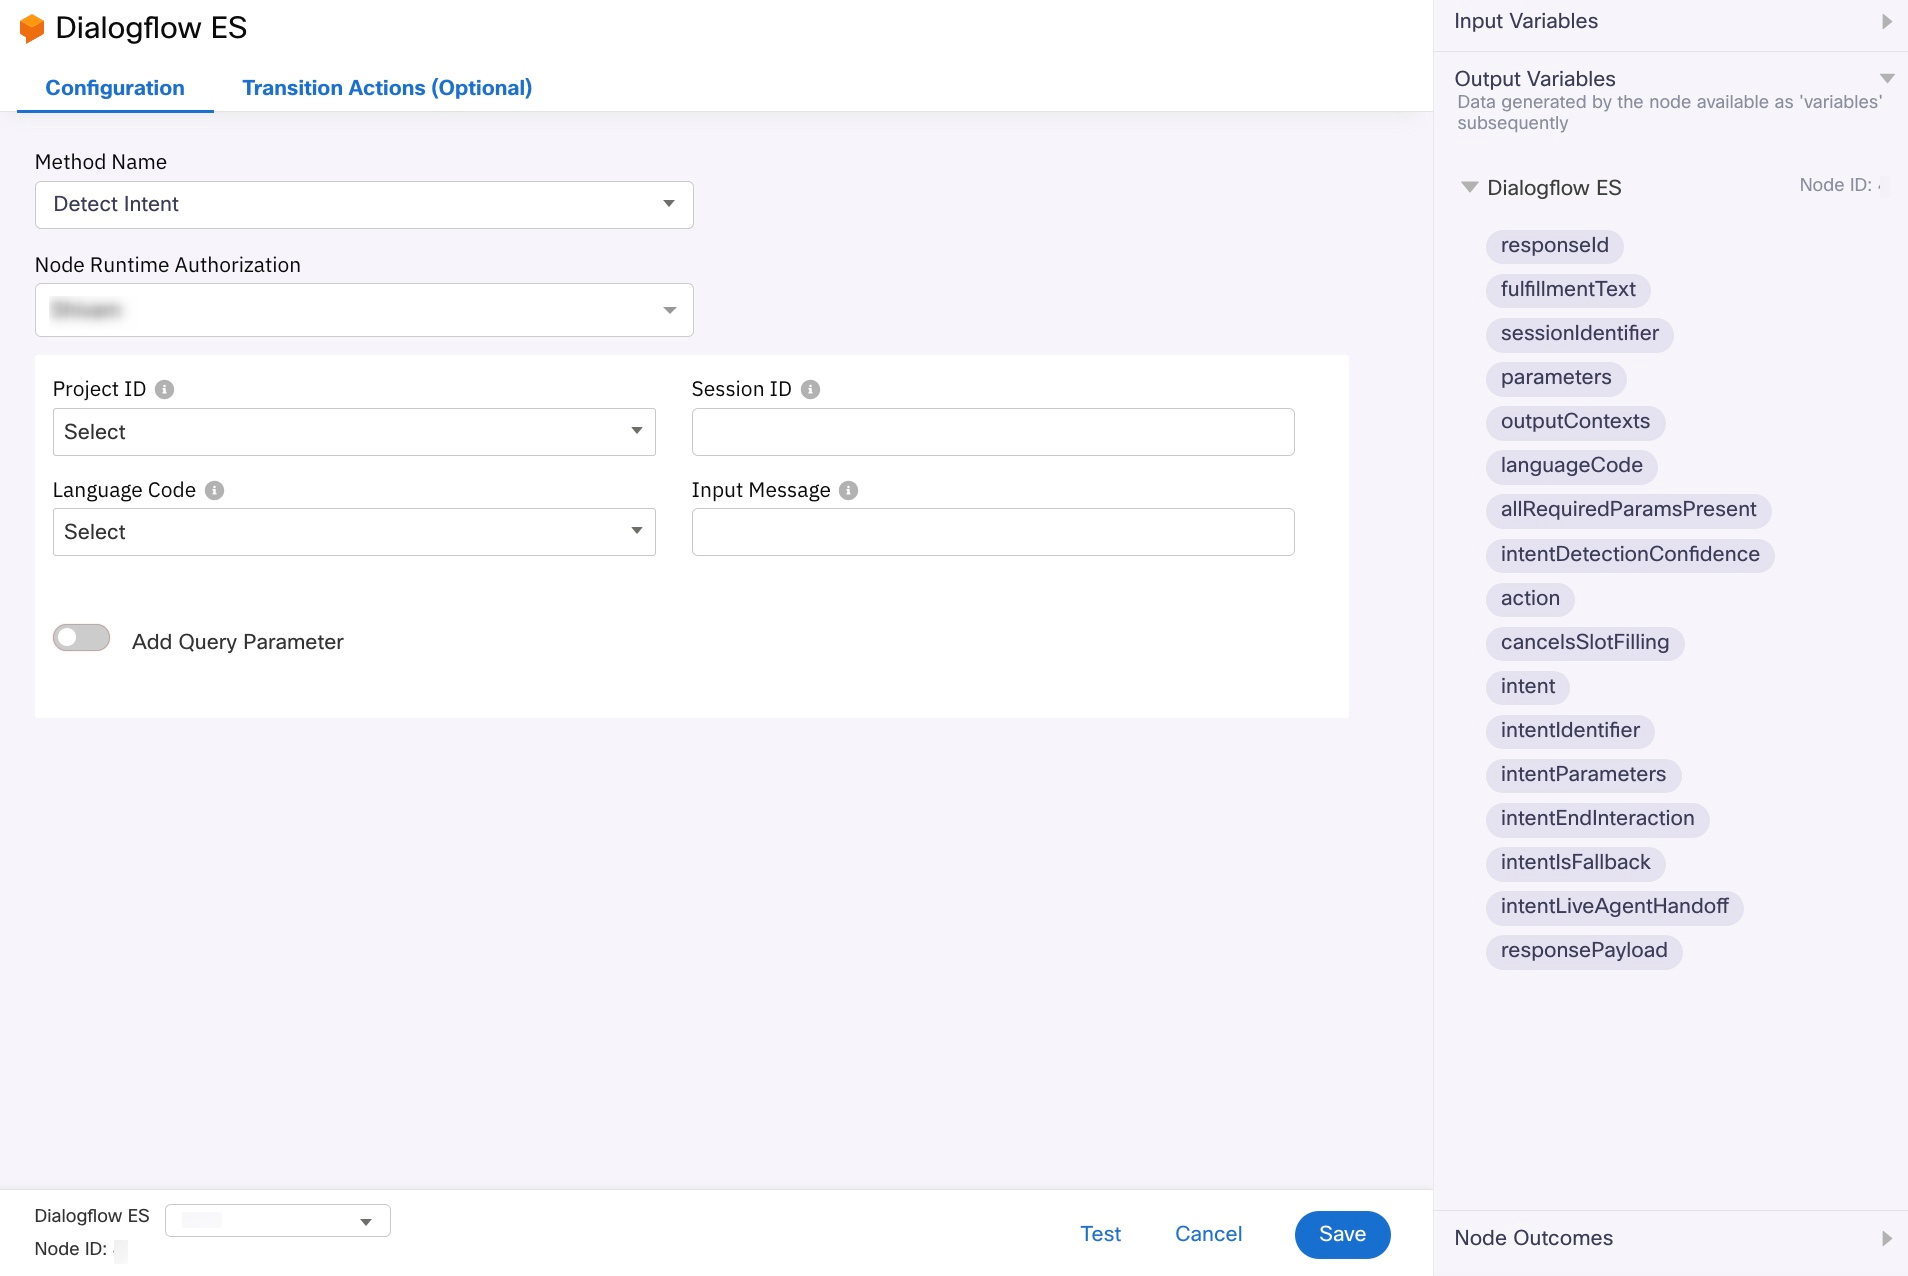
- Open the Dialogflow ES node in the flow canvas.
- Select Detect Intent from the Method Name dropdown.
- Select the required Node Authentication from the dropdown.
Adding a New Authorization
You can add a new authorization at asset integration level while configuring the node if there are no existing authorizations.
To create a new authorization:
- Login to the Webex Connect platform.
- Navigate to Integrations.
- Filter the Integrations page with Pre-built Integrations or search for Dialogflow ES.
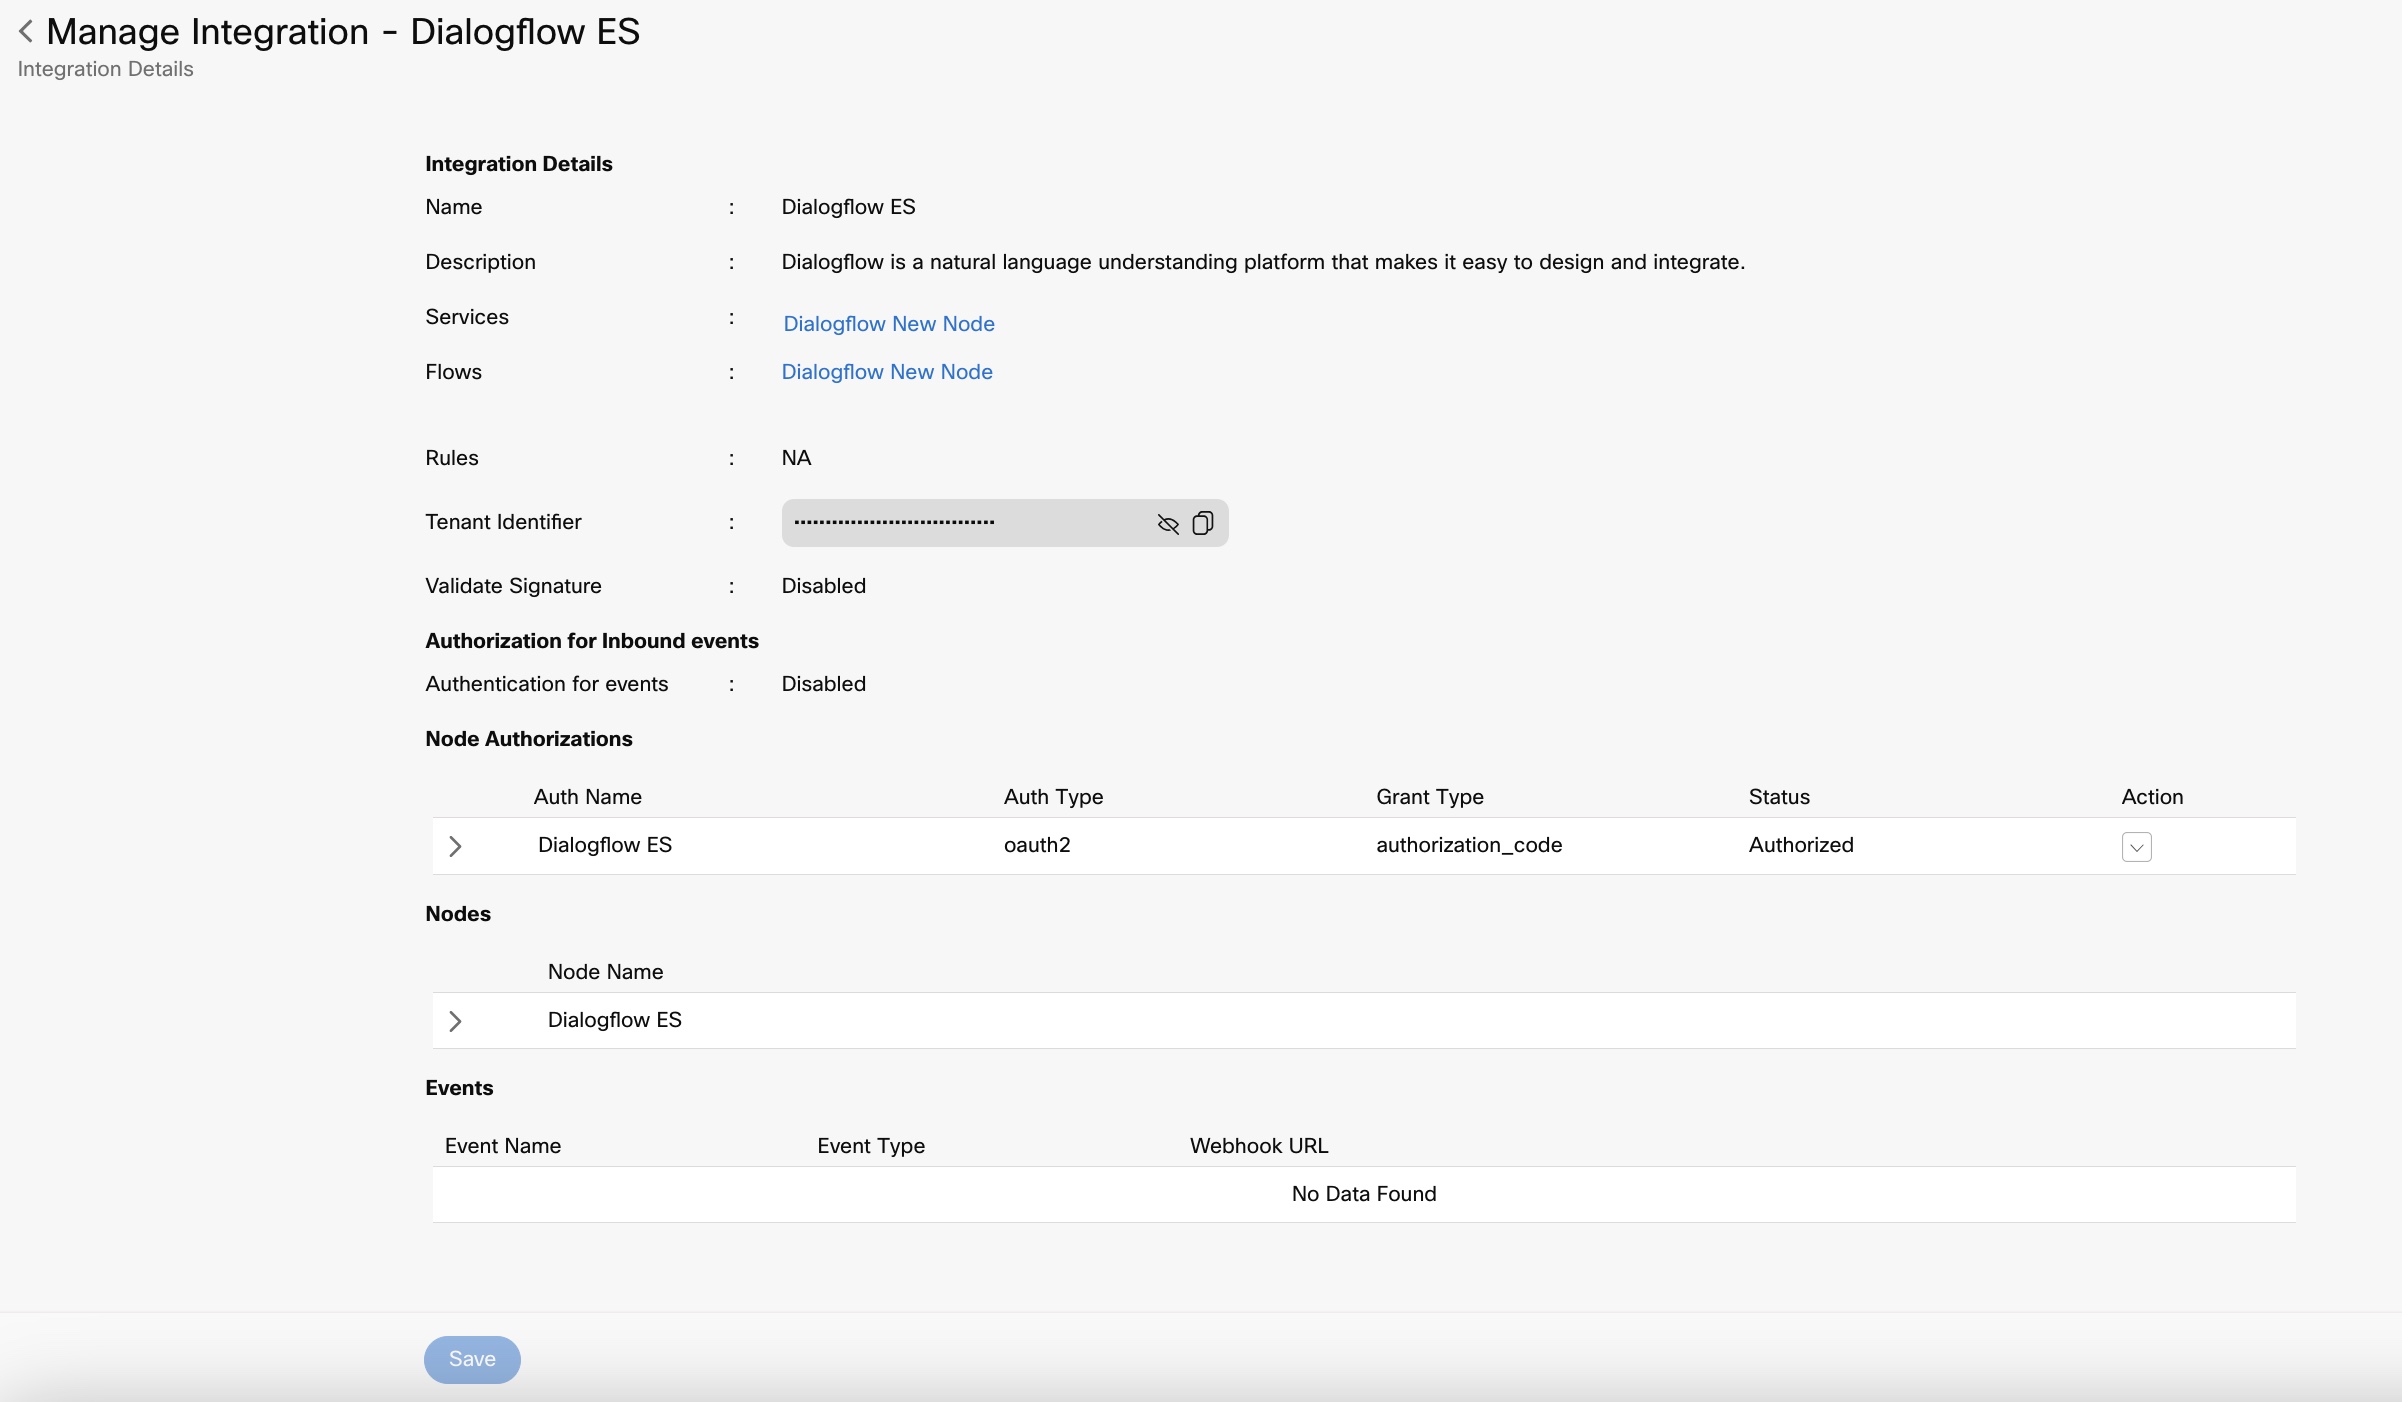
- Select Dialogflow ES and click Actions > Manage.
- On the Manage Integrations – Dialogflow ES screen, under Node Authorizations, click the dropdown in the Action column and then click Add authentication.
- Enter an appropriate authentication name.
- Enter the Client ID, and Client Secret details. For more information on how to obtain Client ID and Client Secret of Dialogflow ES, refer here
- Click Authenticate.
If the credentials are successfully verified by the Dialogflow ES, then a new authorization is added and the access token is saved on Webex Connect. If the credentials are not verified successfully, you will see an error message from Webex Connect. Take the appropriate action based on the error.
Note
During the addition of new authentication, you are prompted to sign in with your Gmail account to complete the OAuth 2.0 authorization with Dialogflow ES.
Obtaining the Client ID and Client Secret of Dialogflow ES
To obtain the Client ID and Client Secret of Dialogflow ES project:
- Log in to the Dialogflow Console.
- Navigate to APIs & Services.
- Click Credentials under APIs & Services.
- To create new set of credentials, click Create Credentials. You can also use the existing credentials, but make sure to add the correct Authorized redirect URIs. The Callback (authorized redirect URL) for Webex Connect is mentioned in the ‘Add New Authentication’ popup.
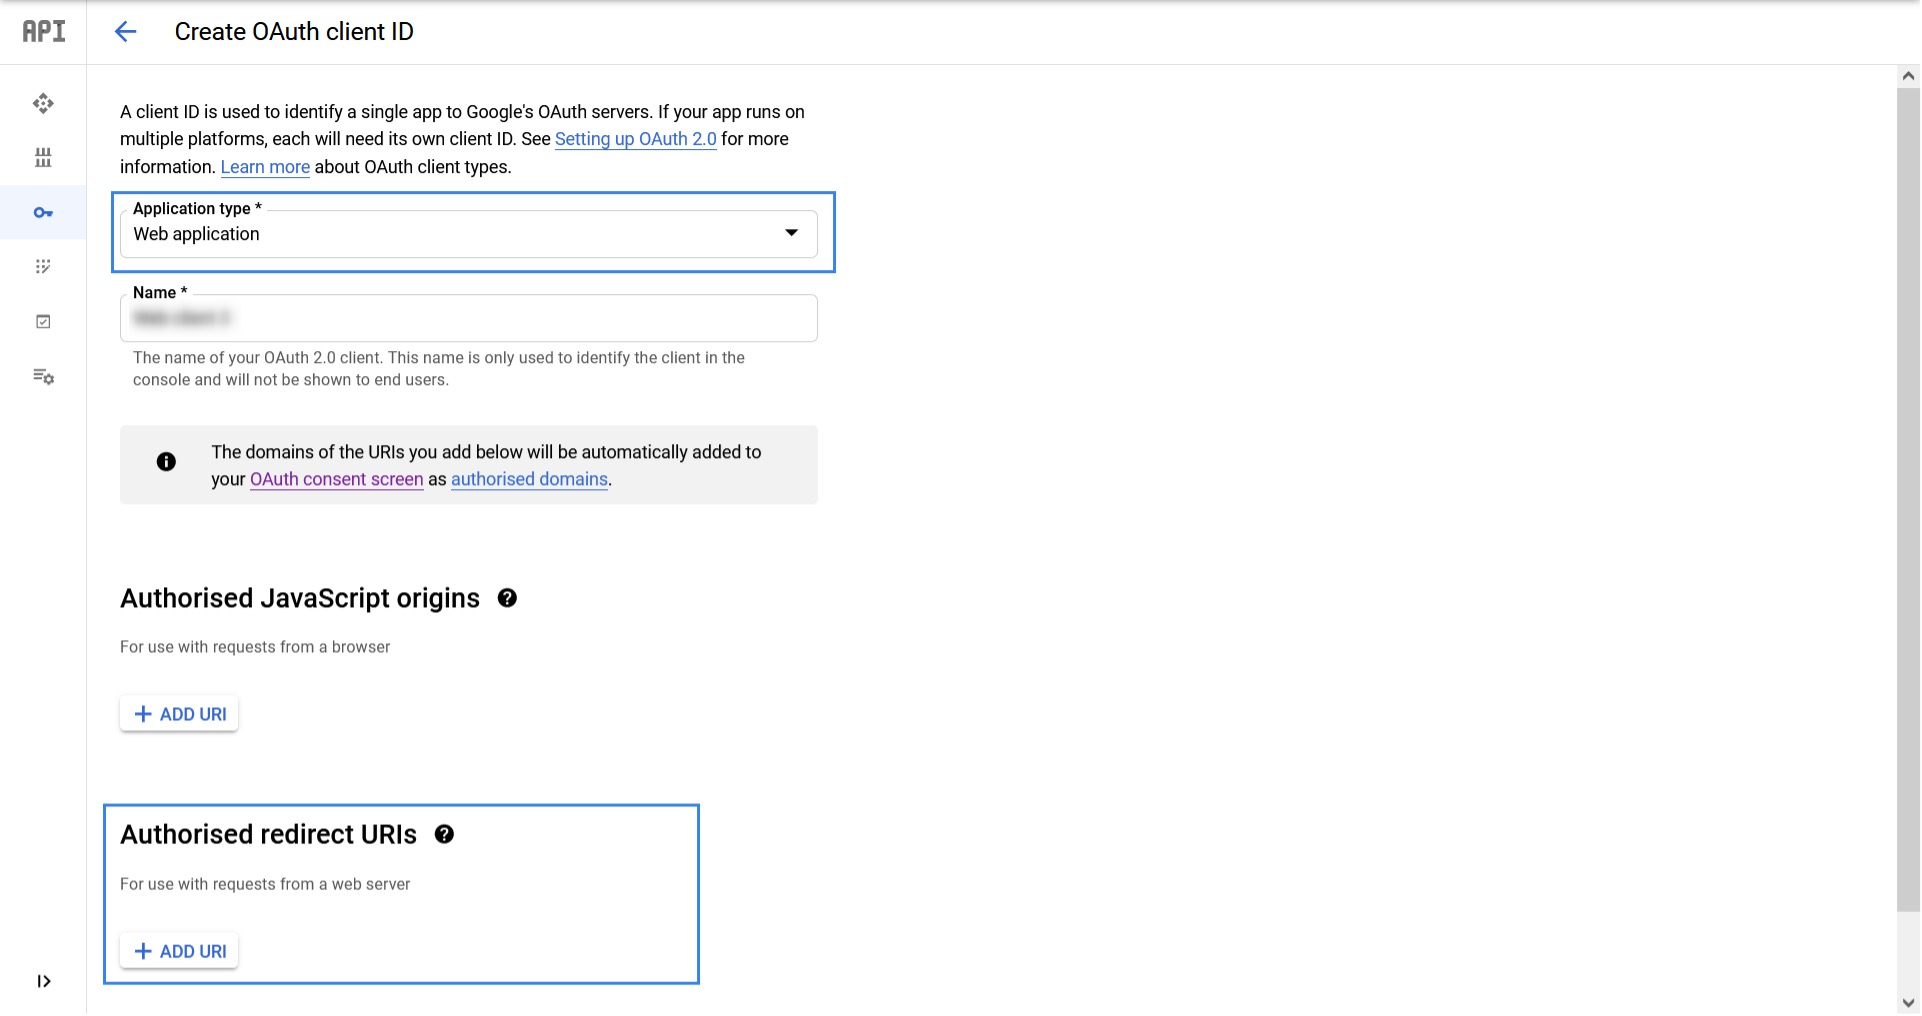
- Select OAuth client ID.
- On the Create OAuth client ID page, select Web Application from the Application type dropdown.
- Enter an appropriate Name for the OAuth 2.0 client.
- Under Authorized redirect URIs, click Add URI and enter the Webex Connect redirect URL mentioned within the Add New Authentication pop-up in Dialogflow ES node.
- Click Create.
The created Client ID and Client Secret can be used for authentication in Webex Connect.
Note:
For more details on how to add authorization on Google Dialogflow ES, refer to the Dialogflow ES documentation.
Please make sure your applications, firewalls, etc. do not restrict access to these new Callback URLs in case you have an internal policy/practice to add these URLs to the allow/accept/allowed list.
The authorization configured is an OAuth with Google Cloud Project wherein the user will be prompted to sign in with their Gmail account.
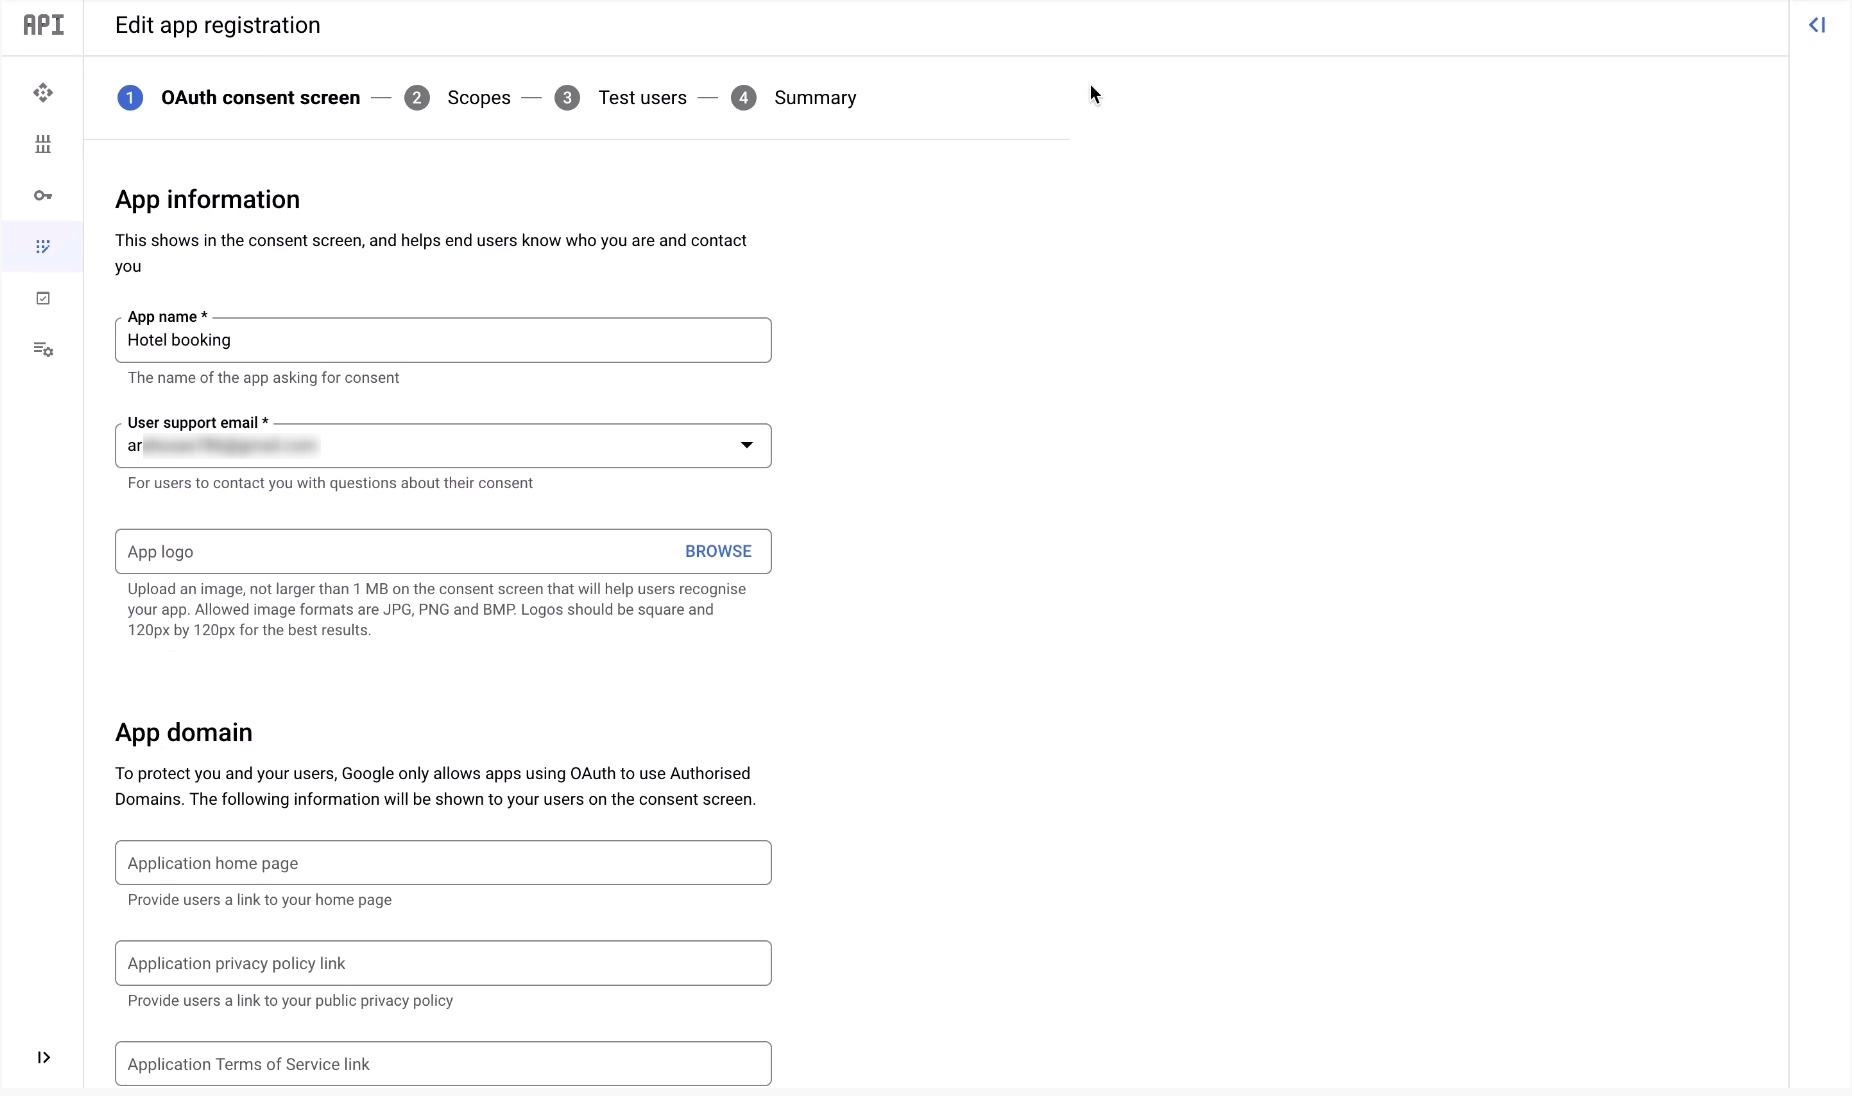
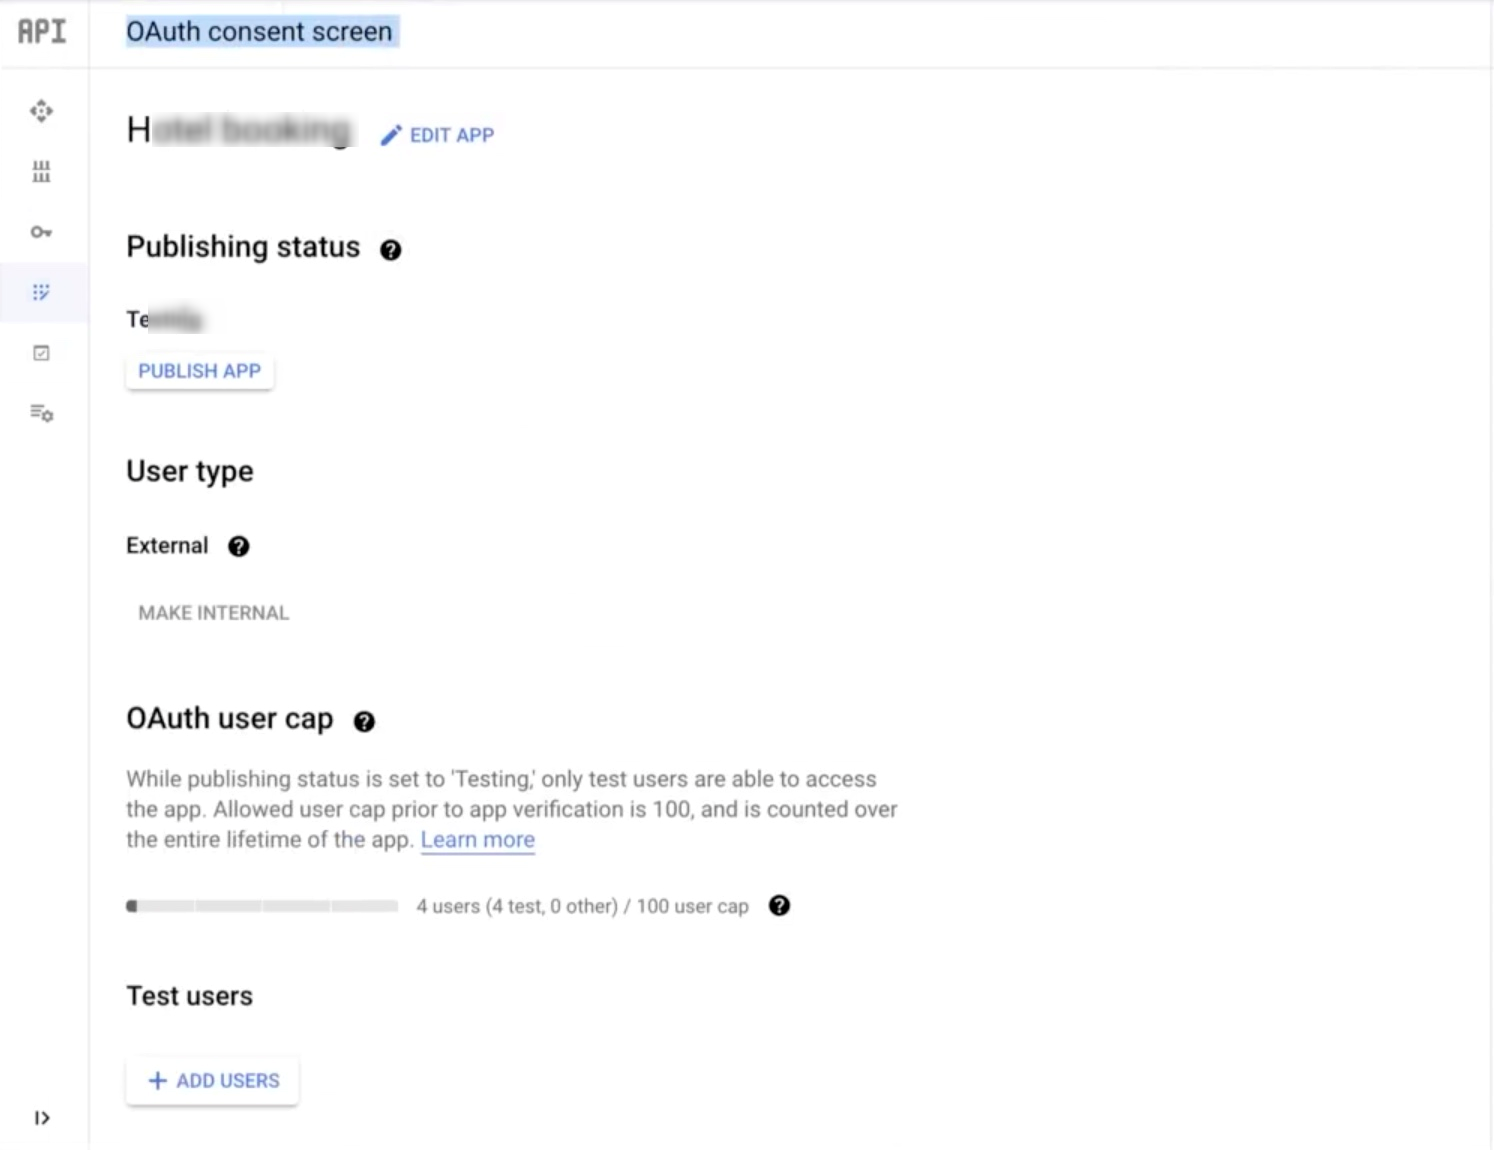
Configuring OAuth Consent Screen
User should configure the following in the OAuth consent screen:
- In the App information, enter your app name and email address of the user in the respective fields and click Save and Continue.
- Publishing Status - Select the relevant status. The available options are:
- Testing - indicates that the app is still in the testing phase. In this status the number of users is limited up to 100.
- In production - indicates that the app is published and is available in production. In this status any user with a Google account can access the app. Based on the configuration of your app, additional verification may be required.
- User Type - The available options are:
- External - Based on the publishing status, any user with a Google account can access the app. It is mandatory to select external.
- Internal - App is only available to internal users within your organization.
Scopes - To configure scopes, click here. Click Save and Continue.

Note
Dialogflow ES node will requires two scopes to fetch list of Agents. They are:
For more information on Dialogflow ES scope please visit
- Test users - You can set your publishing status to Testing or In Production based on your requirement. If you select it as Testing, only the test users can make the API calls to the app. It is mandatory to add the users who will test the app using +Add Users. Click Save and Continue.
Authorization Expiry for GCP
Authorization is only valid for a seven day period for test users and would need to be refreshed again after expiry. To refresh, user should first remove access to the GCP from his Gmail account and request again.
Note
At this moment the node is only accessible for test users, please get in touch with your support contact to raise a request for an 'in-production' project.
Agent Handover
User should define a separate intent in the Google Dialogflow ES Bot to handle Agent Handover. When the intent is matched the node will recognize the below mentioned action field and route it to the agent handover node edge.
The following procedure explains how to create an Intent in Agent Handover:
- Create a new intent for Agent handover functionality.
- Enter LIVE_AGENT_HANDOVER in the Actions and parameters.
- Click Save.

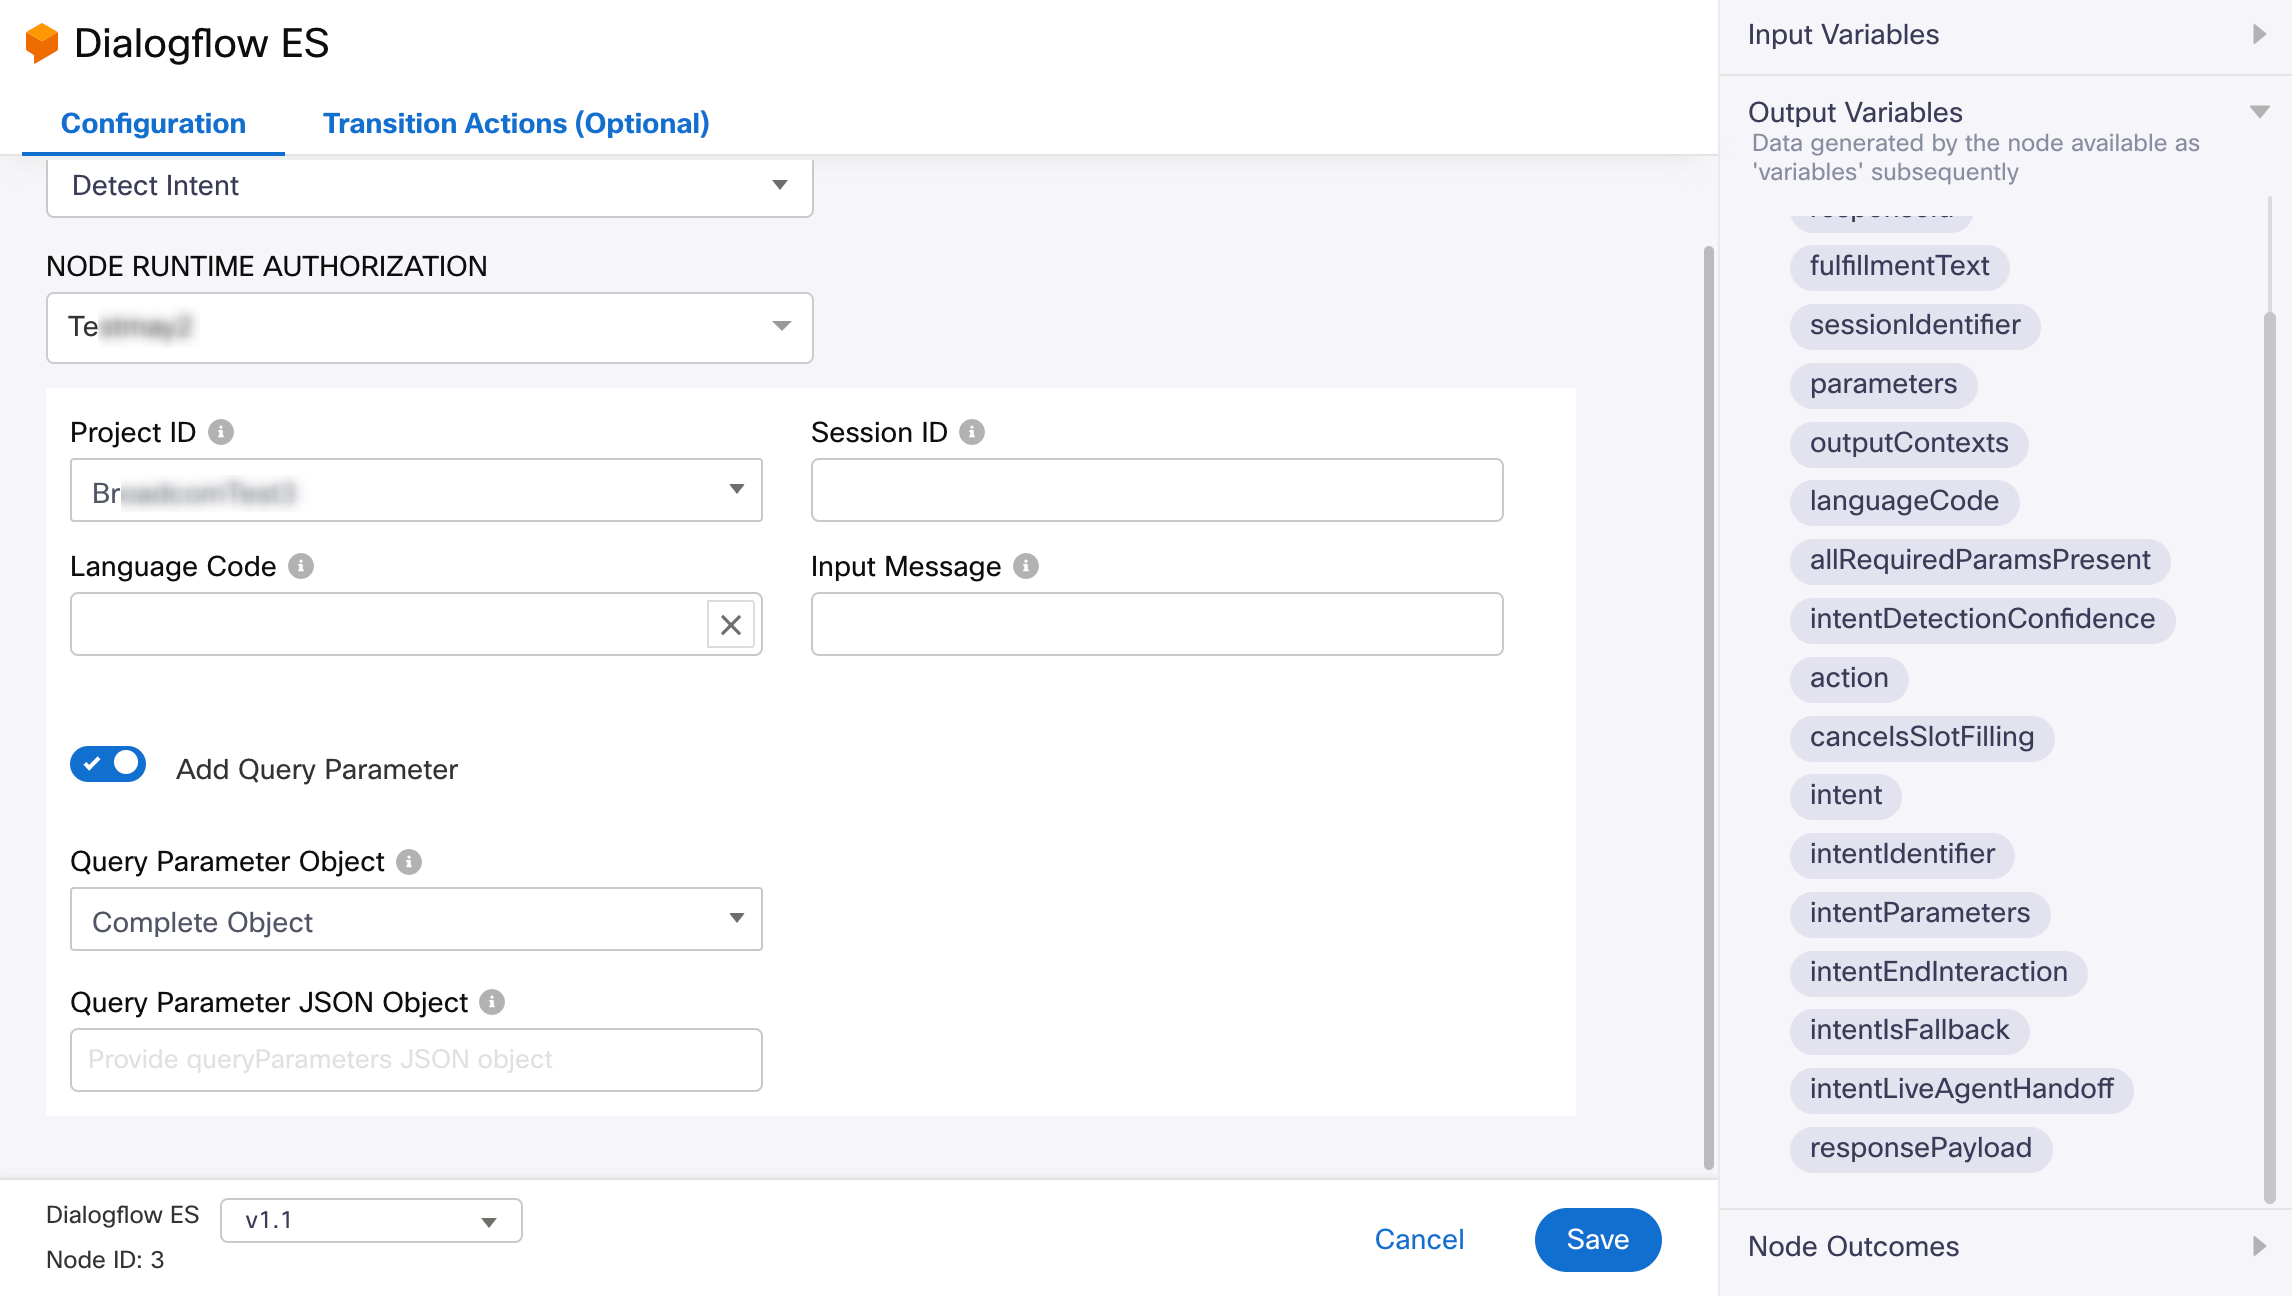
Configuring Dialogflow ES node in flows
Following is the list of Input Variables, Output Variables and Node Outcomes that will be used within Dialogflow node:
| Input Variables | Output Variables | Node Outcomes | Versions |
|---|---|---|---|
| Project ID Is a drop-down field which when the user clicks fetches the available list of Dialogflow ES Bots within their Gmail account. Select ‘Dynamic’ to provide the project ID value during runtime. For more information, refer to the Known Limitations section below. Session ID This field is required. You create a session Id at the beginning of a conversation and use it for each turn of the conversation. Once the conversation has ended, you discontinue using the session. You should not use the same session for concurrent conversations with different end-users. A session remains active and its data is stored for 30 minutes after the last request is sent for the session. Language code Is a drop-down field with an option to provide dynamic variables. Select ‘Dynamic’ to provide the language code value during runtime. Input Message Enter the text. Maximum length of text is upto 256 characters. Add Query Parameters (Toggle Button) - to send query parameters to Dialogflow ES. For more information, refer to the Known Limitations section below. Complete Object - Select this to pass the total JSON object at one go i.e a variable that contains the JSON. Note: When a JSON object is pasted in the Query Parameter JSON Object, the replacement of values by variables is not supported in runtime of the flow. It is mandatory to add a JSON object or a variable before the a node is created. Individual Parameters - Select this to configure each object and pass the parameters individually | Response ID The unique identifier of the response. It can be used to locate a response in the training example set or for reporting issues. Fulfillment text The text to be pronounced to the user or shown on the screen. Session ID This field is required. You create a session Id at the beginning of a conversation and use it for each turn of the conversation. Once the conversation has ended, you discontinue using the session. You should not use the same session for concurrent conversations with different end-users. A session remains active and its data is stored for 30 minutes after the last request is sent for the session. Parameters Object (Struct format)The collection of extracted parameters. Output Contexts The collection of output contexts. If applicable, outputContexts.parameters contains entries with name .original containing the original parameter values before the query. Intent The intent that matched the conversational query. Some, not all fields are filled in this message, including but not limited to: name, displayName, endInteraction and isFallback. Language code The language that was triggered during intent detection. See Language Support for a list of the currently supported language codes. All required params present This is boolean value. This field is set to 'false' if the matched intent has required parameters and not all of the required parameter values have been collected. This field is set to 'true' if all required parameter values have been collected, or if the matched intent doesn't contain any required parameters. Intent detection confidence This accepts only numeric value. The intent detection confidence. Values range from 0.0 (completely uncertain) to 1.0 (completely certain). This value is for informational purpose only and is only used to help match the best intent within the classification threshold. This value may change for the same end-user expression at any time due to a model retraining or change in implementation. Action This accepts String. The action name from the matched intent. Cancel slot filling This is boolean value. This indicates whether the conversational query triggers a cancellation for slot filling. Intent identifier Intent parameters Optional. The collection of parameters associated with the intent. Intent end interaction This is boolean value. Optional. Indicates that this intent ends an interaction. Some integrations (e.g., Actions on Google or Dialogflow ES phone gateway) use this information to close interaction with an end user. Default is false. Intent is fallback This is boolean value. Optional. Indicates whether this is a fallback intent. Intent live agent handoff This is boolean value. Optional. Indicates that a live agent should be brought in to handle the interaction with the user. In most cases, when you set this flag to true, you would also want to set endInteraction to true as well. Default is false. Response payload Full response payload will be captured as part of this output variable. | Success Agent handover Use this node outcome within flows to handover any interaction to a live agent. Error | Add Query Parameters (Toggle Button) is available in v1.1 |
Known Limitations
- When trying to add the ‘sessionEntityTypes’ parameter under ‘Add Query Parameter,’ the field (sessionEntityTypes input) has to be reselected each time a character is entered.
- When trying to add the ‘sessionEntityTypes’ parameter under ‘Add Query Parameter,’ the field (sessionEntityTypes input) shows ‘is required,’ indicating that the input box is empty. Sometimes, this can happen even if you have already entered a variable or input in the field. If you have already entered a variable or a value, the ‘is required’ error for ‘sessionEntityTypes’ input box can be ignored.
- When entering a dynamic value in the UI configuration, the dynamic input box doesn't get cleared even after clicking the close (X) icon.
FAQs
- What is the request timeout for Dialogflow ES node?
The request timeout for Dialogflow ES Node is 20 seconds i.e., the Dialogflow ES node must respond within 20 seconds after receiving a request from Webex Connect. If the Dialogflow ES node does not respond to the received request within 20 seconds, the Dialogflow ES node will timeout in Webex Connect flow through the onTimeout edge. - Does the Dialogflow ES integration support Dialogflow service account?
No, the current integration uses the standard Dialogflow ES OAuth 2.0 (authorization code for grant type) for authentication with Dialogflow servers.
Updated 9 days ago