
Google Dialogflow CX
Understand how you can use Google Dialogflow CX pre-built integration node
Introduction
A Dialogflow CX agent is a virtual agent that handles multiple conversations with the end-users. It is a Natural Language Understanding (NLU) module that understands the nuances of human language. You design and build a Dialogflow agent to handle different types of conversations required for your system.
For more information on Dialogflow CX, please visit - Dialogflow CX documentation | Google Cloud
Note
The Dialogflow CX node has two active versions - v1.0 and v1.1, both of which use the v3 API version. However, we recommend using v1.1 going forward.
Authorization
You can add an existing authorization or create a new authorization for a Dialogflow CX node.
Adding an Existing Authorization
You can add an existing authorization while configuring the node in the flow.
To add an existing authorization:
- Login to the Webex Connect platform.
- Navigate to flow canvas. Drag drop the Dialogflow CX node.
- Open the Dialogflow CX node in the flow canvas.
- Select Detect Intent from the Method Name dropdown.
- Select the required Node Authentication from the dropdown.
Adding a New Authorization
You can add a new authorization at asset integration level while configuring the node if there are no existing authorizations.
To create a new authorization:
- Login to the Webex Connect platform.
- Navigate to Integrations.
- Filter the Integrations page with Pre-built Integrations or search for Dialogflow CX.
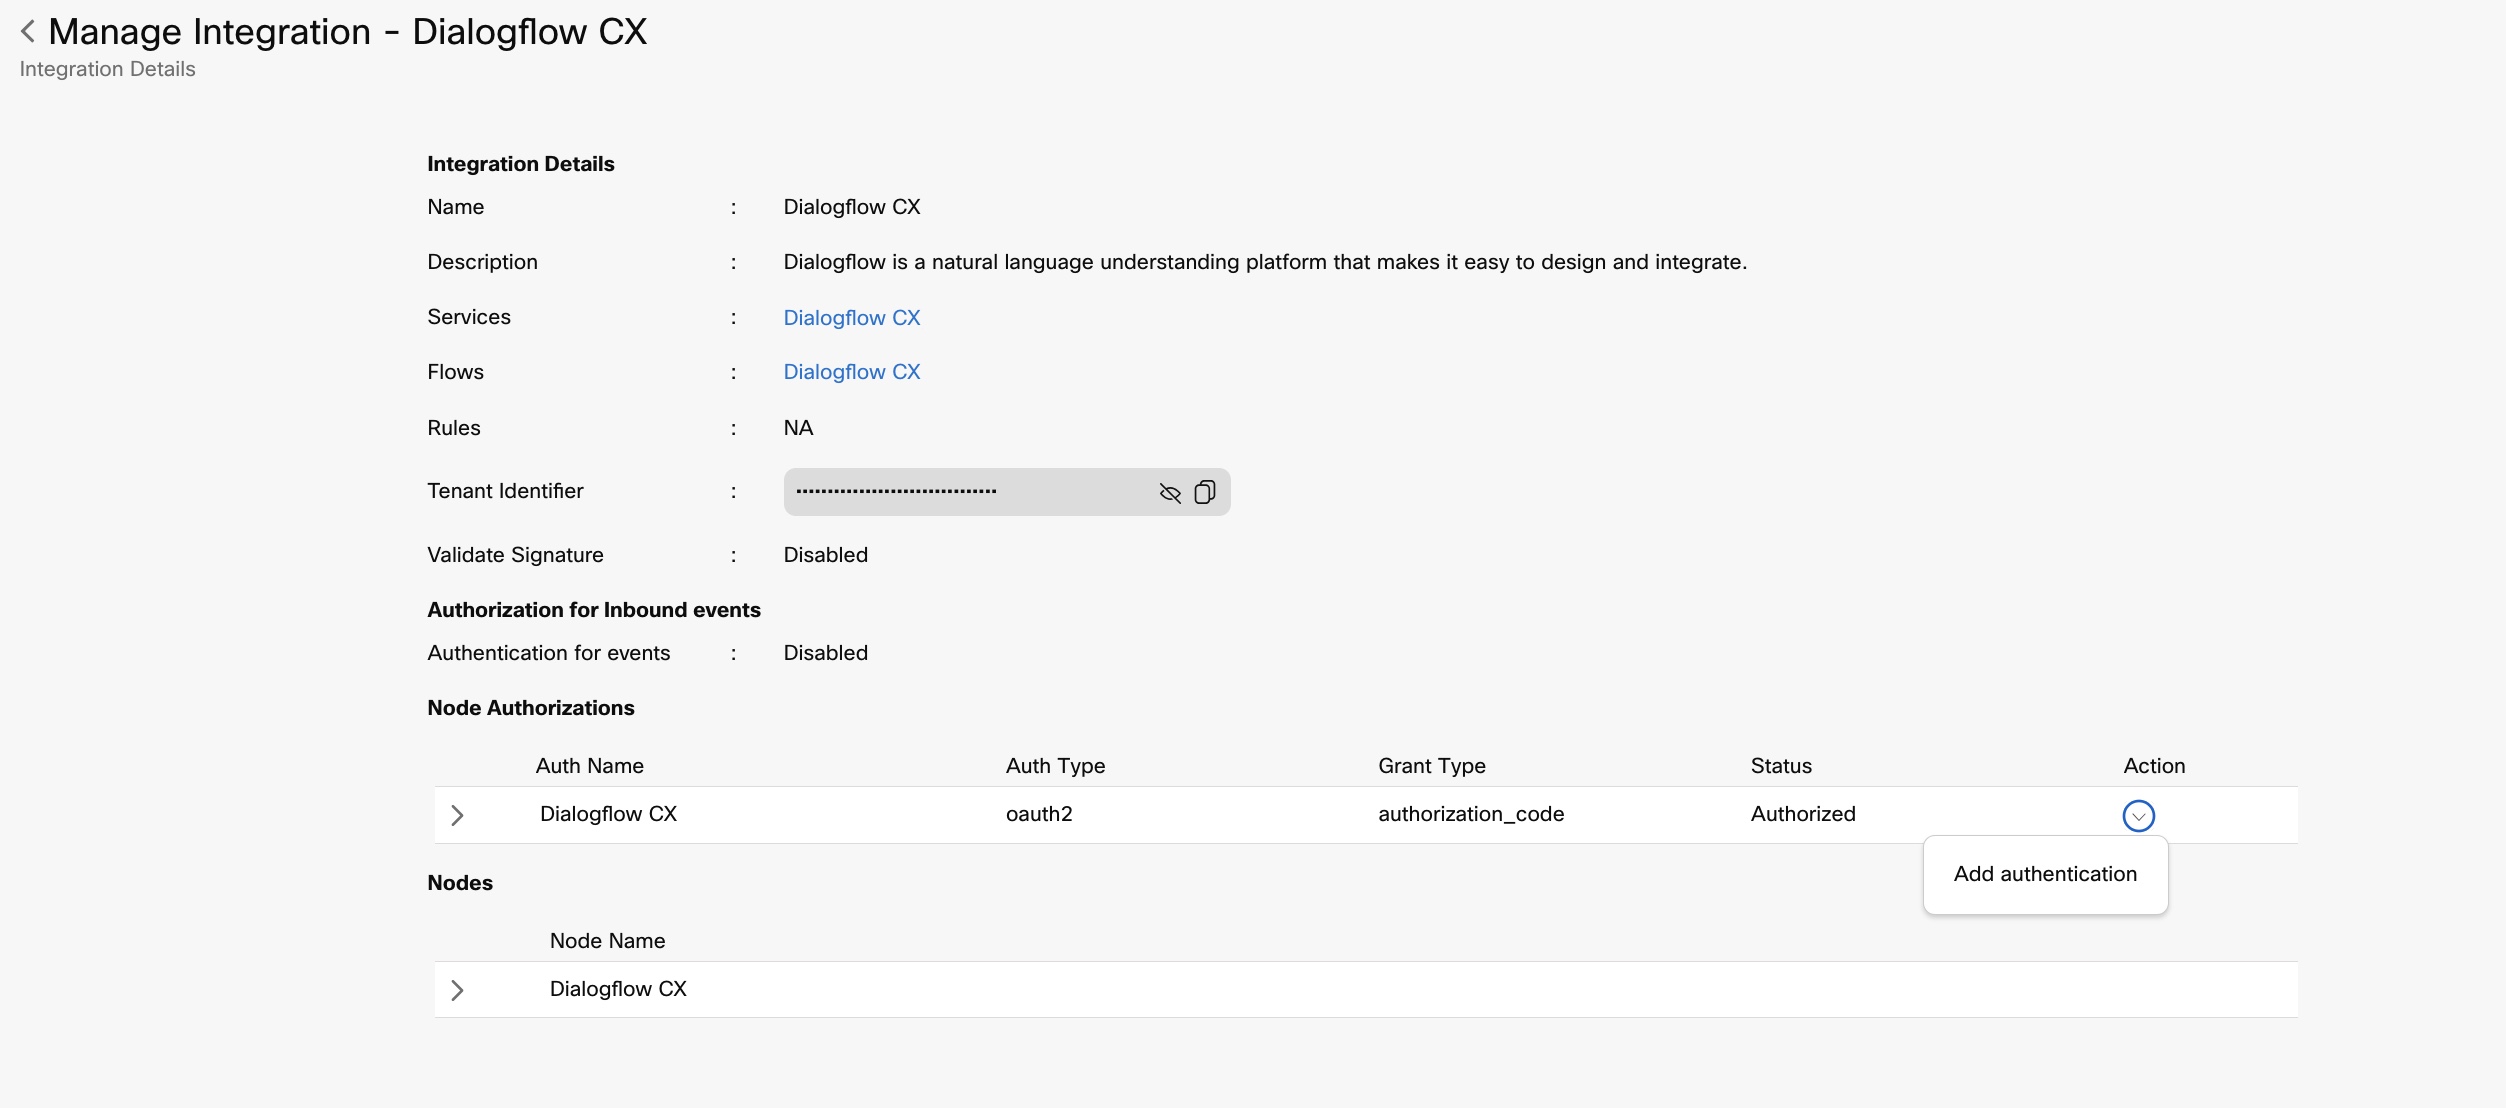
- Select Dialogflow CX and click Actions > Manage.
- On the Manage Integrations – Dialogflow CX screen, under Node Authorizations, click the dropdown in the Action column and then click Add authentication.
- Enter an appropriate authentication name.
- Enter the Client ID, and Client Secret details. For more information on how to obtain Client ID and Client Secret of Dialogflow CX, refer here.
- Click Authenticate.
If the credentials are successfully verified by the Dialogflow CX, then a new authorization is added and the access token is saved on Webex Connect. If the credentials are not verified successfully, you will see an error message from Dialogflow CX. Take the appropriate action based on the error.
Note
During the addition of new authentication, you are prompted to sign in with your Gmail account to complete the OAuth 2.0 authorization with Dialogflow CX.
Obtaining the Client ID and Client Secret of Dialogflow CX
To obtain the Client ID and Client Secret of Dialogflow CX project:
- Login to the Dialogflow Console.
- Navigate to APIs & Services.
- Click Credentials under APIs & Services.
- To create new set of credentials, click Create Credentials. You can also use the existing credentials, but make sure to add the correct Authorized redirect URIs. The Callback (authorized redirect URL) for Webex Connect is mentioned in the ‘Add New Authentication’ popup.
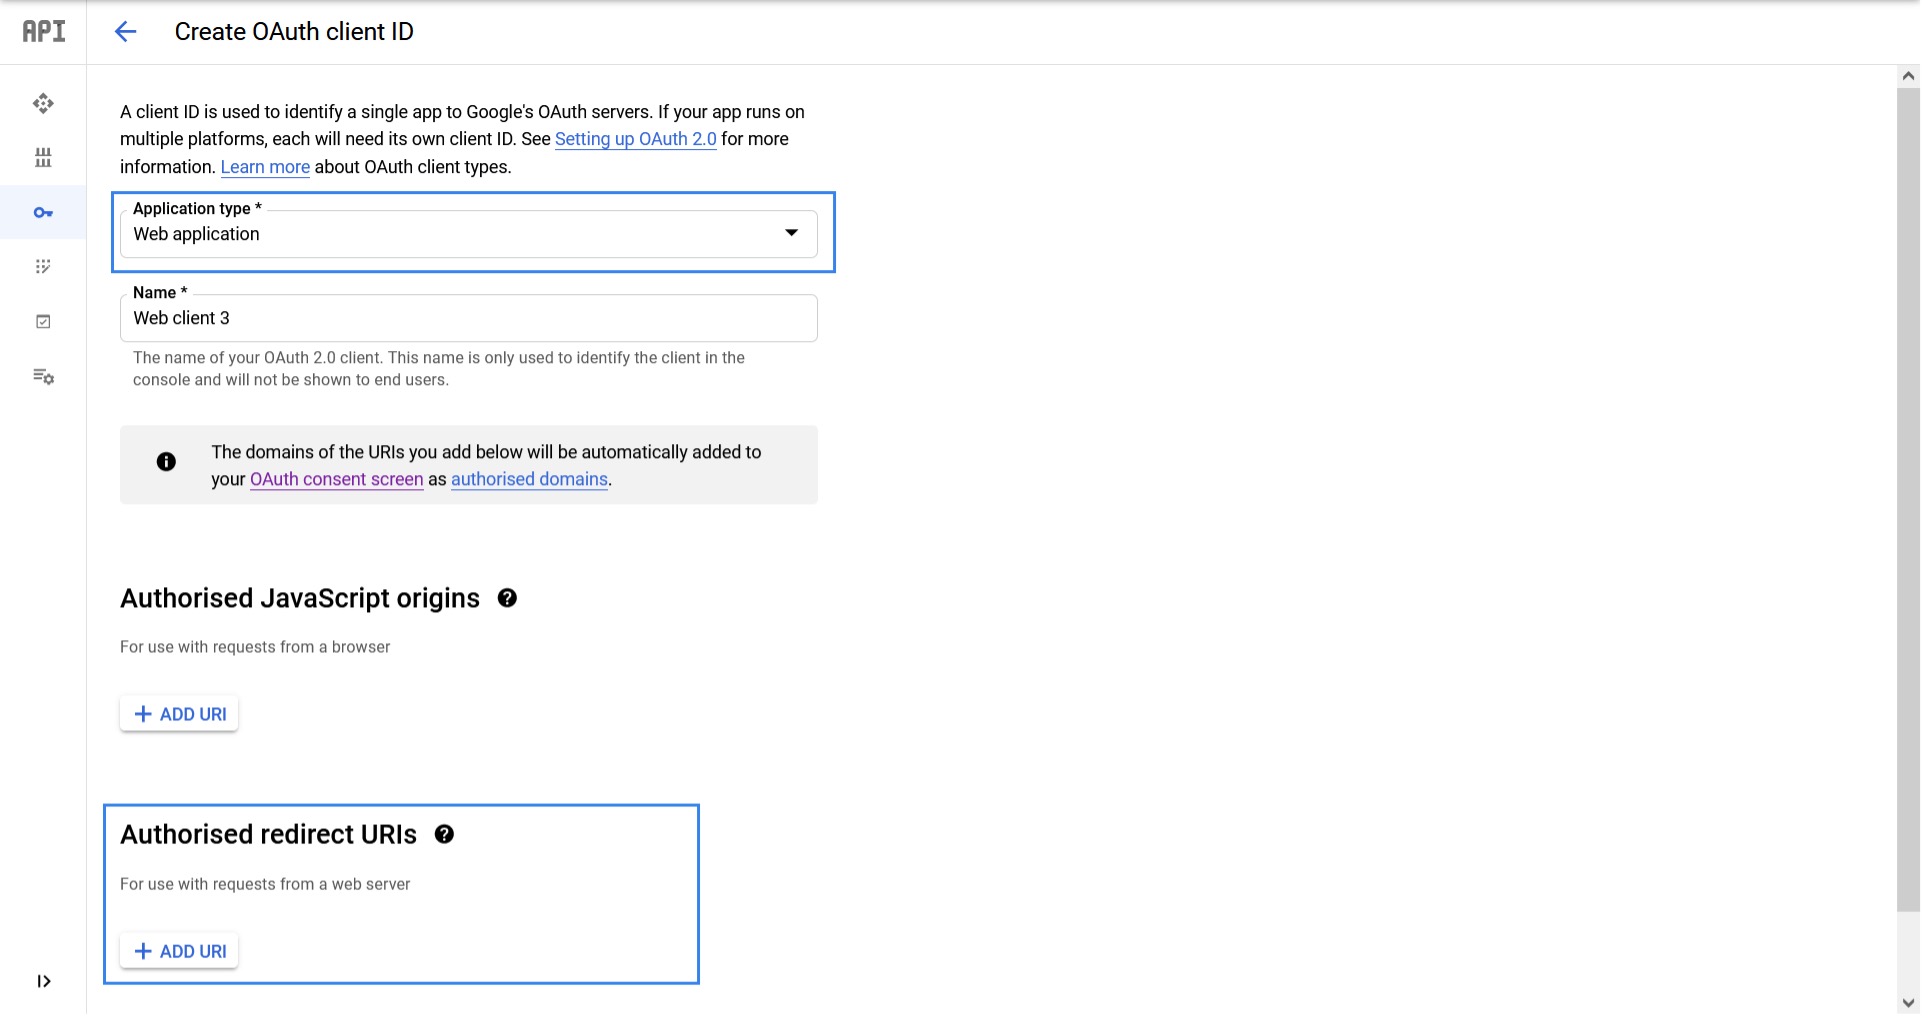
- Select OAuth client ID.
- On the Create OAuth client ID page, select Web Application from the Application type dropdown.
- Enter an appropriate Name for the OAuth 2.0 client.
- Under Authorized redirect URIs, click Add URI and enter the Webex Connect redirect URL mentioned within the Add New Authentication pop-up in Dialogflow CX node.
- Click Create.
The created Client ID and Client Secret can be used for authentication in Webex Connect.
Note
For more details on how to add authorization on Google Dialogflow CX, refer to the (Dialogflow CX setup and cleanup | Google Cloud)
Please make sure your applications, firewalls, etc. do not restrict access to these new Callback URLs in case you have an internal policy or practice to add these URLs to the allow/accept/allowed list.
The authorization configured is OAuth 2.0 with Google Cloud Platform, where you will be prompted to sign in with your Gmail account.
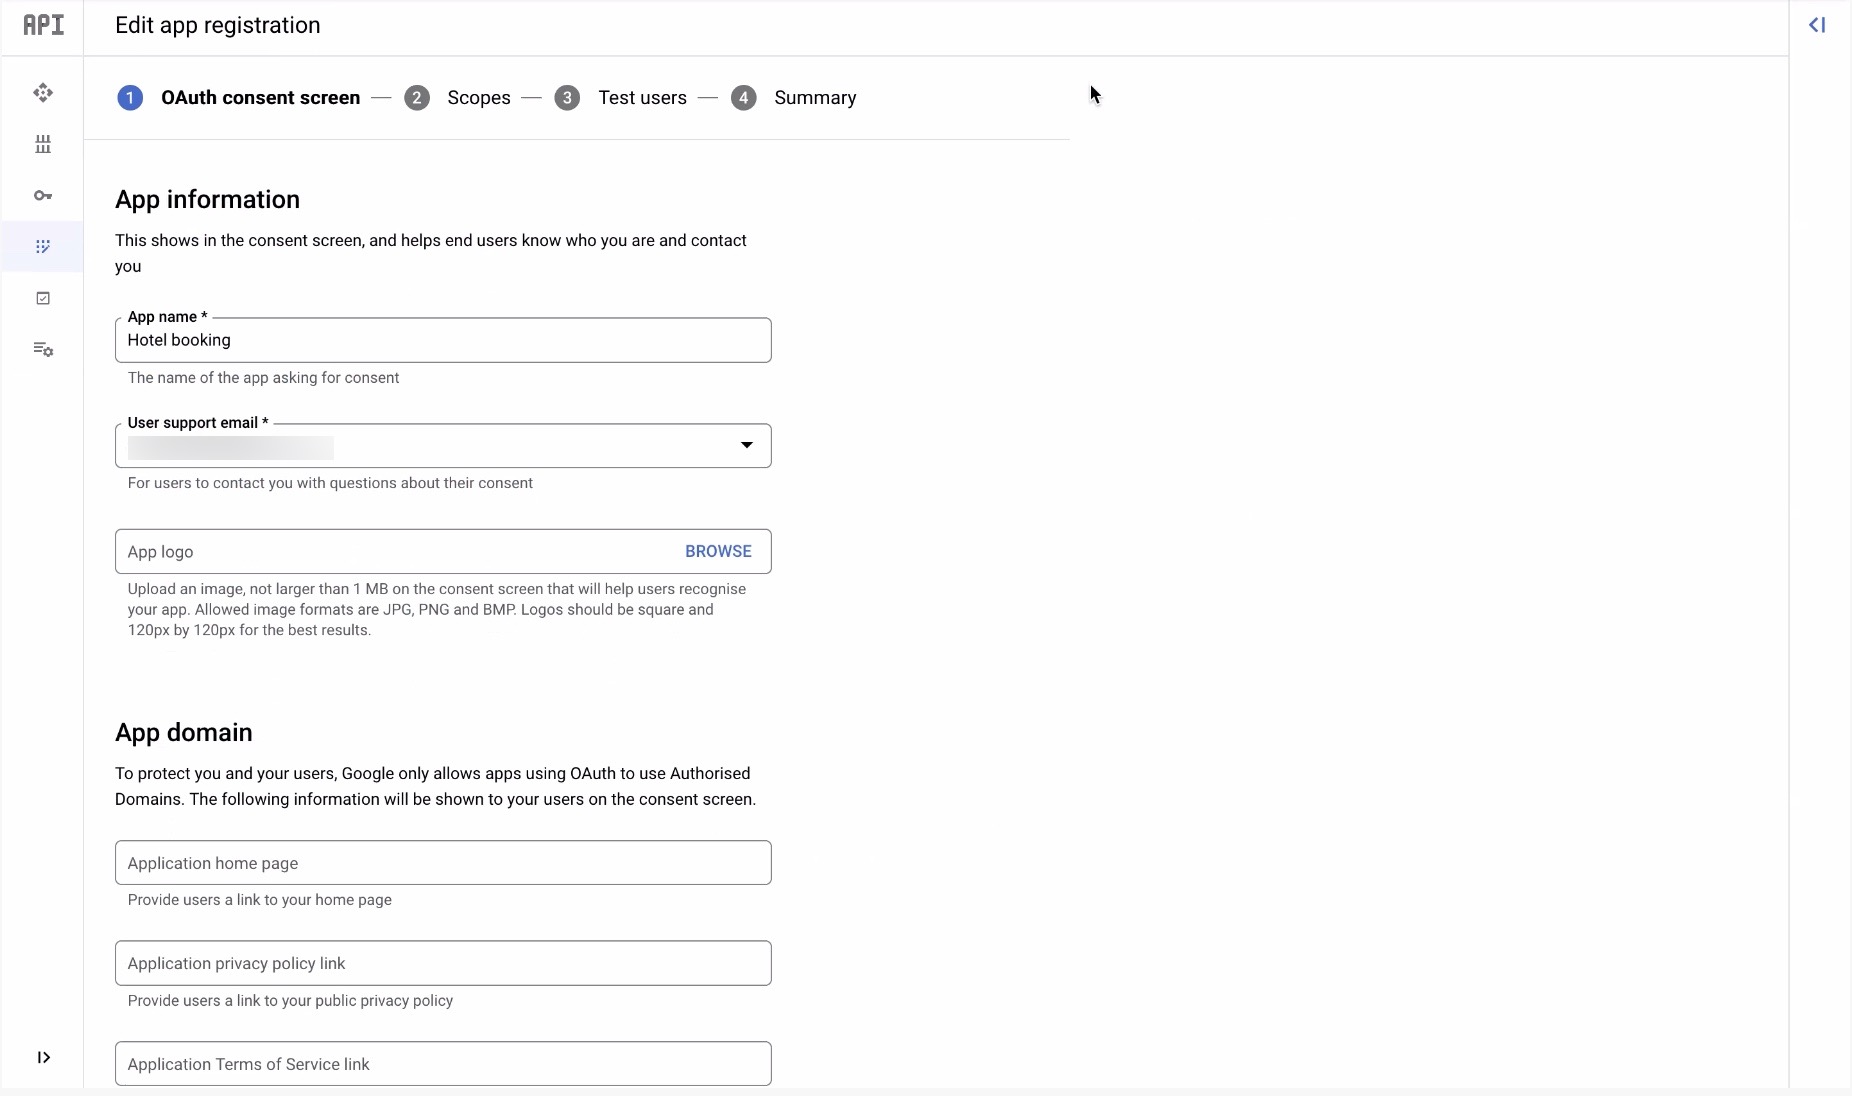
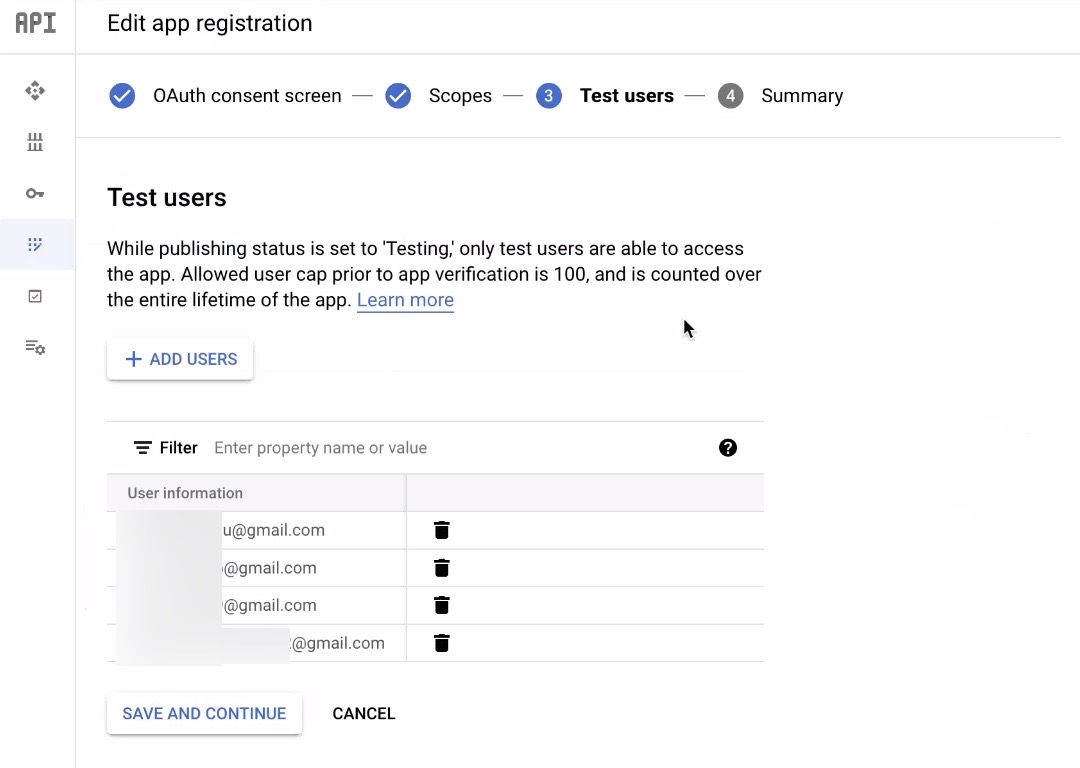
Configuring OAuth Consent Screen
You must configure the following in the OAuth consent screen:
- Enter App name and User support email in the App information section.
- Click Save and Continue.
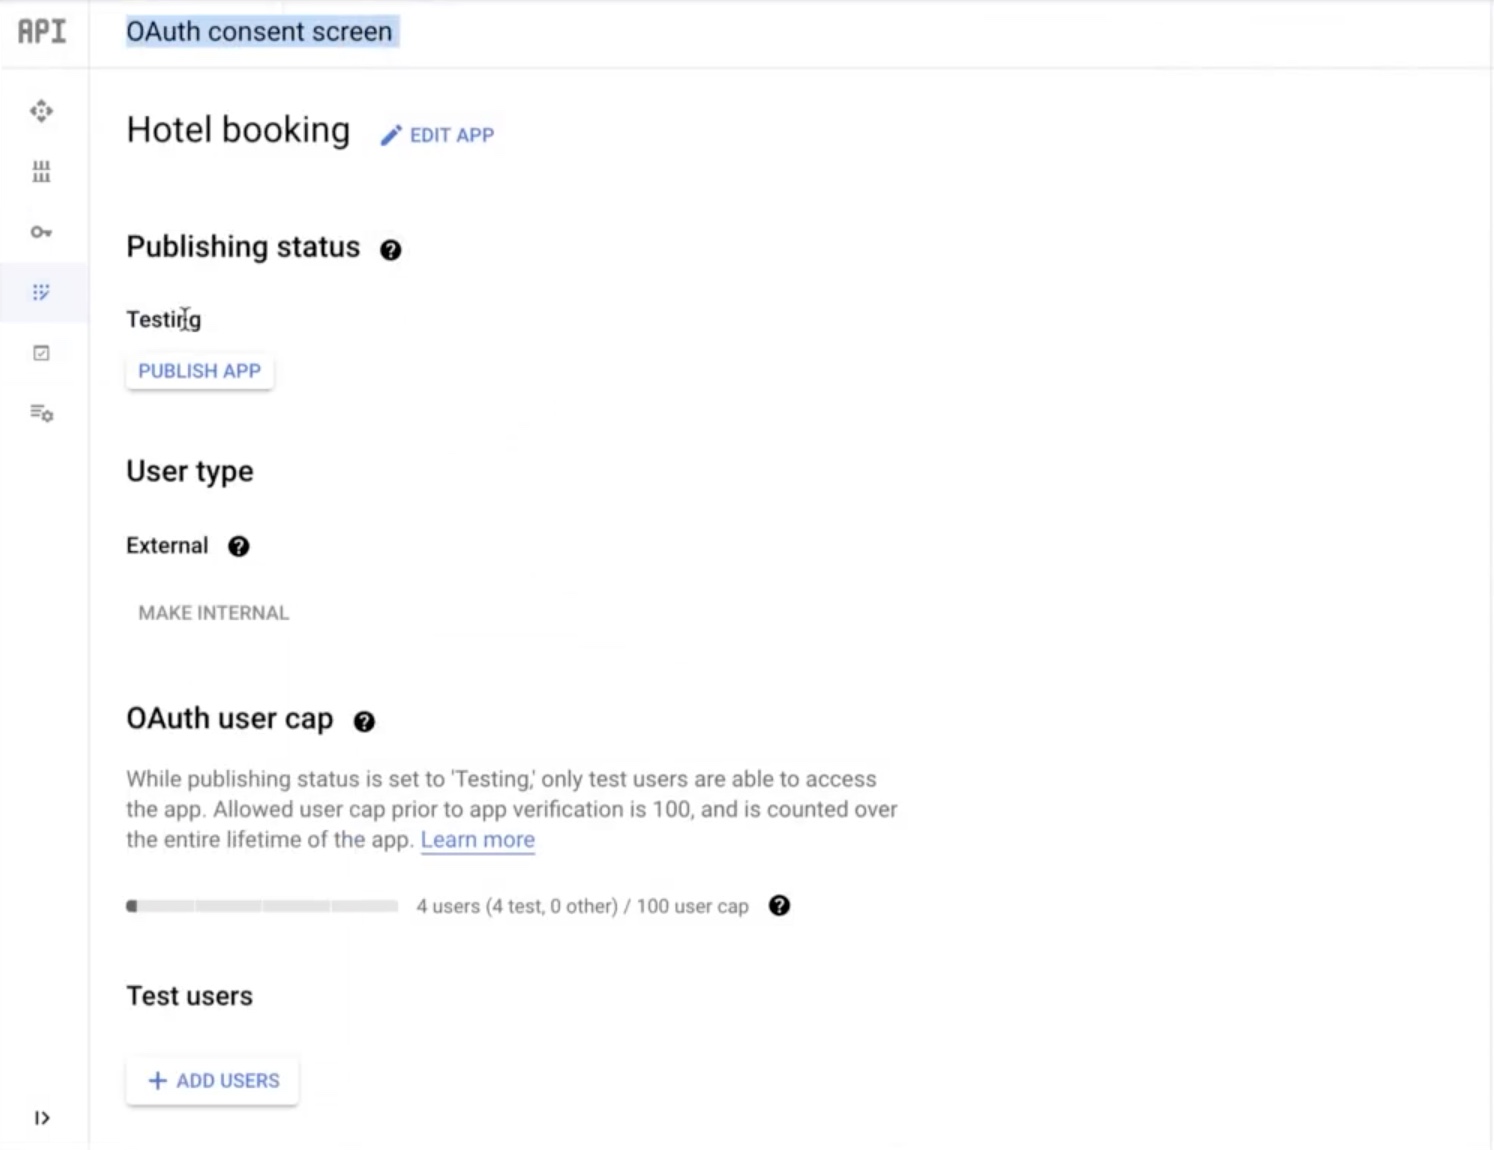
- Publishing Status - Select the relevant status. The available options are:
- Testing - indicates that the app is still in the testing phase. In this status the number of users is limited up to 100.
- In production - indicates that the app is published and is available in production. In this status any user with a Google account can access the app. Based on the configuration of your app, additional verification may be required.
- User Type - The available options are:
- External - Based on the publishing status, any user with a Google account can access the app. It is mandatory to select external.
- Internal - App is only available to internal users within your organization.
- Scopes - To configure scopes, click here. Click Save and Continue.
Agent Handover - Dialogflow CX – Detect Intent
Agent Handover is the process of transferring an end-user conversation from a Dialogflow virtual agent to a human agent. The transfer from virtual agent to human agent can be done when a user triggers intents.
To create an intent:
- Log in to the Dialogflow CX using your valid Gmail credentials.
The following screen is displayed.
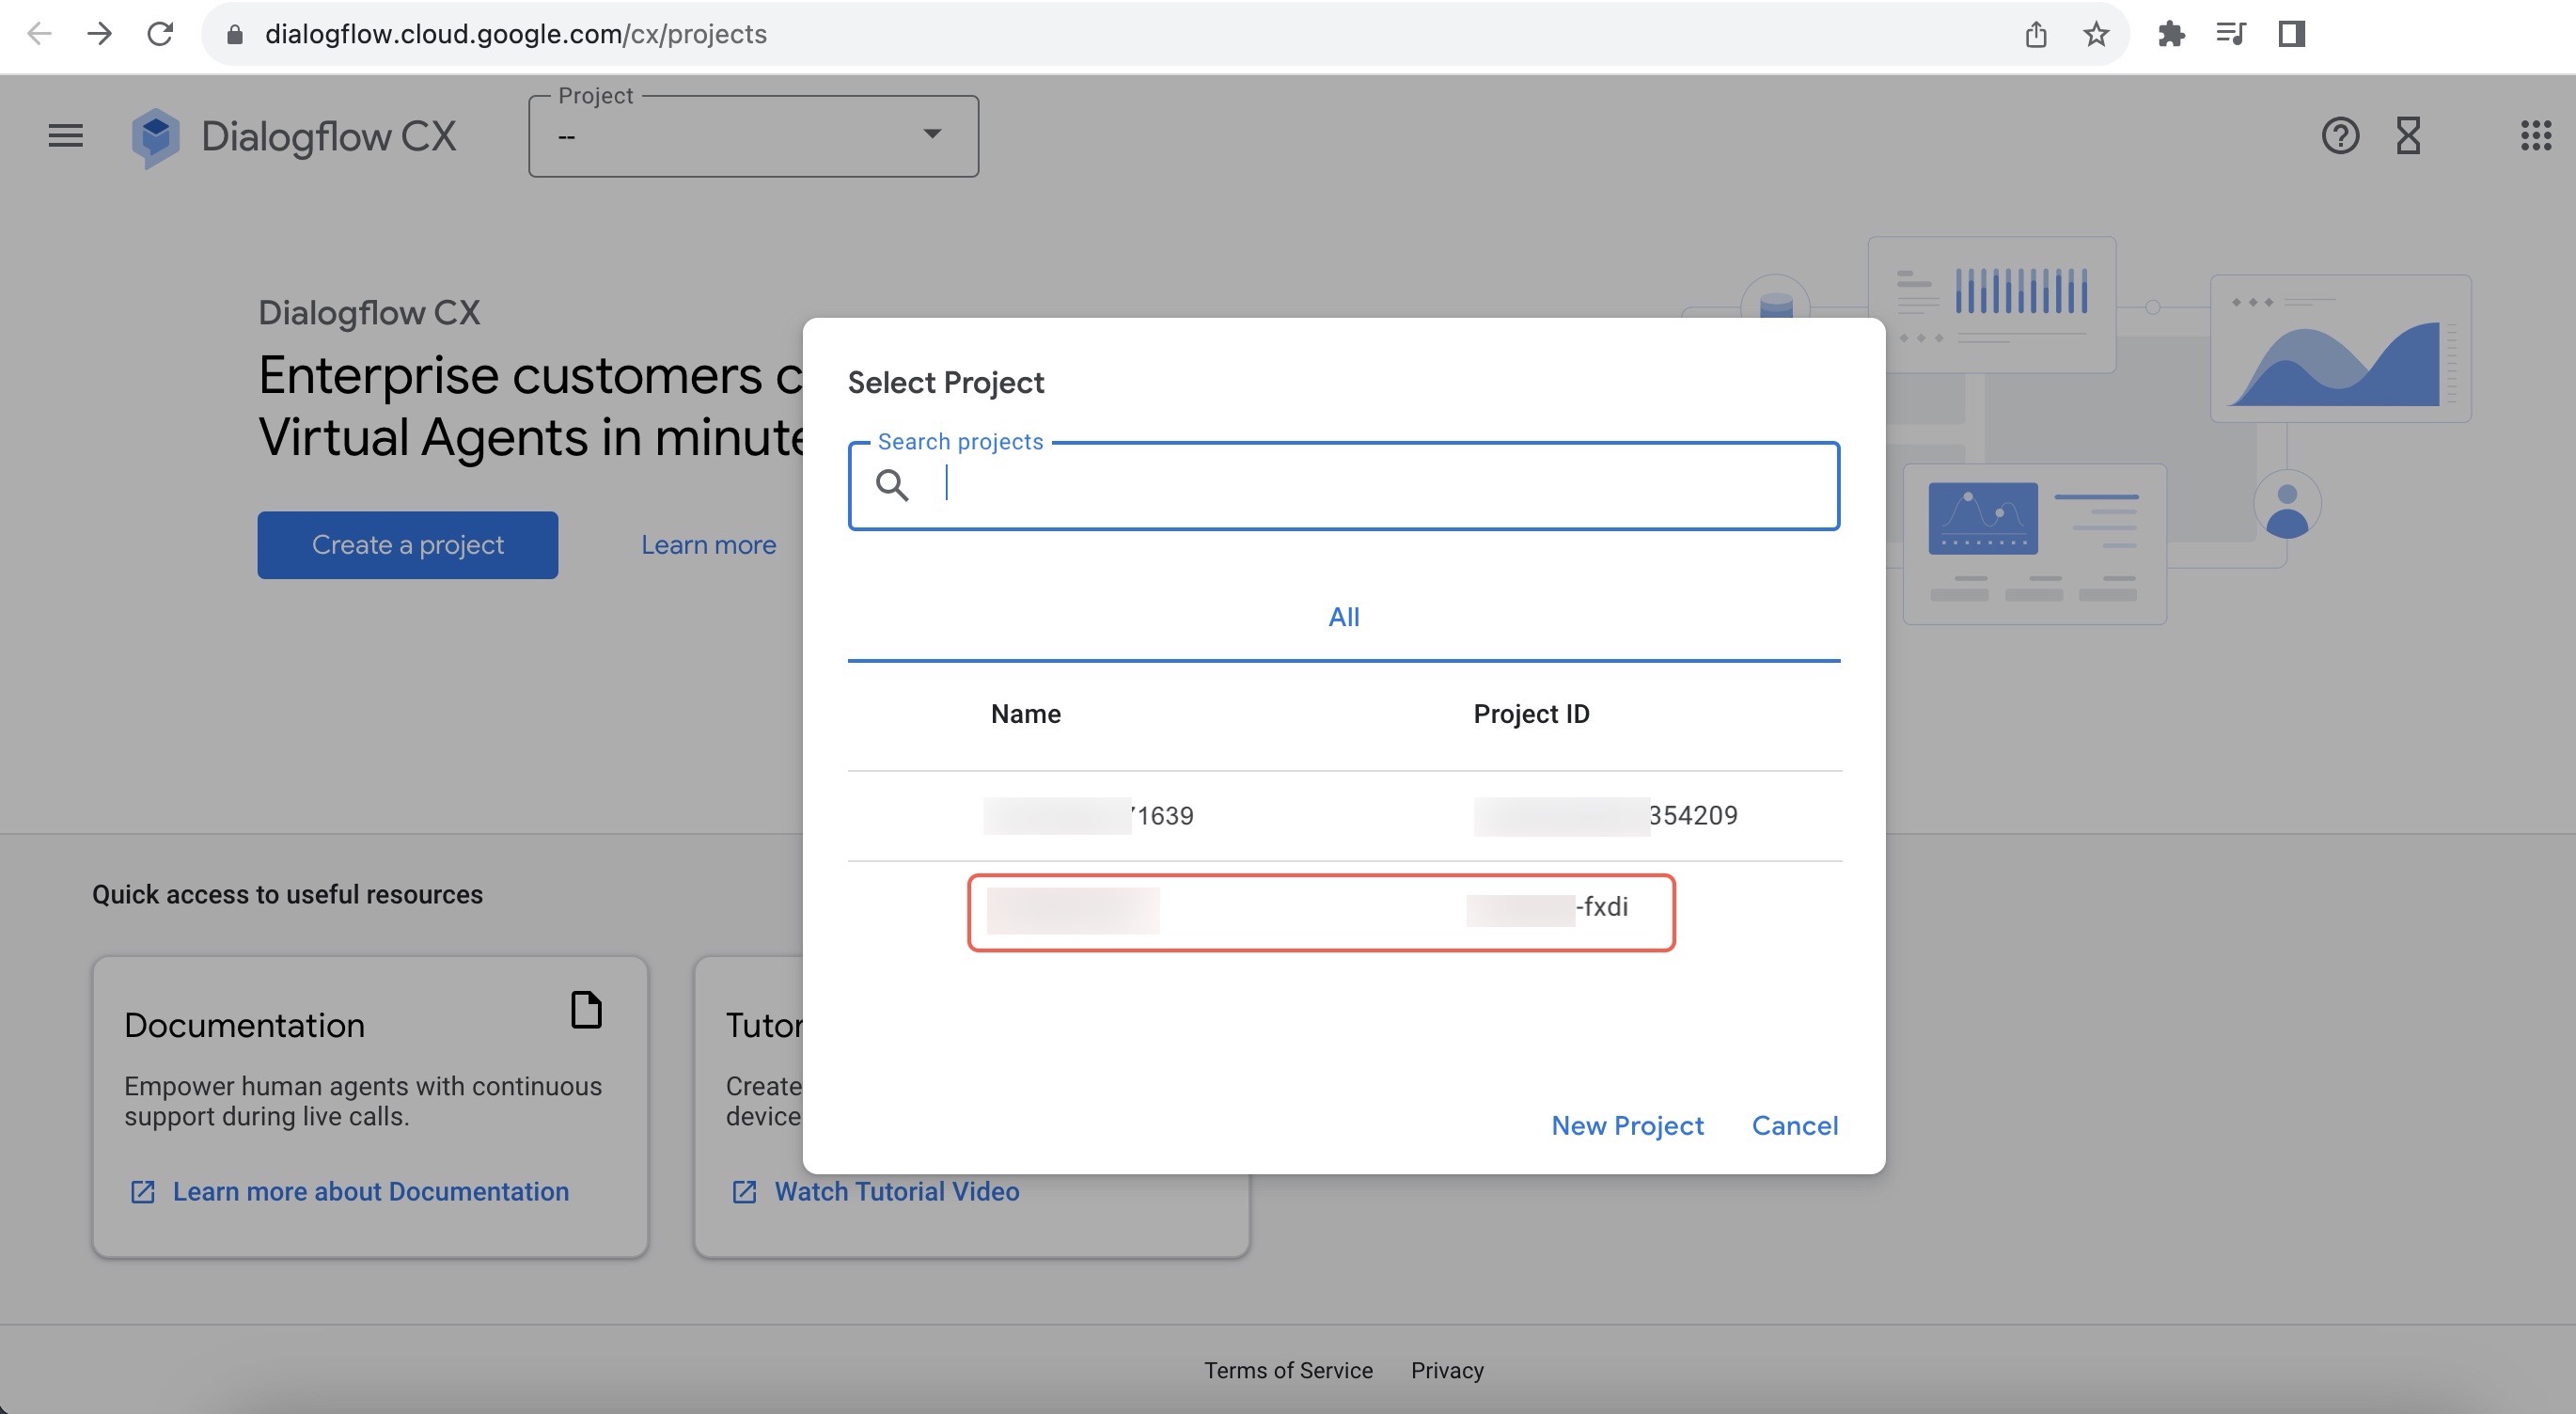
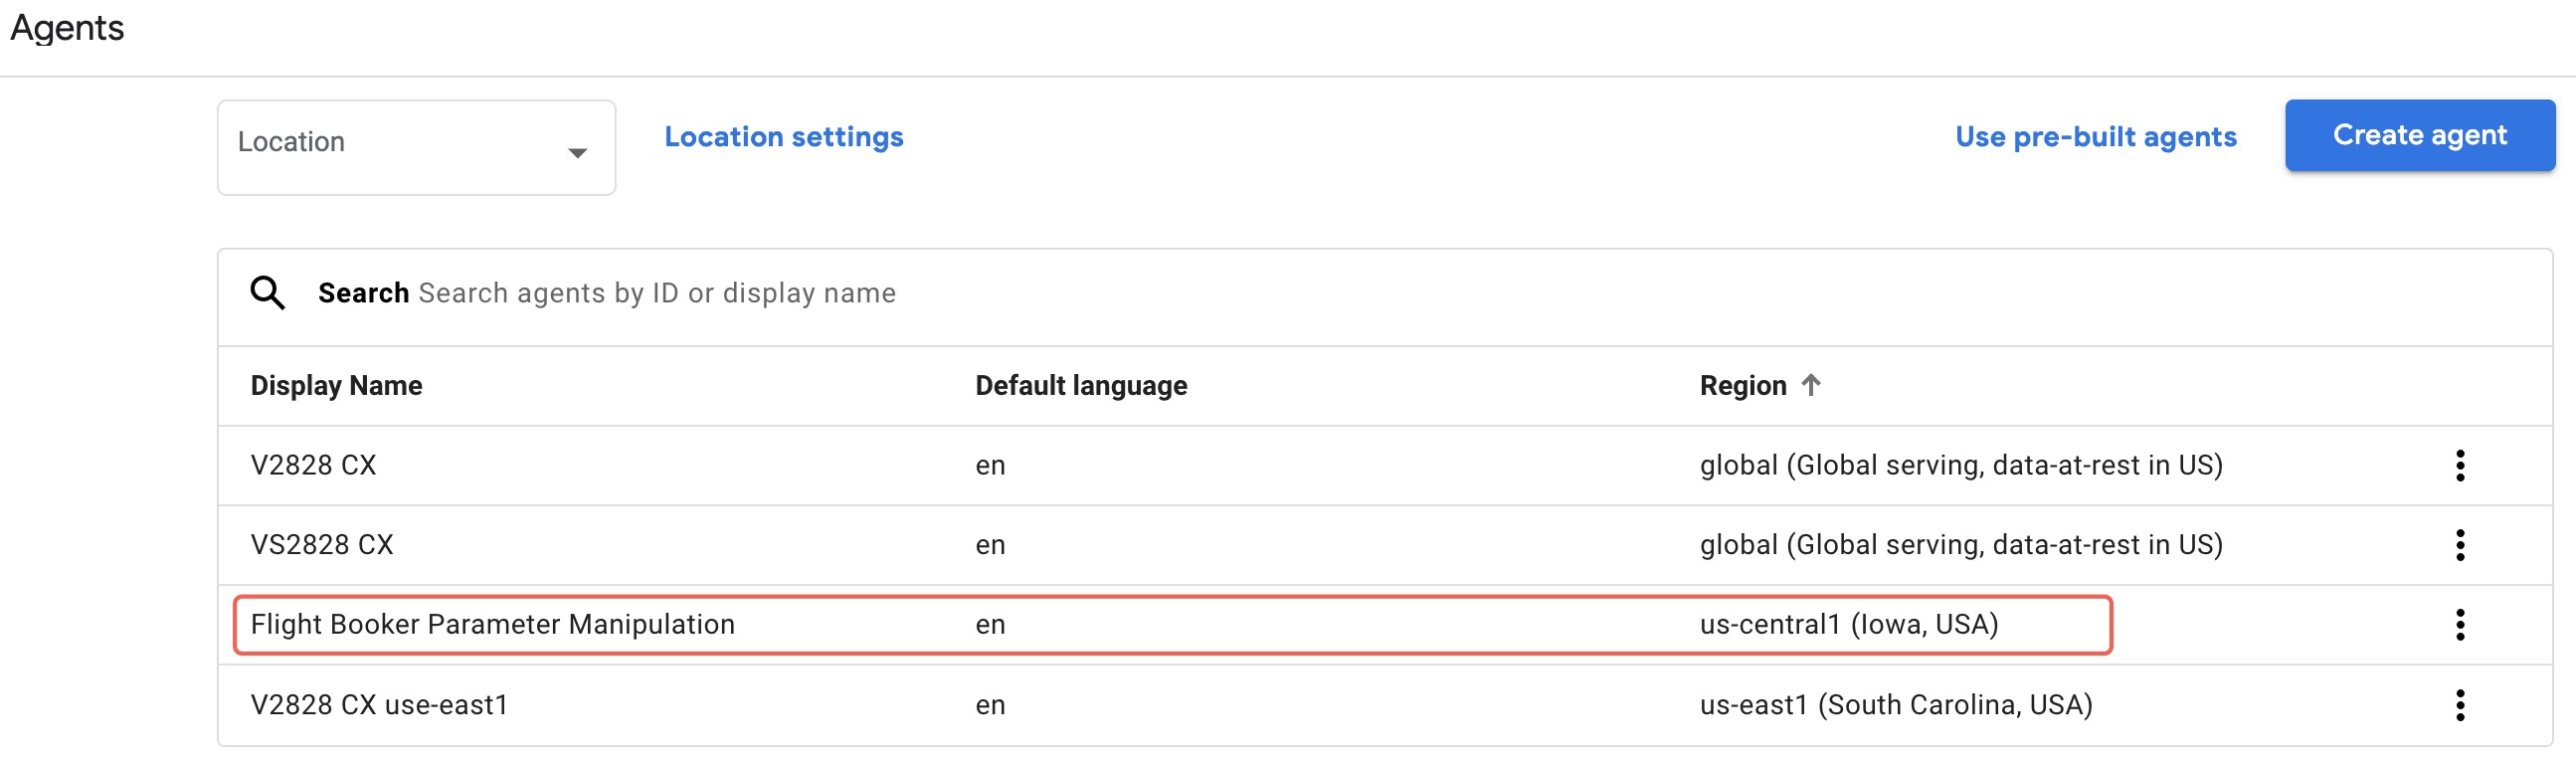
- Select the existing project from the list or click New Project.
- Once the existing project is selected, the Agents page is displayed.
-
Do one of the following:
- Select the existing agent from the list.
- Use pre-built agents.
- Create an agent by clicking Create agent.
-
Once you have selected an existing agent or created an agent, the Dialogflow CX flow builder page is displayed.

-
Click Manage.
The Intents page is displayed. -
Click Create for creating an intent.
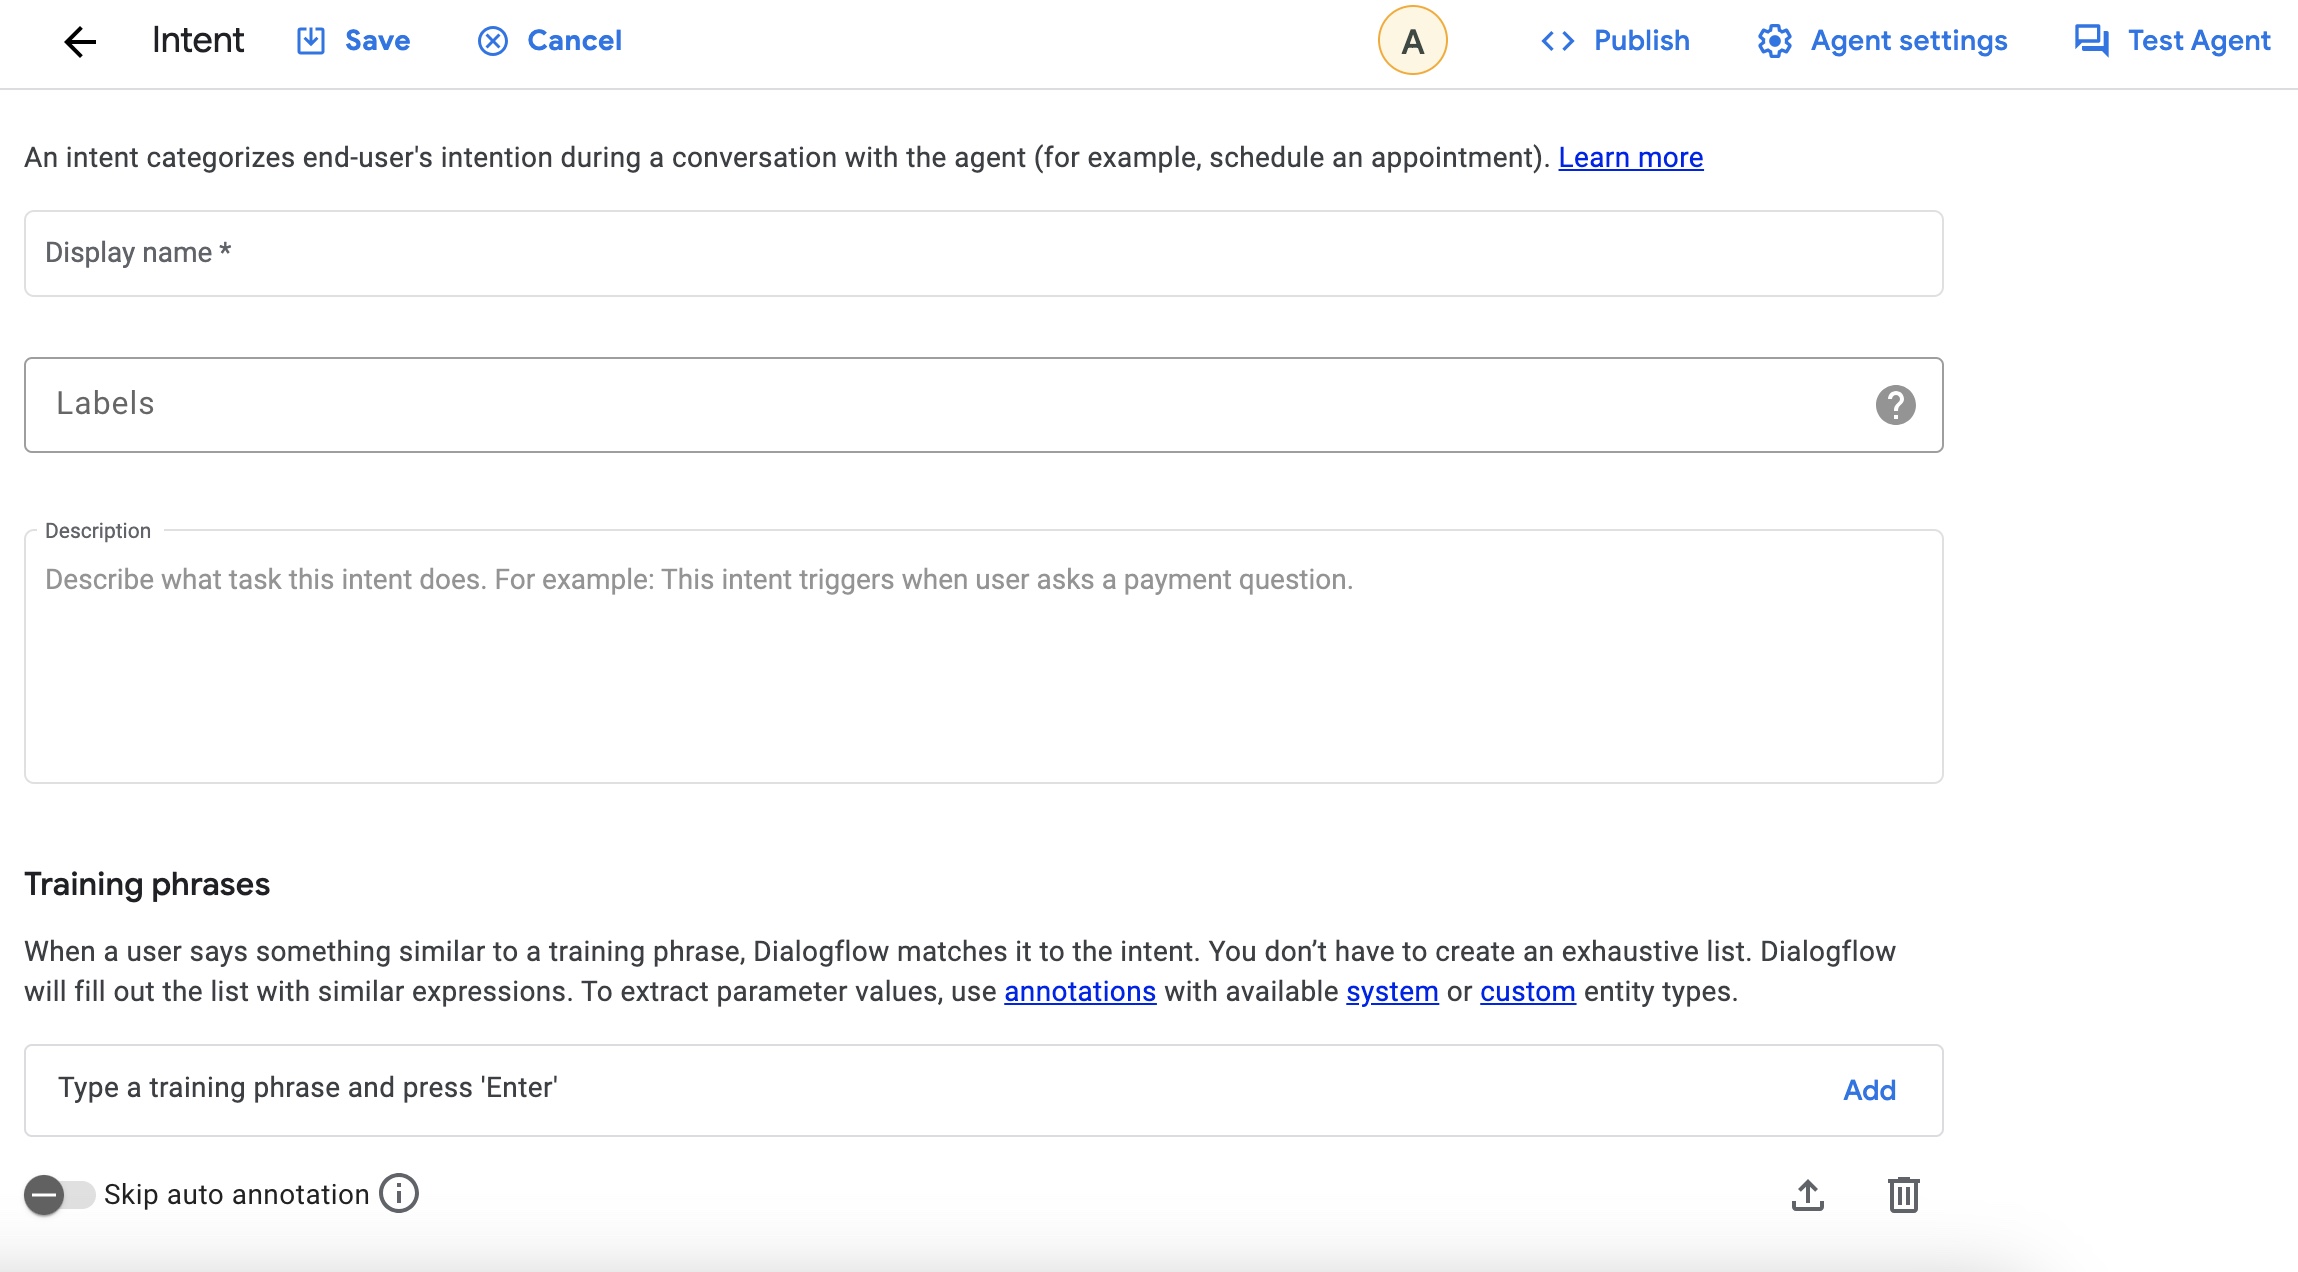
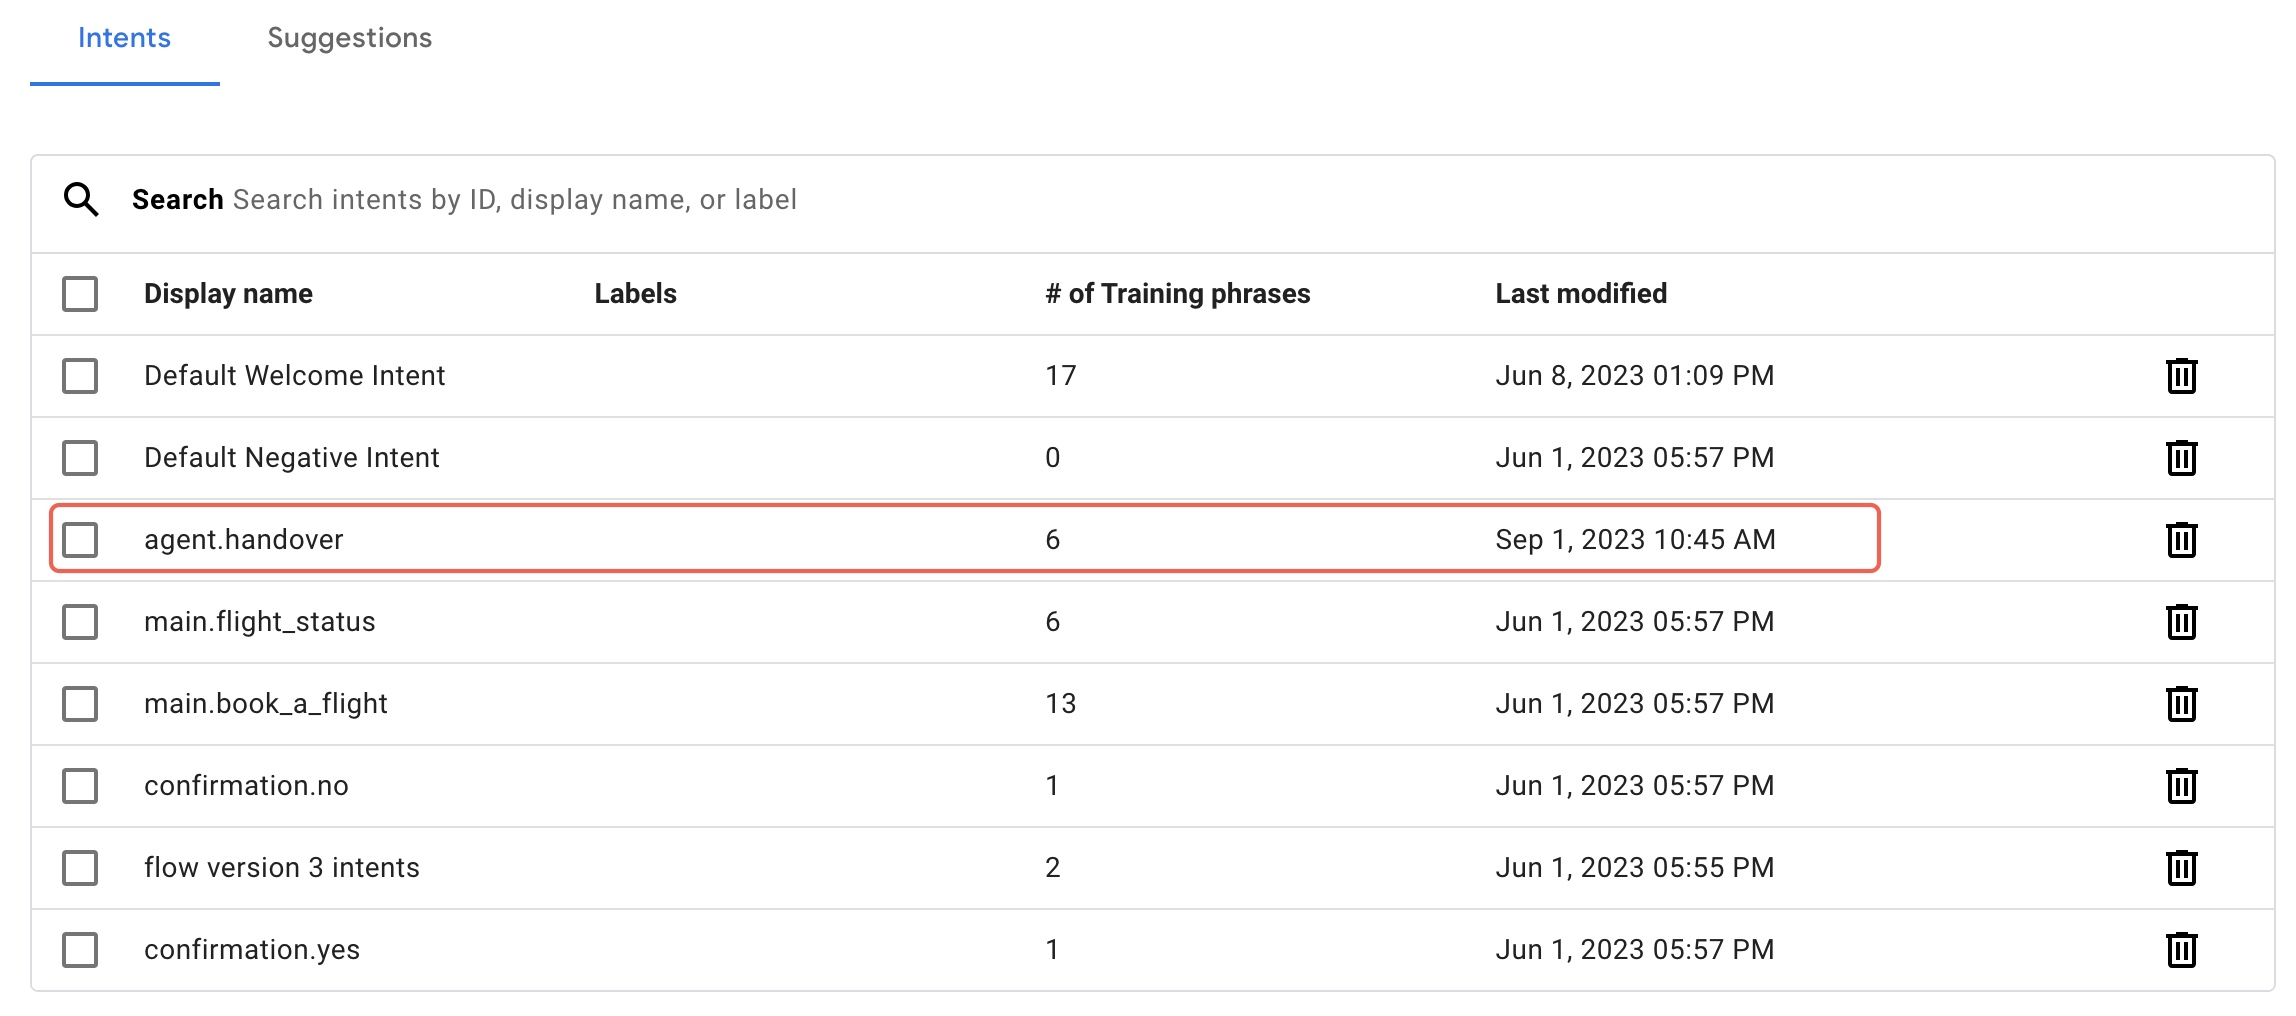
- Fill in the details and click Save. The Intent is created and displayed in the list of intents. In the following image, agent.handover is created as an intent for handing over to a live agent.
Example :
Once the intent is created, you can add the training phrases.
To add training phrases:
- Navigate to the Intents page.
- Click the intent for which you want to add the training phrases.
- Under the Training Phrases section, type a phrase and press Enter or click Add, as shown in the following example.
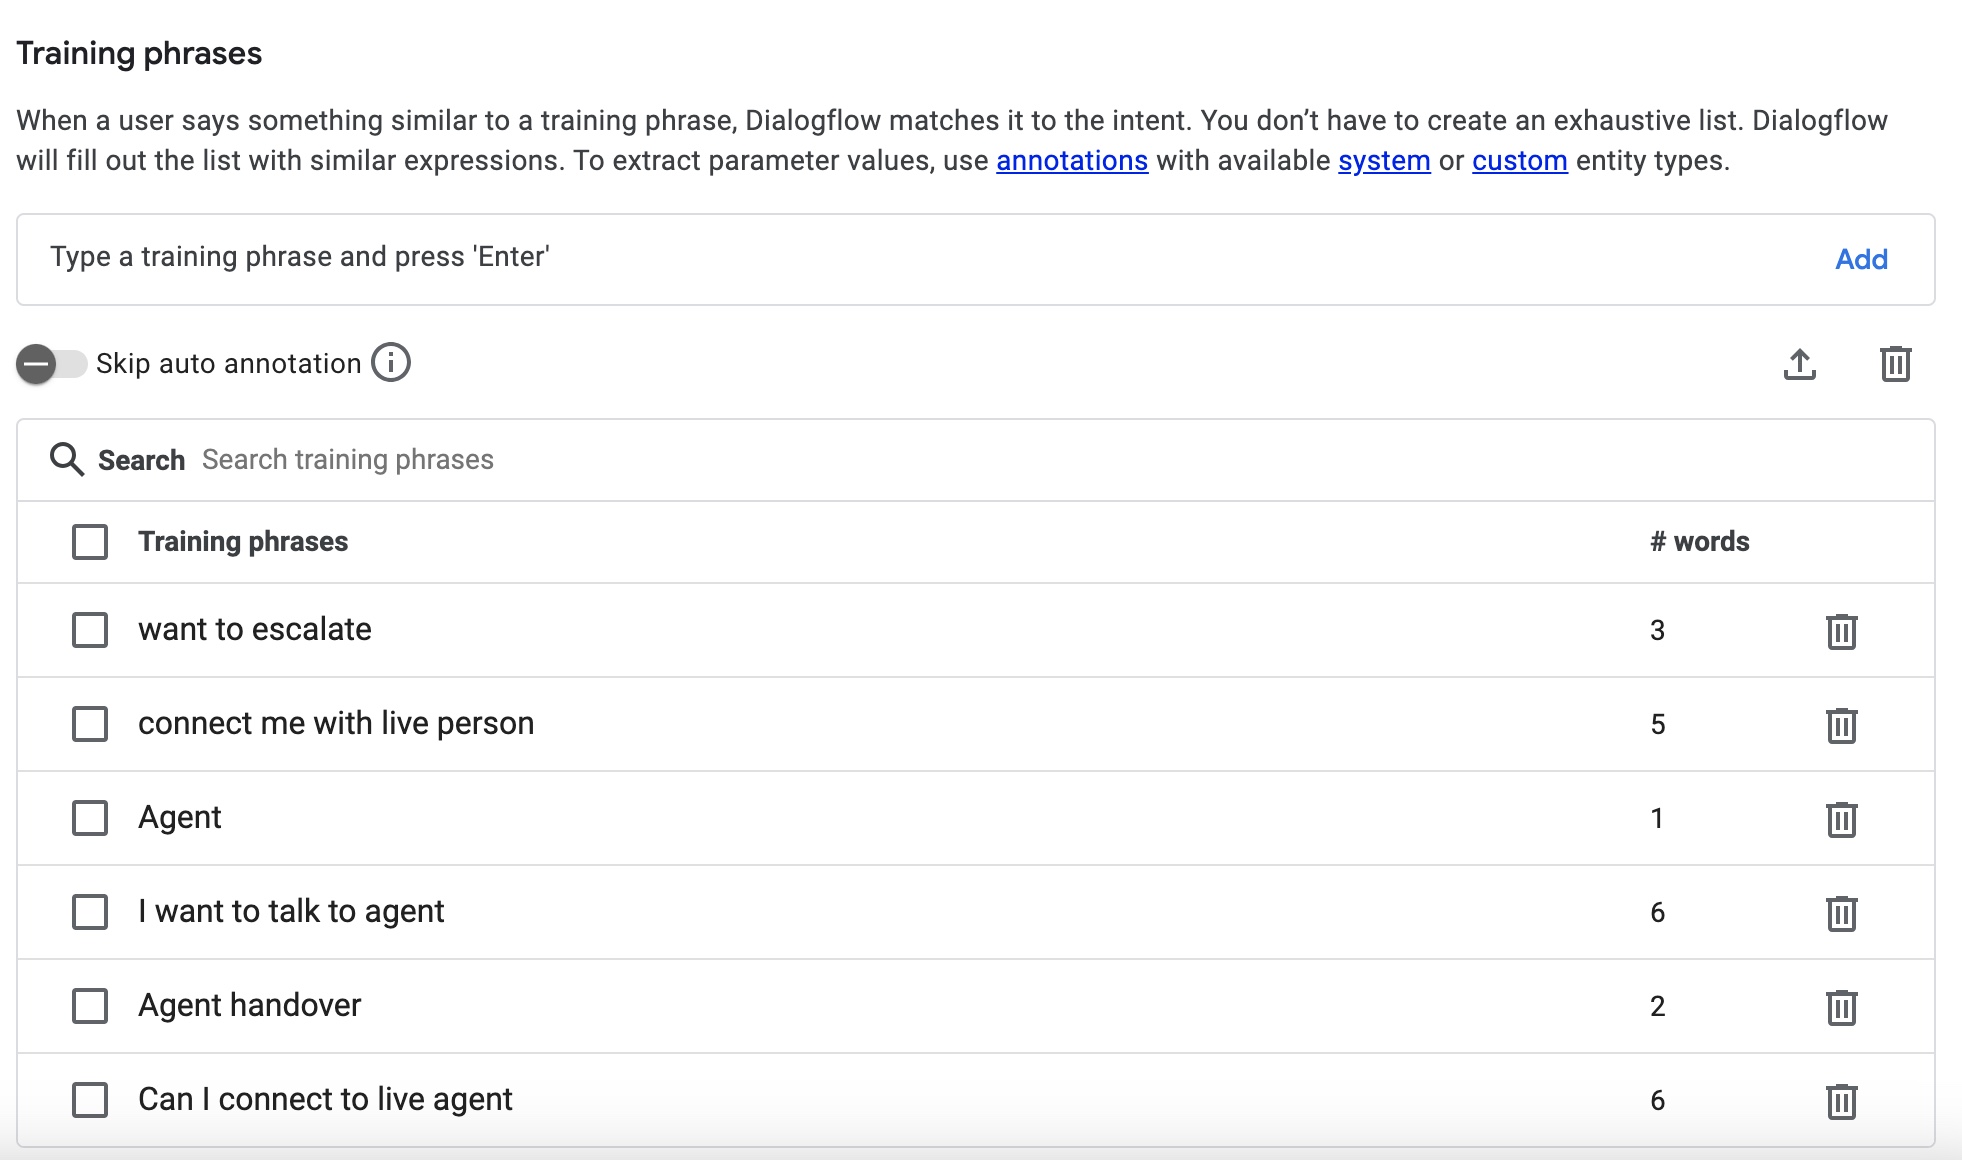
The training phrases are identified by the Dialogflow by intent.displayname and message body.
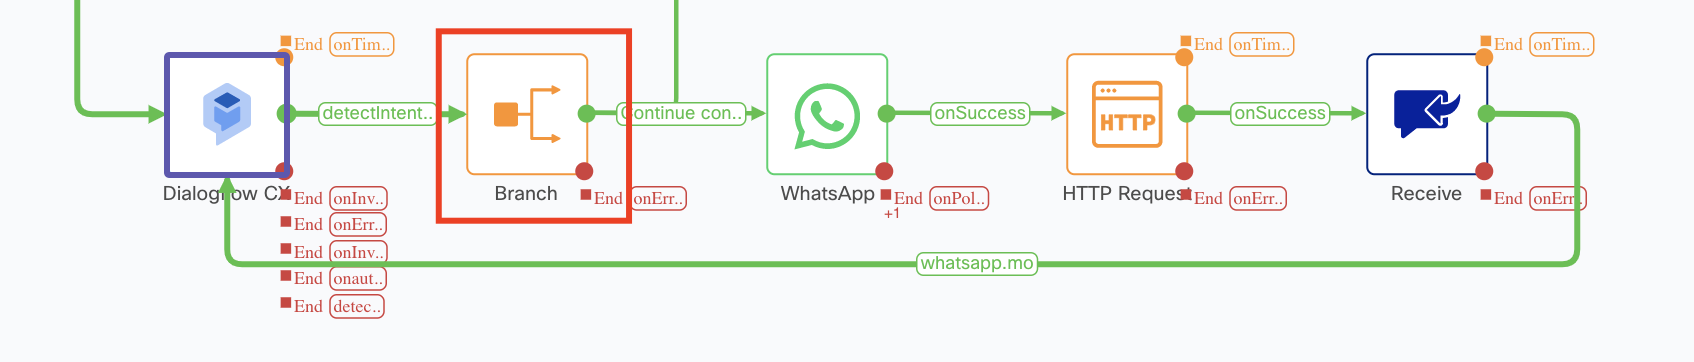
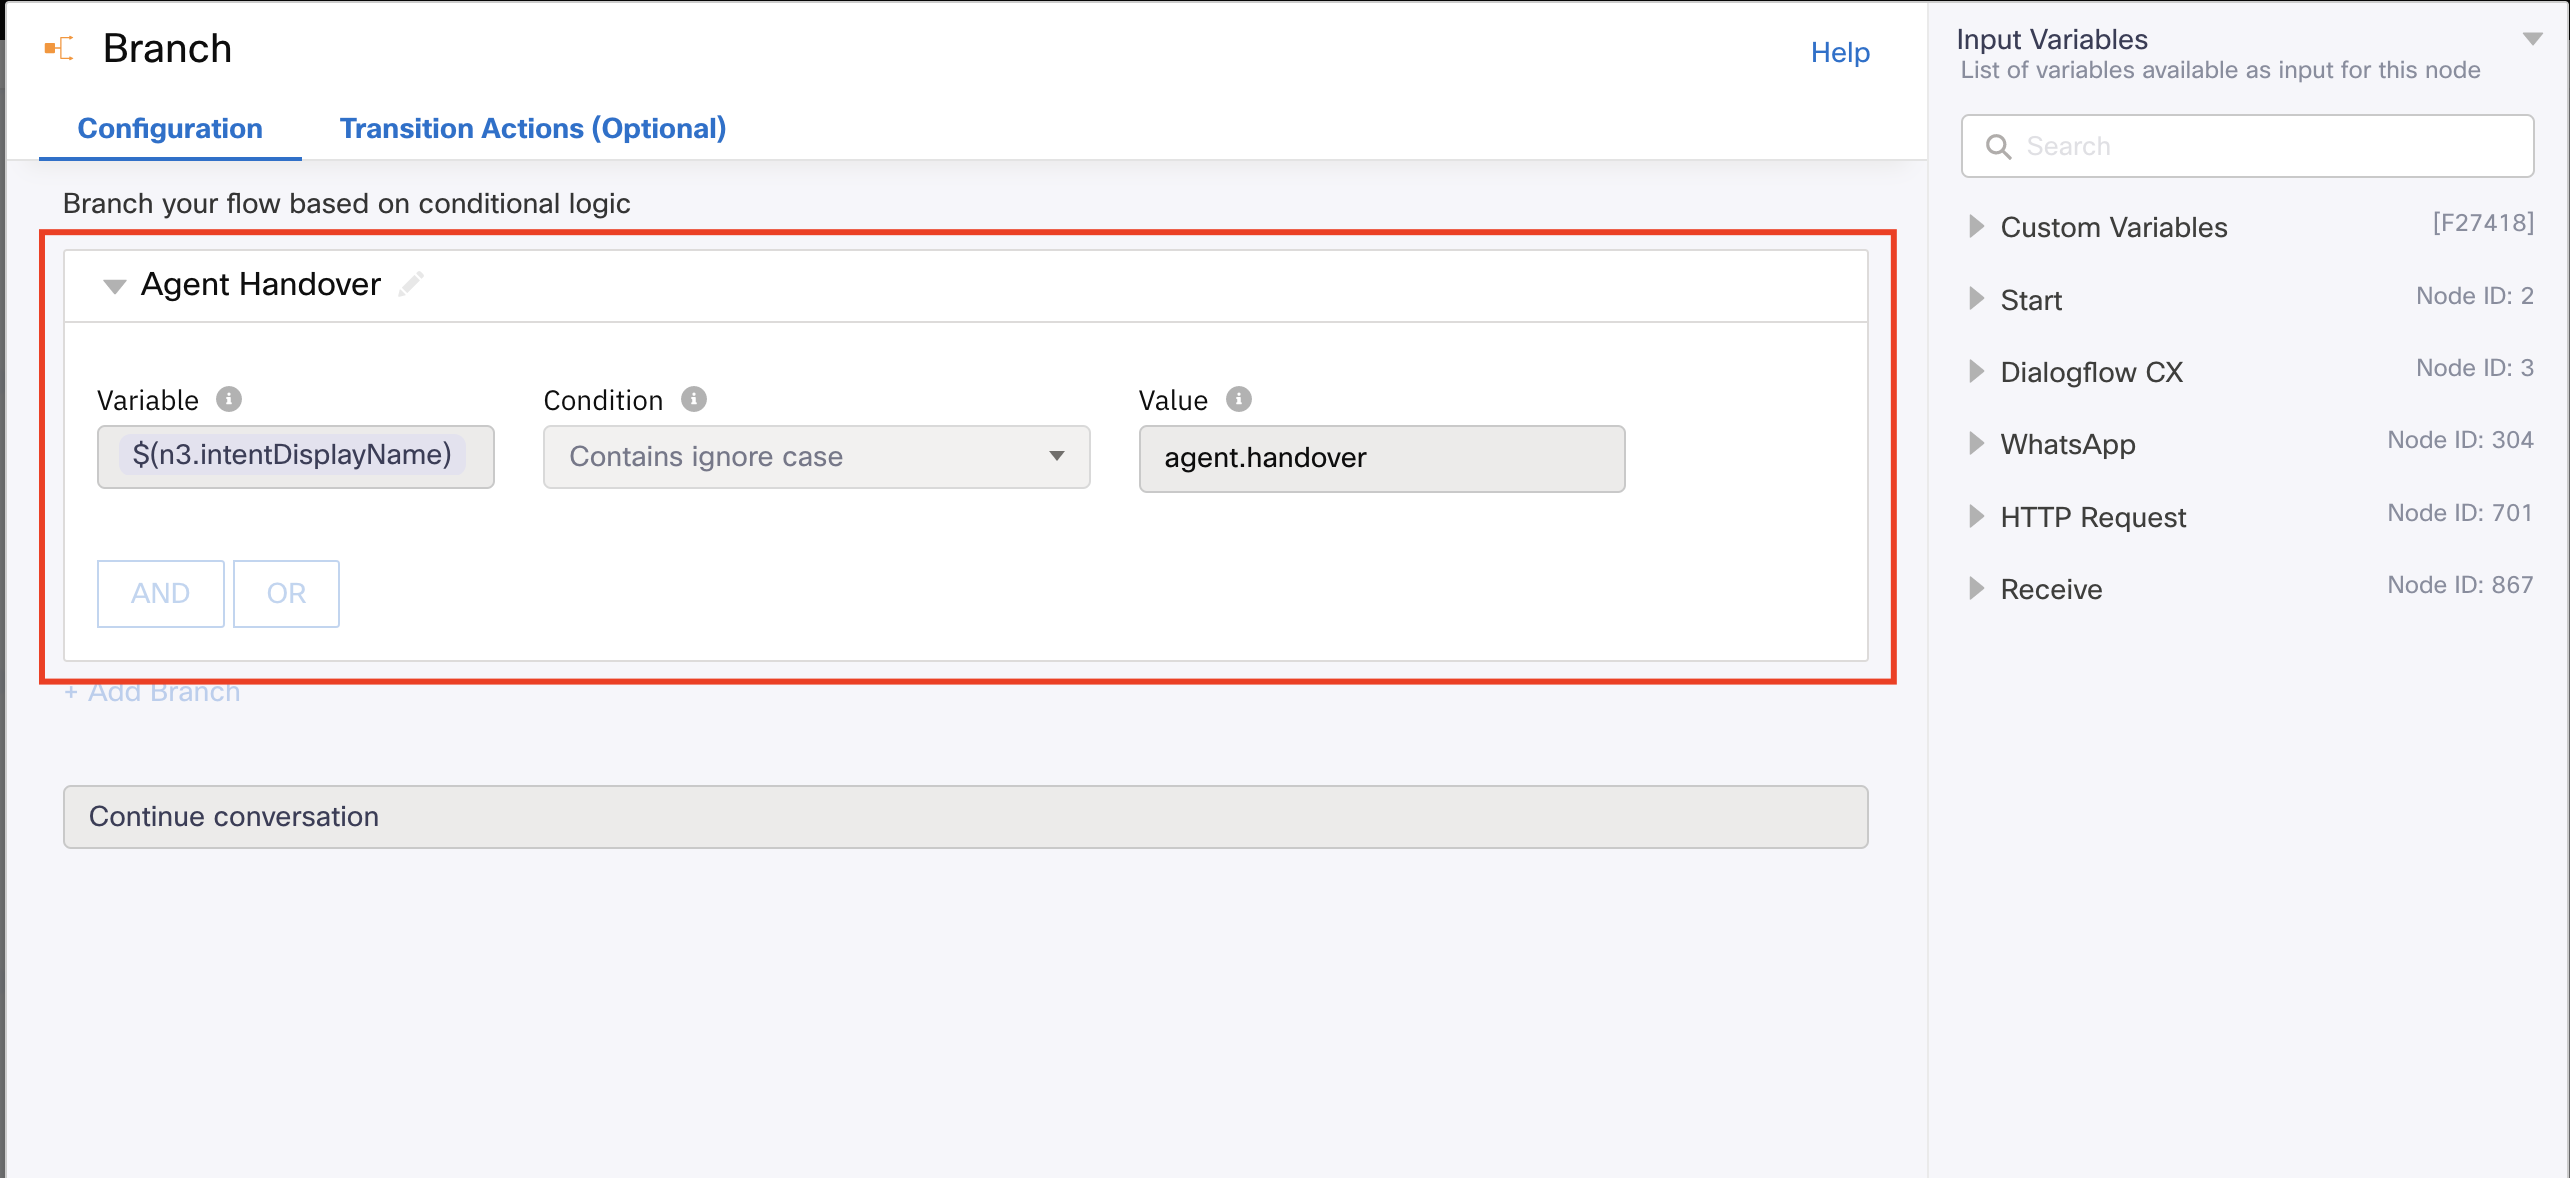
Example Screenshots to configure agent handover:
Configuring Dialogflow CX node in flows
Following is the list of Input Variables, Output Variables and Node Outcomes that will be used within Dialogflow CX node:
| Input Variables | Output Variables | Node Outcomes | Versions |
|---|---|---|---|
| Project – contains the list of the projects created within your Dialogflow CX. If you want to use a different project for every execution, choose 'Dynamic' and specify the variable with the project Id. For more information, refer to the Known Limitations section below. Location – contains the location of the agent. Agent Name – contains the list virtual agents within your Dialogflow CX. If you want a different agent for every execution, choose 'Dynamic' and specify the variable with the Agent Id. Session ID – contains the details of the session Id to maintain the context of the conversation with the Dialogflow CX agent. Each conversation is determined uniquely by a session Id. It is a string of 36 bytes in size. Language – The language of the conversation with the CX agent. Select 'Dynamic' to specify the language code at the runtime example 'en-US'. Input Message - Input text to be processed to CX agent. Message length must not exceed 256 characters. Add Query Parameters (Toggle Button) - to send query parameters to Dialogflow CX. For more information, refer to the Known Limitations section below. Complete Object - Select this to pass the total JSON object at one go i.e a variable that contains the JSON. Note: When a JSON object is pasted in the Query Parameter JSON Object, the replacement of values by variables is not supported in runtime of the flow. It is mandatory to add a JSON object or a variable before the a node is created. Individual Parameters - Select this to configure each object and pass the parameters individually. | responseId – contains the unique identification number for the response. userResponse – contains the details of the response from the user. languageCode – contains the code details of the language. agentResponse - contains the details of the response from the agent. currentPageName – contains the details of the current page name. currentPageDisplayName - contains the details of the current page display name. intentName – contains the unique name for the intent. intentDisplayName – contains the details of display name for the intent. intentDetectionConfidence - displays the confidence returned by the dialogflow for the intent recognition. triggeredTransitionNames - Triggered transition route Id. executionSequence - contains the list of array of execution. alternativeMatchedIntents - contains the next recognised intent by dialogflow. transitionTargetsChain - Page Id of the current page of dialogflow. sessionId – contains the details of the session id. match - contains the information of matched intent, type of match and confidence of the current match. responseType – contains the details of response provided. responsePayload – contains the details of the response payload. | onInvalidData onError onInvalidChoice onTimeout onauthorizationfail detectIntentOnSuccess detectIntentOnError | v1.0 |
Known Limitations
- When trying to add the ‘sessionEntityTypes’ parameter under ‘Add Query Parameter,’ the field (sessionEntityTypes input) has to be reselected each time a character is entered.
- When trying to add the ‘sessionEntityTypes’ parameter under ‘Add Query Parameter,’ the field (sessionEntityTypes input) shows ‘is required,’ indicating that the input box is empty. Sometimes, this can happen even if you have already entered a variable or input in the field. If you have already entered a variable or a value, the ‘is required’ error for ‘sessionEntityTypes’ input box can be ignored.
- When entering a dynamic value in the UI configuration, the dynamic input box doesn't get cleared even after clicking the close (X) icon.
FAQs
- What is the request timeout for Dialogflow CX node?
The request timeout for Dialogflow CX Node is 20 seconds i.e., the Dialogflow CX node must respond within 20 seconds after receiving a request from Webex Connect. If the Dialogflow CX node does not respond to the request received within 20 seconds, the Dialogflow CX node will timeout in Webex Connect flow through the onTimeout edge. - Does the Dialogflow CX integration support Dialogflow service account?
No, the current integration uses the standard Dialogflow CX OAuth 2.0 (authorization code for grant type) for authentication with Dialogflow servers.
Updated 9 days ago